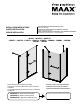
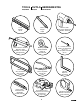
installation instructions Guide d’installation Guía DE instalación For right and left side door installation (LEFT side shown) Pour installation de porte côté droit et gauche (côté GAUCHE ILLUSTRÉ) Para la instalación de la puerta del lado derecho e izquierdo (se muestra INSTALACIÓN AL LADO izquierdo) MODEL • MODÈLE • MODELO 136671 • 136672 • 136673 • 136674 • 136675 • 136880 • 136881 • 136700 • 136701 • 136702 Read all instructions carefully before proceeding.
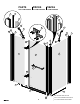
PARTS AND COMPONENTS 3 PIÈCES PIEZAS ET COMPOSANTES Y COMPONENTES 5 8 26 9 4 10 * 23 3 5 23 6 24 4 * * 5 24 25 4 3 * 15 30 * 7 28 2 25 * 27 1 16 6 13 12 14 14 11 * 29 2 * With RETURN PANEL OPTION * Avec L'OPTION PANNEU DE RETOUR * Con OPCIÓN PANEL DE RETORNO
PARTS PIÈCES PIEZAS 3 4 5 6 ** 7 ** 8 ** 11 12 AND COMPONENTS 9 ET COMPOSANTES ** 10 Y COMPONENTES 17 13 14 15 16 18 19 24 20 25 22 21 23 30 ** * 26 * 28 29 * * According to selected model.
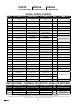
PARTS AND COMPONENTS PIÈCES ET COMPOSANTES PIEZAS Y COMPONENTES DOOR | PORTE | PUERTA # Part Nom de la pièce Pieza Qt Cant.
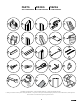
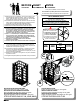
TOOLS OUTILS HERRAMIENTAS REQUIRED REQUIS Necesarias Level Niveau Nivel Pencil Crayon Lápiz Clear silicone sealant Silicone claire Sellador de silicona transparente Masking tape Ruban adhésif Cinta de enmascarar Hacksaw Scie à métaux Sierra para metal Cutting pliers Pince coupante Alicate de corte Utility knife Couteau à lame rétractable Cuchillo multiuso Security equipment Équipement de sécurité Equipamiento de seguridad 5 Electric drill Perceuse électrique Taladro eléctrico ¼" ceramic drill b
BEFORE AVANT YOU BEGIN ANTES DE COMMENCER DE Comenzar A two person installation is recommended. Une installation par deux personnes est recommandé. Se recomienda realizar la instalación entre dos personas. A. Before beginning the installation, make sure that the door and panel fit within the shower enclosure. To do so, measure the height, width and depth of the shower enclosure, and compare these measures to those of the door and panel. B.
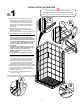
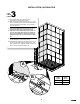
installation | Instalación 1 Images are based on a right door side door installation. Ces images sont basées sur une installation de porte à droite STEP ÉTAPE ETAPA Estas imágenes se basan en la instalación de la puerta al lado derecho. A. Position and level the wall jambs (3) against the shower walls and on the middle of the threshold of the shower base. Use masking tape to keep the wall jambs in place. For MAAX bases adjust the wall jambs in the middle of the threshold.
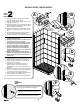
installation | Instalación 2 A STEP ÉTAPE ETAPA A. Apply silicone sealant under the tracks (14) and under the end block (29) as shown. B. Clean the shower base and position the tracks (14) inside the wall jambs (3). C. Make sure the tracks (14) are parallel to the shower base. Use masking tape to keep the tracks in place until the installation is completed. D. Drill the wall covering. [For ceramics always use a ceramics 1/4" drill bit and for acrylic use a 1/8" drill bit]. E.
STEP ÉTAPE ETAPA installation | Instalación 3 A. Hook a setting block (13) to the track (14) at approximately 3" from the wall jamb (3). B. Hook a second panel guide (13) to the track (14) at 16" from the wall jamb (3) for the 48" model or 28" for the 60" model. Hook also two panel guides (13) for the track of the return panel (27) A. Accrocher un guide de panneau (13) au rail (14) à approximativement 3 po. du montant mural (3). B.
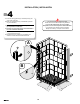
STEP ÉTAPE ETAPA installation | Instalación 4 A. Insert the sealing gaskets (4) on the fixed panel (2) and on the return panel (27). B. Make sure the fixed panel (2) is installed side up based on given information. The corners of the glass panels are fragile. Handle with care and without impact using cardboard. Les coins des panneaux de verre sont fragiles. Manipuler avec soin et sans impact en utlisant du carton. A.
STEP ÉTAPE ETAPA installation | Instalación 5 A A. Insert the fixed panels (2) and (27) in the wall jambs (3), level and square. B. Fully tighten the set screws in the wall jambs (3) using the MAAX® screwdriver (21). C. Install the return panel support (30) in the upper corner of the return panel (27) with the sealing gasket. Tighten the screw with the 4.5mm Allen key. D. Insert the screw covers (5) in the wall jambs (3). Cut if needed. 3 3 27 2 A.
STEP ÉTAPE ETAPA 6 installation | Instalación A. Join the wall fastener (23) and the support bar (24) as shown. B. Install the support bar (24) on the support (25), place the wall fastener (23) against the wall and mark the fastening holes. The center of the wall fastener (23) must be 3.5" in height above the glass. C. Install the support (25) on the return panel (27) with the sealing gasket.
installation | Instalación INSTALLATION WITH RETURN PANEL ALCOVE INSTALLATION INSTALLATION AVEC PANNEAU DE RETOUR INSTALLATION EN ALCÔVE INSTALACIÓN CON PANEL DE RETORNO Instalación en recinto Follow the installation from step 15 of the guide. Follow the installation from step 7 of the guide. Suivre l'installation à partir de l'étape 15 du guide. Suivre l'installation à partir de l'étape 7 du guide. Seguir la instalación a partir de la etapa 15 de la guía.
ALCOVE installation | Instalación EN NICHO 7 STEP ÉTAPE ETAPA Images are based on a right door side door installation. A. Position and level the wall jamb (3) [fixed panel side] 1/4" from the outside edge of the shower base. For MAAX bases adjust the wall jambs in the middle of the threshold. For other brands do an assembly test before fixing permanently. B. Mark the fastening holes. C. Drill the wall covering. [For ceramics always use a ceramics 1/4" drill bit and for acrylic use a 1/8" drill bit]. D.
STEP ÉTAPE ETAPA 8 installation | Instalación A - 1/2" A. Measure the distance wall-to-wall at the top of the alcove and subtract 1/2" and cut the track based on this measure. B. Apply silicone sealant under the track (14). C. Clean the shower base and position the track (14) inside the wall jamb (3). D. Make sure the track (14) is parallel to the shower base. Use masking tape to keep the track in place until the installation is completed (install door side only). 3 A.
STEP ÉTAPE ETAPA 9 installation | Instalación A. Apply silicone sealant under the end block (11) as shown. B. Hook the end block (11) to the track (14), slide the end block against the wall [door side] and apply pressure so the end block adheres well to the shower base. 11 A. Appliquer du silicone sous l'embout (11) tel que démontré. B. Accrocher l'embout (11) au rail (14), glisser l'embout contre le mur [côté porte] et appliquer une pression afin que l'embout colle bien à la base de douche. A.
STEP ÉTAPE ETAPA installation | Instalación 10 A 10 A. Sit the wall channel (10) on the end block (11) and level the wall channel. B. Mark the fastening holes. C. Drill the wall covering. [For ceramics always use a ceramics 1/4" drill bit and for acrylic use a 1/8" drill bit]. D. Fill the holes with a generous amount of silicone and apply silicone behind the wall channel (10). E. Position the wall channel (10) on the end block (11) and install the wall channel with the provided screws (17). 11 A.
STEP ÉTAPE ETAPA 11 installation | Instalación A. Hook a setting block (13) to the track (14) at approximately 3" from the wall jamb (3). B. Hook a second panel guide (13) to the track (14) at 16" from the wall jamb (3) for the 48" model or 28" for the 60" model. A. Accrocher un guide de panneau (13) au rail (14) à approximativement 3 po. du montant mural (3). B. Accrocher un second guide de panneau (13) au rail (14) à 16" du montant mural (3) pour un modèle 48" ou 28" pour un modèle 60". A.
STEP ÉTAPE ETAPA 12 installation | Instalación A. Insert the sealing gasket (4) on the fixed panel (2). B. Make sure the fixed panel (2) is installed side up based on given information. A A. Insérer le joint d'étanchéité (4) sur le panneau fixe (2). B. S'assurer que le panneau fixe (2) sera installé dans le bon sens à l'aide des indications. 4 A. Inserte la junta de estanqueidad (4) en el panel fijo (2). B.
STEP ÉTAPE ETAPA installation | Instalación 13 A. Insert the fixed panel (2) in the wall jamb (3), level and square. B. Fully tighten the set screws in the wall jamb (3) using the MAAX® screwdriver (21). C. Insert the screw cover (5) in the wall jamb (3). Cut the screw cover if needed. A 3 2 A. Insérer le panneau fixe (2) dans le montant mural (3), mettre à niveau et à l'équerre. B. Bien serrer les vis de pression du montant mural (3) avec le tournevis MAAX® (21). C.
STEP ÉTAPE ETAPA 14 installation | Instalación A 24 A. Join the wall fastener (23) and the support bar (24) as shown. B. Install the support bar (24) on the support (25), place the wall fastener (23) against the wall and mark the fastening holes. The center of the wall fastener (23) must be 3.5" in height above the glass. C. Install the support (25) on the return panel (27) with the sealing gasket.
STEP ÉTAPE ETAPA 15 installation | Instalación B A. Install the bottom parts of the hinges (6) on the fixed panel (2) using the MAAX® screwdriver (21) and square them. B. Refer to the hinges blisterpack to select the appropriate black guide. A 6 A. Fixer les parties inférieures des charnières (6) sur le panneau fixe (2) avec le tournevis MAAX® (21) et les mettre à l’équerre. B. Référéz-vous à l'emballage de quincaillerie pour sélectionner le bon guide noir. A.
STEP ÉTAPE ETAPA 16 installation | Instalación 6 A. Place the door (1) temporarily and safely on a wall over cardboard. B. Make sure the door (1) is installed side up based on given information. Validate the alignment of holes and the lower part of the glass. C. Install the top parts of the hinges (6) on the door (1) using the MAAX® screwdriver (21) and square them. A. Appuyer la porte (1) temporairement et sécuritairement contre un mur sur des cartons. B.
STEP ÉTAPE ETAPA 17 installation | Instalación 6 A. Join the door (1) to the fixed panel (2) insert top hinge in bottom (6). B. Fasten the hinges (6) with the safety ring as shown using the handle of the MAAX® screwdriver (21). A A. Assembler la porte (1) au panneau fixe (2), insérer la partie supérieure de la penture (6) dans la partie inférieure. B. Sécuriser les charnières (6) avec la bague de sureté tel que démontré avec la poignée du tournevis MAAX® (21). A.
STEP ÉTAPE ETAPA 18 installation | Instalación ALCOVE - NICHO A. Insert the magnetic jamb (7) on the door (1) and cut as needed. 7 A A. Insérer le montant magnétique (7) sur la porte (1) et couper au besoin. A. Insertar la jamba magnética (7) en la puerta (1) y cortar el excedente en caso que sea necesario.
installation | Instalación In the installation with return panel this step and parts are NOT necessary STEP ÉTAPE ETAPA 19 Dans l'installation avec panneau de retour cette étape et pièces ne sont PAS nécessaires 8 En la instalación con panel de retorno este paso y piezas NO son necesarias A A. Slide the magnet strip (26) into the adjustable magnetic jamb (8) from the top and trim it to length. Check that the polarity is correct by placing it against the magnet on the door and testing the attraction.
STEP ÉTAPE ETAPA 20 installation | Instalación A. Install the handle (6) on the door (1) as shown. [Hand tighten the rounded knob] B. Use the provided 1.5mm Allen key (22) to tighten the flat head screw as shown. A. Installer la poignée (6) sur la porte (1) tel que démontré. [Serrer à la main la poignée ronde] B. Utiliser la clé Allen de 1,5 mm fourni (22) pour serrer la vis à tête plate, tel que démontré. A A. Instalar el tirador (6) en la puerta (1) como se muestra.
STEP ÉTAPE ETAPA 21 installation | Instalación A 1 A. Place the bottom sealing gasket (12) on the door (1) and cut the excess if needed. A. Placer le joint d’étanchéité inférieur (12) sur la porte (1) et couper l'excédent au besoin. A. Colocar la junta de estanqueidad inferior (12) sobre la puerta (1) y cortar el exceso si es necesario.
STEP ÉTAPE ETAPA 22 installation | Instalación A. Open the door (1), insert the side sealing gasket (15) on the edge of the door and cut the excess as needed. 15 A. Ouvrir la porte (1), insérer le joint d’étanchéité de côté (15) sur le rebord de la porte et couper l'excédent au besoin. A. Abrir la puerta (1), insertar la junta de estanqueidad lateral (15) sobre el borde de la puerta y cortar el excedente si es necesario.
STEP ÉTAPE ETAPA 23 installation | Instalación A A. From outside the shower, apply silicone sealant along the wall jamb (3) [fixed panel side] plus magnetic closure. B. From outside the shower, apply silicone sealant on the top of the rail (14) against the fixed panel (2). A. De l'extérieur de la douche, appliquer du silicone le long du montant mural (3) [côté panneau fixe] et fermeture magnétique. B.
LIMITED WARRANTY Garantie limitée Garantía limitada MAAX Bath Inc. (hereafter “MAAX”) offers an express limited warranty on each of its products. This warranty extends only to the original owner/end-user for personal household use. For commercial uses, additional limitations apply. MAAX Bath Inc. (ci-après “MAAX”) offre une garantie limitée expresse sur chacun de ses produits. Cette garantie s’adresse uniquement au propriétaire/utilisateur original pour un usage personnel domestique.
www.maax.com Technical Services / Service technique / Servicio técnico T. 1 877 361-2044 F. 1 888 361-2045 © 2008 MAAX Bath Inc.