
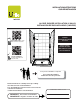
Installation Guide

10
3
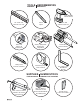
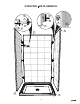
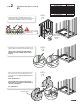
STEP Installing Ulok system
on the walls
Install three X fasteners (1) on each side of the back wall
(14) in the pre drilled holes using the screws provided (2).
Quick tip
14
Back wall
1
14
2
2
1
14
This side
down
4
3
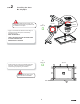
Fasten 3 retraction pins per side wall in the pre drilled
holes with the screws provided (4) to the left-hand or right-
hand fastening fl ange of the side walls (15) depending on
which side the wall will be installed on.
The side walls are interchangeable.
For left wall install the pins on the
right side, for the right wall install the
pins on the left side.
Quick tip
Side walls
15
15
Fastening fl ange
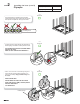
3.1
Check me!
3.2
Check me!
This side down
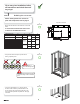
The Ulok system parts are in the side
wall boxes. (1 pack per side wall box)
There is a positioning pin on X
fastener so they can only be
installed one way.
Positioning
pin
w
ww
.m
a
ax
.c
o
m
1006
0
303 –
ULO
K
S
kin
p
a
ck
f
or
U
t
i
le
-
1
j
unc
t
i
o
n
3
1
2
4
BA
C
K
W
A
L
L
M
UR
ARR
IÈ
RE
M
U
R
O
P
O
STE
R
I
O
R
IN
S
ID
E
VI
E
W
VUE
IN
T
É
RIE
UR
E
VIS
T
A
I
NTER
I
O
R
S
I
D
E
W
A
LL
MU
R
D
E CÔT
É
MU
R
O
L
A
TE
RA
L
3
4
I
N
S
I
D
E
V
I
EW
V
U
E
I
NTÉ
R
I
EU
R
E
V
IS
T
A
I
NT
ER
I
O
R
b
y/
p
ar
M
A
A
X
*
E
xtra
p
ar
t
s
a
r
e inclu
d
ed
in this
p
ack
in
cas
e
o
f
loss
o
r
d
a
m
age
*
D
e
s p
i
èces
su
p
p
l
ém
en
t
a
ir
e
s s
o
nt
in
clus
e
s
en c
a
s
de
p
er
t
e
o
u
bris
* Piezas
e
x
tra
s
es
tán incl
u
idas
en es
te
emp
a
q
u
e
en
c
a
s
o
de p
erdida
o
d
año
w
w
w.m
a
ax.
c
om
1
0
0
6
0
3
0
3
–
UL
O
K
Sk
in
p
ac
k
fo
r
U
ti
le
-
1
jun
c
t
ion
3
1
2
4
BA
CK
W
A
LL
M
UR
A
RR
I
È
R
E
MU
R
O
P
O
S
T
E
R
IO
R
I
N
S
I
D
E VI
E
W
VUE I
NT
É
RIE
UR
E
VIS
T
A
I
NTE
RI
O
R
S
I
D
E
WA
LL
MUR
DE
CÔ
TÉ
M
U
R
O
L
A
TE
R
A
L
3
4
INS
I
D
E
V
I
EW
V
U
E I
N
TÉ
RI
E
URE
VI
S
T
A
I
NT
E
RI
OR
by/p
a
r
M
A
A
X
* E
x
tra p
a
rt
s
ar
e
inclu
d
ed
in this
p
ack
i
n
cas
e
o
f
l
os
s or
dama
g
e
*
Des
p
ièc
e
s
s
u
p
p
lémentaires
son
t
inclu
s
es
e
n
cas
de
p
erte o
u
b
r
i
s
*
Pi
ezas
ex
tras
es
tán
i
nclu
ida
s
en es
te
emp
aq
ue
en
cas
o
d
e
p
er
d
i
da o
daño