
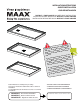
Installation Guide

9
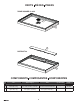
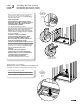
Ø 1/8"
3/8" (8 mm)
Tiling fl ange
Bride de carrelage
Brida de fi jación
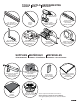
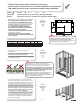
Insert the drain cover (3) as shown.
Insérer le couvercle du drain (3) comme montré.
Insertar la cubierta del desagüe (3) como se muestra.
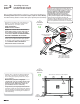
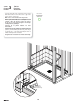
With a 1/8" drill bit, drill holes in the base fl ange then
secure the base to all the wall studs with #8 x 1¾"
fl at-head screws (not included). Pre-drill the flange
only and not the studs.
HAND TIGHTEN ONLY!
THE BOTTOM OF ALL HOLES IN THE FLANGE
MUST BE AT LEAST 8MM (3/8") ABOVE THE BASE
THRESHOLD! HOLES MUST BE FILLED WITH
SILICONE BEFORE SCREWING
CUT THE EXCESS PART OF SHIMS
Avec une mèche de 1/8 po, percer des trous dans
la bride de la base et visser la base dans les
montants avec des vis #8 x 1¾ po (non fournies).
S'assurer de percer la bride de la base seulement
et non les montants.
SERRAGE À LA MAIN SEULEMENT!
LE BAS DE CHAQUE TROU DANS LA BRIDE
DOIT ÊTRE À AU MOINS 8MM (3/8 PO) AU-
DESSUS DU SEUIL DE LA BASE. REMPLIR LES
TROUS DE SILICONE AVANT VISSER
COUPER LA PARTIE EXCÈDENTAIRE DES CALES.
Con una broca de 1/8", perforar los agujeros de la brida
de la base y fijar la base a todos los montantes usando
tornillos # 8 x 1¾" (no incluidos). Asegurarse de per-
forar solo la brida de la base y no los
montantes.
APRETAR A MANO ÚNICAMENTE!
CADA AGUJERO DE LA BRIDA DEBE ESTAR
MÍNIMO A 8 MM (3/8 PO) DE LA SUPERFICIE DE
LA BASE! LLENAR LOS AGUJEROS DE
SILICONA ANTES DE ATORNILLAR
CORTAR EL EXCEDENTE DE LAS CUÑAS.
2.8
Check me!
Cochez-moi!
Marcarme!
3
2
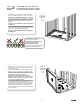
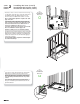
STEP Installing the base (cont'd)
ÉTAPE Installation de la base (suite)
ETAPA Instalación de la base (cont.)
2.7
Check me!
Cochez-moi!
Marcarme!
Distinct 48 drain cover installation
Installation de couvercle de drain pour base Distinct 48
Instalación de cubierta de drenaje para base Distinct 48
1