
Installation Guide


26
INSTALLATION | INSTALACIÓN
13
STEP
ÉTAPE
ETAPA
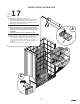
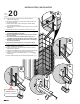
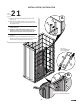
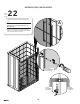
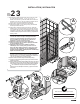
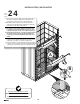
A. Close the door (1) and trace a line on the wall along the
magnetic door jamb (15).
B. Position the wall channel (17) next to the traced line and mark
the holes to be drilled.
C. Drill the wall covering on the markings. [For ceramics always
use a ceramics 1/4" drill bit.]
D. Fill the holes with a generous amount of silicone and / or use wall
anchors (21).
E.
Fasten the wall channel (17) with the provided screws (20 b).
A. Fermer la porte (1) et tracer une ligne sur le mur le long du
montant magnétique de porte (15).
B.
Placer le profilé mural (17) contre la ligne tracée et marquer
les trous à percer.
C. Percer le revêtement aux endroits marqués. [Pour de la
céramique, toujours prendre une mèche à céramique 1/4 po.]
D.
Remplir les trous généreusement de silicone et / ou utiliser
les ancrages muraux (21).
E.
Installer le profilé mural (17) avec les vis fournies (20 b).
A. Cerrar la puerta (1) y trazar una línea en la pared a lo largo de la
jamba magnética de la puerta (15).
B.
Colocar el perfil mural (17) contra la línea trazada y marcar la
ubicación de los agujeros.
C. Taladrar el revestimiento en los lugares marcados. [Para taladrar
azulejos, usar siempre una broca para cerámica de 1/4"]
D.
Llenar los agujeros con abundante silicona y / o usar anclajes
murales (21).
E.
Instalar el perfil mural (8) con los tornillos proporcionados (20 b).
A
B
17
1
C
D
E
17
20b
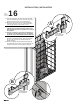
Stud required.
Montant nécessaire.
Se necesita un montante.
15
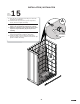
INSIDE VIEW
VUE INTÉRIEURE
VISTA INTERIOR
20