
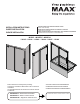
How to Guide


8
INSTALLATION | INSTALACIÓN
2
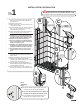
STEP
ÉTAPE
ETAPA
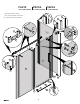
A
2
7
A. Insert the fixed panel (2) in the wall jamb (7).
B. Level and square the fixed panel (2). [For leveling, use wedge
spacers (26) as needed]
C. From the inside of the shower, insert the sealing gasket (8)
between the fi xed panel (2) and the wall jamb (7).
D. Use the insertion tool (24) to completely insert the gasket (8).
A. Inserer le panneau fixe (2) dans le montant mural (7).
B. Mettre à niveau et à l'équerre le panneau fi xe (2). [Pour
niveler, utiliser des coussinets à cale (26) au besoin]
C. De l'intérieur de la douche, insérer le joint d'étanchéité
(8) entre le panneau fi xe (2) et le montant mural (7).
D. Utiliser l'outil d'insertion (24) pour assurer l'installation
complète du joint (8).
A. Insertar el panel fijo (2) en la jamba mural (7).
B. Poner el panel fijo (2) a nivel y a escuadra. [Para la
nivelación, utilizar una cuña espaciadora (26) según sea
necesario]
C. Desde el interior de la ducha, colocar la junta de
estanqueidad (8) entre el panel fijo (2) y la jamba mural (7).
D. Utilizar la herramienta de inserción (24) para insertar
completamente la junta (8).
INSIDE
INTÉRIEUR
INTERIOR
2
7
2
26
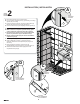
B
2
7
8
24
D
INSIDE VIEW
VUE INTÉRIEURE
VISTA INTERIOR
C
7
8
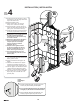
8
7
2
INSIDE
INTÉRIEUR
INTERIOR
TOP VIEW
VUE SUPÉRIEURE
VISTA SUPERIOR