TO BE REMOVED FOR USE BY THE OCCUPANT- RETIRER DE L’UNITÉ AVANT L’UTILISATION - RETIRE DE LA UNIDAD ANTES DE USAR Shower Bases | Bases de douche | Bases de ducha ............1 Shower Walls | Murs de douche | Paredes de ducha ..........17 Shower Door | Porte de douche | Puertas de ducha ..........33 INSTALLATIONINSTRUCTIONS GUIDE D’INSTALLATION GUÍA PARA INSTALACIÓN Shower Walls and Bases • Murs et bases de douche • Bases y paredes de ducha Read all instructions carefully before proceeding.
SHOWER WALLS AND BASES MURS ET BASES DE DOUCHE BASES Y PAREDES DE DUCHA Corner Installation Installation en coin Instalación en esquina Alcove Installation Installation en alcôve Instalación en nicho Wall Kit / Ensemble de Murs / Conjunto de paredes 102847 / 102967 / 105029 / 105062 / 105256 / 105277 (30") 102848 / 102968 / 105030 / 105063 / 105257 / 105278 (32") 102849 / 102969 / 105031 / 105064 / 105258 / 105279 (36") 102850 / 102970 / 105032 / 105065 / 105259 / 105280 (38”) 102851 / 102971 / 105033 /
BEFORE YOU BEGIN AVANT DE DÉBUTER ANTES DE COMENZAR • Consult local building codes to make sure the installation complies with standards. • Consulter les codes de construction locaux pour assurer une installation conforme aux normes. • Consulte las normas de códigos locales para garantizar una instalación conforme a las normas. • Remove the unit from its packaging. Before disposing of it, inspect the unit to make sure it is in good shape.
GENERAL RULES RÈGLES GÉNÉRALES REGLAS GENERALES 6ගකඝඋගඝකඍ ,ඖඛගඉඔඔඉගඑඖ DO NOT BUILD THE SURROUNDING STRUCTURE BEFORE RECEIVING YOUR UNIT. Structure measurements ,ඖඛගඉඔඔඉගඑඖ ඌඍ ඔඉ ඛගකඝඋගඝකඍ NE PAS CONSTRUIRE LA STRUCTURE AVANT D’AVOIR REÇU L’UNITÉ. Afin d’assurer une should be verified against the unit to ensure a proper fit. installation parfaite, les dimensions de la structure doivent être vérifiées à partir des dimensions de l’unité.
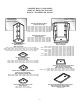
PARTS IDENTIFICATION IDENTIFICATION DES COMPOSANTES IDENTIFICACIÓN DE LOS COMPONENTES Left Wall Mur gauche Pared izquierda Right Wall Mur droit Pared derecha Vertical Guide Guide vertical Guía verticale Top view Vue de dessus Vista de arriba Shower Base Base de douche Base de ducha Left Wall Mur gauche Pared izquierda Right Wall Mur droit Pared derecha Back Wall Mur de fond Pared del fondo Shower Base Base de douche Base de ducha 5
1 - FRAMING / ENCADREMENT / ESTRUCTURA Structure measurements must be verified against the unit. Les dimensions de la structure doivent être vérifiées à partir des dimensions de l’unité. Las dimensiones de la estructura deben ser verificadas a partir de las dimensiones de la unidad.
2 - REINFORCEMENTS INSTALLATION / INSTALLATION DES RENFORTS / INSTALACIÓN DE LOS REFUERZOS In order to ensure maximum strength in the unit walls, at a height of 48” from the bottom of the unit, add pieces of wood between the back of the walls and the frame. Afin d’assurer un maximum de rigidité des murs de l’unité, ajouter, à une hauteur de 48” depuis le fond de l’unité, des pièces de bois entre l’arrière des murs et l’encadrement.
3 - BASE INSTALLATION / INSTALLATION DE LA BASE / INSTALACIÓN DE LA BASE 1 2 Mark drain location. Marquez l’emplacement du drain. Marcar la ubicación del desagüe. Install the Drain (refer to the manufacturer's instruction) Installez le drain (référez-vous aux instructions du fabriquant) Instale el desagüe (referirse a las instrucciones del fabricante) Mark exterior location of the base. Marquez le contour de la base. Trazar el contorno de la base.
4 - RIGHT WALL INSTALLATION / INSTALLATION DU MUR DROIT / INSTALACIÓN DE LA PARED DERECHA 1 Wall Mur Pared Silicone Silicona 2 Base Shim* Cale* Cuñas* #8 x 1 1/4" Ø3/16" Wall Mur Pared Silicone Silicona Base *Note: Use shims behind the fastening flange as required. *Note : Utiliser des cales derrière la lèvre de lixation au besoin. *Nota : Utilizar cuñas de madera detrás la brida de fijación si es necesario.
5 - BACK WALL INSTALLATION / INSTALLATION DU MUR DE FOND / INSTALACIÓN DE LA PARED DEL FONDO 1 Left Wall Mur gauche Pared izquierda Base Right Wall Mur droit Pared derecha Silicone Silicona 1" (25 mm) Apply silicone in the groove Appliquer du silicone dans la rainure Applique silicona en la ranura Do not apply silicone in the corner Ne pas appliquer de silicone dans le coin No applique silicona en la esquina 2 Top view Vue de dessus Vista de arriba 2 Back Wall Mur de fond Pared del fondo Press ag
6 - LEFT WALL INSTALLATION / INSTALLATION DU MUR GAUCHE / INSTALACIÓN DE LA PARED IZQUIERDA 1 Right Wall / Back Wall Mur droit / Mur de fond Pared derecha / Pared del fondo Base Silicone Silicona 1" (25 mm) Apply silicone in the groove Appliquer du silicone dans la rainure Applique silicona en la ranura Do not apply silicone in the corner Ne pas appliquer de silicone dans le coin No applique silicona en la esquina 2 Press against right wall / Back wall Appuyez contre le mur droit / Mur de fond Apoye
7 - CONNECTING THE PLUMBING / RACCORDEMENT DE LA PLOMBERIE / CONEXIÓN DE LA PLOMERÍA Connect plumbing (drain, faucets, etc.) according to local standards and to the general rules at the beginning of this guide. Effectuer le raccordement de la plomberie (drain, robinet, etc.) selon les normes locales et les règles générales au début de ce guide. 12 Conecte la tubería (desagüe, grifos, etc.) según las normas locales y reglas generales que se encuentran al inicio de esta guía.
MAINTENANCE ENTRETIEN MANTENIMIENTO Regular disinfection provides an effective defense against various types of bacteria that can develop in the deposits building up over time in all bathtubs and showers. For daily maintenance cleaning, use a moist cloth and gentle liquid detergent. For acrylic surfaces, occasional use of a special acrylic surface cleaner such as LUMASHINE® or LUMACREAM® will add luster and protect the finish.
damage caused thereby or resulting thereof, either directly or indirectly. The owner/enduser must provide access to the components of the product as described in the installation guide, so that MAAX can execute the warranty specified herein. If such access is not available, all expenses to provide said access will be the responsibility of the owner/end-user. résultant de celle-ci.
Warranty service Garantie de service Garantía de servicio MAAX’s warranty obligation shall be discharged upon tender of replacement or repair. The purchaser refusal to accept the tender terminates MAAX’s warranty obligation. L’obligation de MAAX en vertu de la garantie cesse au moment où MAAX fournit le remplacement ou la réparation. Le refus du client d’accepter cette mesure met un terme à l’obligation de MAAX en vertu de la garantie.
TO BE REMOVED FOR USE BY THE OCCUPANT- RETIRER DE L’UNITÉ AVANT L’UTILISATION - RETIRE DE LA UNIDAD ANTES DE USAR www.maax.com Technical Services • Service technique • Servicio Técnico T. 1 877 GET-MAAX (1 877 438-6229) F. 1 877 636-6250 © MAAX Bath Inc.
INSTALLATION INSTRUCTIONS GUIDE D’INSTALLATION GUÍA DE INSTALACIÓN FOR SHOWER WALLS INSTALLATION POUR INSTALLATION DES MURS DE DOUCHE PARA LA INSTALACIÓN DE MUROS DE DUCHA FOR MODELS • POUR LES MODÈLES • PARA LOS MODELOS 106108 • 106382 • 106383 • 137300 • 137301 • 300009 • 300011 • 500005 • 500008 Read all instructions carefully before proceeding. Lire toutes les instructions attentivement avant de commencer l’installation. Leer detenidamente todas las instrucciones antes de comenzar la instalación.
PARTS AND COMPONENTS PIÈCES ET COMPOSANTES PIEZAS Y COMPONENTES 3 2 7 5 6 6 4 1 # Part Nom de la pièce Pieza Qt Cant.
TOOLS OUTILS HERRAMIENTAS REQUIRED Level Niveau Nivel Clear silicone sealant Silicone claire Sellador de silicona transparente Security equipment Équipement de sécurité Equipamiento de seguridad REQUIS NECESARIAS Pencil Crayon Lápiz Square Équerre Escuadra Measuring tape Ruban à mesurer Cinta métrica 3 Electric drill Perceuse électrique Taladro eléctrico ¼" ceramic drill bit Mèche à céramique de ¼ po.
BEFORE AVANT YOU BEGIN DE COMMENCER ANTES DE COMENZAR A two person installation is recommended. Une installation par deux personnes est recommandé. Se recomienda realizar la instalación entre dos personas. A. Before beginning the installation, verify that the shower base has been installed directly against the studs.
BEFORE AVANT YOU BEGIN DE COMMENCER ANTES DE COMENZAR A two person installation is recommended. Une installation par deux personnes est recommandé. Se recomienda realizar la instalación entre dos personas. A. Before beginning the installation, verify that the shower base has been installed directly against the studs.
1 Wood structure required for walls 106108 installation on the following models: Structure en bois requise pour l'installation des murs 106108 sur les modèles suivants: Estructura de madera requerida para la instalación de muros 106108 en los siguientes modelos: Note: WKH ZRRGHQ SLHFHV PXVW EH ¿[HG RQ ¿QLVKHG ZDOO A. Starting with the longest vertical pieces, fasten wood pieces as shown. Make sure all wood pieces are level.
2 A. Remove the plastic wrap. B. Align the walls and the caddy on a flat surface. Drill holes on the imprints with a 7/32" brill bit as shown. C. Apply a continuous bead of silicone inside the bolts IURP WRS WR ERWWRP RQ RQH RI WKH ZDOO ÀDQJHV D. Assemble walls with the #10-32 x 5/8" screws, 1/4" washers and #10-32 nuts provided. B C A. Enlever la pellicule de plastique. B. Aligner les murs et le caddie sur une surface plane. Percer les trous dans les empreintes avec une mèche 7/32" tel qu'illustré. C.
3 A. Slide the shower into its location. The wood framing built in step 1 should fall inside raised sections of the walls without interference. If there is any interference adjust framing accordingly to remove any stress from walls. B. Drill holes through the upper lip of the walls, using a 3/32" drill bit, evenly distributed on the upper lip. C. Fasten the top of the walls with the # 8 x 1¼" stainless steel screws using a screwdriver. DO NOT SCREW THE WALLS WITH AN ELECTRIC DRILL. C B A.
1 Wood structure required for walls 106383 installation on the following models: Structure en bois requise pour l'installation des murs 106383 sur les modèles suivants: Estructura de madera requerida para la instalación de muros 106383 en los siguientes modelos: Note: WKH ZRRGHQ SLHFHV PXVW EH ¿[HG RQ ¿QLVKHG ZDOO A. Starting with the longest vertical pieces, fasten wood pieces as shown. Make sure all wood pieces are level.
2 A. Remove the plastic wrap. B. Align the walls and the caddy on a flat surface. Drill holes on the imprints with a 7/32" brill bit as shown. C. Apply a continuous bead of silicone inside the bolts IURP WRS WR ERWWRP RQ RQH RI WKH ZDOO ÀDQJHV D. Assemble walls with the #10-32 x 5/8" screws, 1/4" washers and #10-32 nuts provided. B C A. Enlever la pellicule de plastique. B. Aligner les murs et le caddie sur une surface plane. Percer les trous dans les empreintes avec une mèche 7/32" tel qu'illustré. C.
3 A. Slide the shower into its location. The wood framing built in step 1 should fall inside raised sections of the walls without interference. If there is any interference adjust framing accordingly to remove any stress from walls. B. Drill holes through the upper lip of the walls, using a 3/32" drill bit, evenly distributed on the upper lip. C. Fasten the top of the walls with the # 8 x 1¼" stainless steel screws using a screwdriver. DO NOT SCREW THE WALLS WITH AN ELECTRIC DRILL. C B A.
Wood structure required for walls 106108 installation on the following models: Structure en bois requise pour l'installation des murs 106108 sur les modèles suivants: Estructura de madera requerida para la instalación de muros 106108 en los siguientes modelos: 1 This frame is for these models only Ce cadre est pour ces modèles seulement (VWD HVWUXFWXUD HV SDUD HVWRV PRGHORV ~QLFDPHQWH Note: WKH ZRRGHQ SLHFHV PXVW EH ¿[HG RQ ¿QLVKHG ZDOO A.
2 A. Remove the plastic wrap. B. Align the walls and the caddy on a flat surface. Drill holes on the imprints with a 7/32" brill bit as shown. C. Apply a continuous bead of silicone inside the bolts IURP WRS WR ERWWRP RQ RQH RI WKH ZDOO ÀDQJHV D. Assemble walls with the #10-32 x 5/8" screws, 1/4" washers and #10-32 nuts provided. B C A. Enlever la pellicule de plastique. B. Aligner les murs et le caddie sur une surface plane. Percer les trous dans les empreintes avec une mèche 7/32" tel qu'illustré. C.
3 A. Slide the shower into its location. THE SHOWER BASE MUST BE UNI-FORMLY LEVELED AND RESTING OVER ENTIRE SURFACE. The wood Do not overlyITS tighten framingthe built in step 1 should fall inside raised sections parts together. of the walls without interference. If there is any interference adjust Ne pas trop framing serrer accordingly to remove any stressles from walls.ensemble. parties B.
LIMITED WARRANTY GARANTIE LIMITÉE GARANTÍA LIMITADA MAAX Bath Inc. (hereafter “MAAX”) offers an express limited warranty on each of its products. This warranty extends only to the original owner/end-user for personal household use. For commercial uses, additional limitations apply. MAAX Bath Inc. (ci-après “MAAX”) offre une garantie limitée expresse sur chacun de ses produits. Cette garantie s’adresse uniquement au propriétaire/utilisateur original pour un usage personnel domestique.
www.maax.com Technical Services / Service technique / Servicio técnico T. 1 877 GET-MAAX (1 877 438-6229) F. 1 888 361-2045 © 2008 MAAX Bath Inc.
INSTALLATION INSTRUCTIONS GUIDE D’INSTALLATION GUÍA DE INSTALACIÓN FOR CORNER DOORS INSTALLATION POUR INSTALLATION DES PORTES EN COIN PARA LA INSTALACIÓN DE PUERTAS EN ESQUINA MODEL • MODÈLE • MODELO 136330 • 139330 Read all instructions carefully before proceeding. Lire toutes les instructions attentivement avant de commencer l’installation. Leer detenidamente todas las instrucciones antes de comenzar la instalación.
8 PARTS 9 PIÈCES PIEZAS AND COMPONENTS ET COMPOSANTES Y COMPONENTES 21 14 10 13 22 10 * 2 3 13 1 4 11 4 15 14 5 12 16 6 7 19 * This part comes pre-assembled Cette pièce est pré-assemblée Esta parte viene pre-ensamblada 25 2
PARTS PIÈCES PIEZAS AND COMPONENTS ET COMPOSANTES Y COMPONENTES 16 4 5 6 5 7 8 9 20 10 10 13 11 14 12 * 16 17 18 19 15 22 * 19 21 23 24 This part comes pre-assembled Cette pièce est pré-assemblée Esta parte viene pre-ensamblada 3
PARTS PIÈCES PIEZAS AND COMPONENTS ET COMPOSANTES Y COMPONENTES XXX 084=Chrome, Cromo 305=Brushed nickel, Nickel brossé, Níquel cepillado 173=Dark bronze, Bronze foncé, Bronce oscuro #/ Part Pièce Pieza Qty Cant.
TOOLS OUTILS HERRAMIENTAS REQUIRED REQUIS NECESARIAS Level Niveau Nivel Pencil Crayon Lápiz Clear silicone sealant Silicone claire Sellador de silicona transparente Phillips screwdriver Tournevis étoile Destornillador estrella Ɨ" drill bit 0qFKH GH Ɨ SR %URFD GH Ɨ" Security equipment Équipement de sécurité Equipamiento de seguridad Measuring tape Ruban à mesurer Cinta métrica Utility knife Couteau à lame rétractable Cuchillo multiuso 5 Electric drill Perceuse électrique Taladro eléctrico ¼" c
BEFORE AVANT YOU BEGIN ANTES DE COMMENCER DE COMENZAR A two person installation is recommended. Une installation par deux personnes est recommandé. Se recomienda realizar la instalación entre dos personas. Installation sequence: 1. Shower base installation. 2. Optionnal shower walls (if bought) 3. Shower door installation Séquence d'installation: 1. Installation de la base de douche. 2. Murs de douche en option (si acheté) 3. Installation de la porte de douche Secuencia de instalación: 1.
BEFORE AVANT YOU BEGIN B. Identify the door opening side and select the corresponding corner piece. Assemble the bottom extrusions to the threshold using the corner pieces and the provided screws. % ,GHQWL¿HU OH F{Wp GH O RXYHUWXUH GH OD SRUWH HW sélectionner la pièce en coin correspondante. Assembler les extrusions inférieures au seuil en utilisant les pièces en coin et les vis fournies. ANTES DE COMMENCER DE COMENZAR B Do not cut the bottom extrusions, they fit with the glass.
1 Do not cut the bottom extrusions, they fit with the glass. Ne coupez pas les extrusions inférieures, elles s'adaptent au verre. 1R FRUWH ODV H[WUXVLRQHV LQIHULRUHV TXH HQFDMDQ FRQ HO vidrio. A. Identify the door opening side and select the corresponding corner piece. Assemble the bottom extrusions to the threshold using the corner pieces and the provided screws. $ ,GHQWL¿HU OH F{Wp GH O RXYHUWXUH GH OD SRUWH HW sélectionner la pièce en coin correspondante.
2 A. 3ODFH WKH ZDOO MDPEV RYHU WKH ERWWRP H[WUXVLRQ DQG DJDLQVW WKH shower walls and verify that they are leveled. Mark the position of WKH ZDOO MDPE IDVWHQLQJ KROHV RQ WKH VKRZHU ZDOOV 5HPRYH WKH ZDOO MDPEV B. Drill the holes on the previously marked positions. Fill the holes with silicone. C. $SSO\ D EHDG RI VLOLFRQH DW WKH ERWWRP ZKHUH HDFK ZDOO MDPE ZLOO VLW D. 3ODFH WKH ZDOO MDPEV RQ WKH VKRZHU ZDOOV DQG IDVWHQ ZLWK WKH provided screws. A.
3 A. 5HPRYH WDSH ¿OP XQGHU WKH ERWWRP WUDFN DQG 8 FKDQQHOV and set them back in the previosly marked position. B. 6OLGH WKH VHDOLQJ JDVNHWV LQ WKH ZDOO MDPEV ZLWK WKH ORQJ side facing the outside. A. Enlever la pellicule en-dessous du rail inférieur en du rail en U et les remettre à l'endroit prealablement marqué. B. Faites glisser les joints d'étanchéité dans les PRQWDQWV PXUDX[ DYHF OH F{Wp ORQJ YHUV O H[WpULHXU A.
4 A. Apply a bead of silicone inside the U-channels. Insert the UHWXUQ DQG ¿[HG SDQHOV RQ WKH ZDOO MDPEV DV VKRZQ 0DNH VXUH the panels are leveled (use shims if needed). B. ,QVHUW WKH ÀH[LEOH 39& LQ WKH ZDOO MDPE H[WUXVLRQV RQ WKH LQVLGH RI WKH VKRZHU WR VHFXUH WKH JODVV SDQHOV LQ SODFH 3XVK ZLWK ¿Qgers, start by inserting the bottom then moving to the top. C. ,QVWDOO WKH KLQJH RQ WKH ¿[ SDQHO PDNLQJ VXUH WKH KLQJH LV leveled horizontally. D.
5A A. ,QVWDOO WKH KLQJH RQ WKH ¿[ SDQHO PDNLQJ VXUH WKH KLQJH LV leveled horizontally. $ ,QVWDOOHU OD FKDUQLqUH VXU OH SDQQHDX ¿[H HQ V DVVXUDQW TXH la charnière est nivelée horizontalement. A.
5B B. Temporarily replace the hinge bushings with the door holders as shown. B. Remplacer temporairement les coussinets de charnière avec les supports de porte comme indiqué. B. 6XVWLWX\D WHPSRUDOPHQWH ORV EXMHV GH OD ELVDJUD FRQ ORV soportes de la puerta, como se muestra.
6 A.Place the header assembly on top of the glass panels. )DVWHQ WKH VHW VFUHZV
7 A. Mount the door on the door supports. Make sure is leaning on the 4 door supports in the upper and lower holes of the panel. B. Remove the door holders one at a time. Two people are recommended for this step. C. Fasten with the hinge bushing. Two people are recommended for this step. D. Fasten the bottom hinge with the bushings. A. Monter la porte sur les supports de porte. Assurez-vous de bien engager les 4 supports de porte dans les trous au haut et au bas du panneau. B.
8 A. Insert the magnetic extrusions on door and return panel edges as shown. B. Install the handles on the doors as shown. A A. Insérer les joints d'étanchéités magnétiques sur les bords de la porte et du panneau de retour, comme indiqué. B. Installer les poignées sur les portes comme indiqué. A. ,QVHUWH ODV MXQWDV GH HVWDQTXHLGDG PDJQpWLFDV HQ ORV bordes de la puerta y del panel de retorno como se muestra. B.
9 A. Test closing and opening the door. If required, reOHDVH WKH KHDGHU DQG DGMXVW 2QFH PDJQHWV DUH DOLJQHG VHFXUH KHDGHU VFUHZV ,I DGGLWLRQDO DGMXVWPHQW LV UHTXLred, remove the gaskets and pull on the glass panels. Replace the gaskets. B. Install header caps in position as shown. C. Insert the vertical gasket on the hinged side of the door with the lip facing inside the shower. D.
10 A. Apply silicone around the outside of the frame, between WKH ZDOO DQG WKH ZDOO MDPEV DORQJ WKH ERWWRP UDLO DQG EHORZ WKH ¿[HG SDQHOV A. Appliquer du silicone autour du cadre extérieur, entre le mur et les montants muraux, le long du rail inférieur et DX GHVVRXV GHV SDQQHDX[ ¿[HV A. $SOLTXH VLOLFRQD DOUHGHGRU GHO H[WHULRU GHO PDUFR HQWUH OD SDUHG \ ORV PRQWDQWHV PXUDOHV D OR ODUJR GHO ULHO LQIHULRU \ GHEDMR GH ORV SDQHOHV ¿MRV 24H Wait 24 hours before using the shower.
LIMITED WARRANTY GARANTIE LIMITÉE GARANTÍA LIMITADA MAAX Bath Inc. (hereafter “MAAX”) offers an express limited warranty on each of its products. This warranty extends only to the original owner/end-user for personal household use. For commercial uses, additional limitations apply. MAAX Bath Inc. (ci-après “MAAX”) offre une garantie limitée expresse sur chacun de ses produits. Cette garantie s’adresse uniquement au propriétaire/utilisateur original pour un usage personnel domestique.
www.maax.com Technical Services / Service technique / Servicio técnico T. 1 877 GET-MAAX (1 877 438-6229) F. 1 888 361-2045 © 2008 MAAX Bath Inc.