
Installation Guide


7
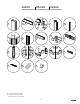
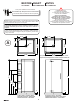
B. Identify the door opening side and select the correspon-
ding corner piece. Assemble the bottom extrusions to the
threshold using the corner pieces and the provided screws.
%,GHQWL¿HUOHF{WpGHORXYHUWXUHGHODSRUWHHW
sélectionner la pièce en coin correspondante. Assem-
bler les extrusions inférieures au seuil en utilisant les
pièces en coin et les vis fournies.
B. ,GHQWL¿TXH HO ODGR GHDSHUWXUD GH OD SXHUWD\ VHOHF-
FLRQH OD SLH]D GH HVTXLQD FRUUHVSRQGLHQWH 0RQWDU ODV
extrusiones inferiores al umbral usando las piezas de
HVTXLQD\ORVWRUQLOORVVXPLQLVWUDGRV
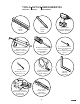
Do not cut the bottom extrusions, they fit with the glass.
Ne coupez pas les extrusions inférieures, elles
s'adaptent au verre.
1RFRUWHODVH[WUXVLRQHVLQIHULRUHVTXHHQFDMDQFRQHO
vidrio.
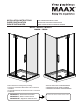
BEFORE
YOU BEGIN
AVANT
DE COMMENCER
ANTES
DE COMENZAR
B
2
3
C
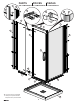
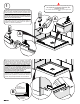
C. 7KHGRRULVUHYHUVLEOH,IRSHQLQJWRWKHULJKWLVGHVLUHGÀLS
the support bar, loose the clamps and fasten them as shown.
Place the header assembly on top of the glass panels.
)DVWHQWKHVHWVFUHZV<RXPD\KDYHWRUHDGMXVWLWDIWHUWKH
door is installed.
C. La porte est réversible. Si l'ouverture à gauche est
souhaitée, basculer la barre de support, détacher les
SLQFHVHWOHV¿[HUFRPPHLQGLTXp
Placer l'emsemble de la barre de soutien sur les panneaux
de verre.
Serrer les vis de réglage. Vous devrez peut-être réajuster la
barre après l'installation de la porte.
C. La puerta es reversible. Si se desea abrir a la derecha,
JLUH OD EDUUD GH VRSRUWH VXHOWH ODV DEUD]DGHUDV \ ItMHODV
como se muestra.
&RORFDUHOFRQMXQWRGHODEDUUDGHVRSRUWHHQODSDUWH
superior de los paneles de vidrio. Apretar los tornillos de
¿MDFLyQ3XHGHTXHWHQJDTXHUHDMXVWDUORGHVSXpVGH
instalar la puerta.
TOP VIEW
VUE DE DESSUS
VISTA SUPERIOR
8QGHU¿[HGSDQHO
6RXVOHSDQQHDX¿[H
'HEDMRGHOSDQHO¿MR
Under return panel
Sous le panneau de retour
'HEDMRGHOSDQHOGHUHWRUQR
Under door
Sous la porte
'HEDMRGHODSXHUWD
1