
Installation Guide


9
3
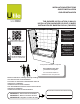
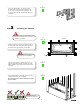
STEP Installing Ulok system
on the walls
Install three X fasteners (1) on each side of the back wall
(14) in the pre drilled holes using the screws provided (2).
Quick tip
There is a positioning pin on X
fastener so they can only be
installed one way.
14
Back wall
1
14
2
2
1
14
This side
down
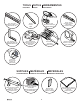
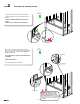
4
3
The side walls are interchangeable.
For left wall install the pins on the
right side, for the right wall install the
pins on the left side.
Quick tip
Side walls
15
15
Fastening ange
3.1
Check me!
3.2
Check me!
This side down
Positioning
pin
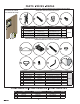
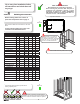
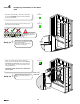
The Ulok system parts are in the
side wall boxes. (1 pack per box)
www.maax.com
10060303 – ULOK Skin pack for Utile - 1 junction
3
1
2
4
1
2
BACK WALL
MUR ARRIÈRE
MURO POSTERIOR
INSIDE VIEW
VUE INTÉRIEURE
VISTA INTERIOR
SIDE WALL
MUR DE CÔTÉ
MURO LATERAL
3
4
INSIDE VIEW
VUE INTÉRIEURE
VISTA INTERIOR
by/par
MAAX
* Extra parts are included in this pack in case of loss or damage
* Des pièces supplémentaires sont incluses en cas de perte ou bris
* Piezas extras están incluidas en este empaque en caso de perdida o daño
Fasten 3 retraction pins per side wall in the pre drilled
holes with the screws provided (4) to the left-hand or right-
hand fastening ange of the side walls (15) depending on
which side the wall will be installed on.