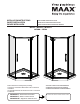
INSTALLATION INSTRUCTIONS GUIDE D’INSTALLATION GUÍA DE INSTALACIÓN FOR CORNER DOORS INSTALLATION POUR INSTALLATION DES PORTES EN COIN PARA LA INSTALACIÓN DE PUERTAS EN ESQUINA MODEL • MODÈLE • MODELO 137300 • 137301 Read all instructions carefully before proceeding. Lire toutes les instructions attentivement avant de commencer l’installation. Leer detenidamente todas las instrucciones antes de comenzar la instalación.
PARTS AND COMPONENTS 7 PIÈCES ET COMPOSANTES 8 Y COMPONENTES 12 13 20 PIEZAS 9 9 21 * 2 3 4 12 1 4 10 14 13 11 5 15 19 * 16 5 6 This part comes pre-assembled Cette pièce est pré-assemblée Esta parte viene pre-ensamblada 23 2
PARTS AND COMPONENTS PIÈCES ET COMPOSANTES 16 4 5 PIEZAS Y COMPONENTES 5 7 6 8 19 9 9 12 10 11 13 * 15 16 18 17 20 22 14 21 #/ Part Pièce Pieza Qty Cant.
TOOLS OUTILS HERRAMIENTAS REQUIRED REQUIS NECESARIAS Level Niveau Nivel Pencil Crayon Lápiz Clear silicone sealant Silicone claire Sellador de silicona transparente Phillips screwdriver Tournevis étoile Destornillador estrella ⅛" drill bit Mèche de ⅛ po. Broca de ⅛" Measuring tape Ruban à mesurer Cinta métrica Security equipment Équipement de sécurité Equipamiento de seguridad 4 Electric drill Perceuse électrique Taladro eléctrico ¼" ceramic drill bit Mèche à céramique de ¼ po.
BEFORE AVANT YOU BEGIN DE COMMENCER ANTES DE COMENZAR Installation sequence: 1. Shower base installation. 2. Optionnal shower walls (if bought) 3. Shower door installation A two person installation is recommended. Une installation par deux personnes est recommandé. Se recomienda realizar la instalación entre dos personas. Séquence d'installation: 1. Installation de la base de douche. 2. Murs de douche en option (si acheté) 3. Installation de la porte de douche Secuencia de instalación: 1.
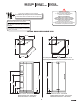
BEFORE AVANT YOU BEGIN ANTES DE COMMENCER DE COMENZAR A two person installation is recommended. Une installation par deux personnes est recommandé. Se recomienda realizar la instalación entre dos personas. A. Before beginning the installation, verify that the shower base has been installed directly against the studs. Verify measurements shown. Make sure the walls and the base are level and square. A.
A two person installation is recommended. Une installation à deux personnes est recommandé. Se recomienda realizar la instalación entre dos personas. 1 A. Identify the door opening side and select the right corner piece according to the opening. Assemble the bottom extrusions to the threshold using the corner pieces and the provided screws. B. Dry fit the bottom extrusion assembly on the base threshold. Mark 3/4'' from each wall on the base threshold. Temporarily secure with tape. A.
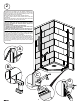
2 A. Place the wall jambs over the bottom extrusion and against the shower walls and verify that they are leveled. Mark the position of the wall jamb fastening holes on the shower walls. Remove the wall jambs. B. Drill the holes on the previously marked positions. C. Apply a bead of silicone at the bottom where each wall jamb will sit. D. Place the wall jambs on the shower walls, fill the holes with silicone and fasten with the provided screws. A.
3 B A. Remove tape film under the bottom track and U-channels and set them back in the previosly marked position. B. Slide the sealing gaskets in the wall jambs with the long side facing the outside. B A. Enlever la pellicule en-dessous du rail inférieur en du rail en U et les remettre à l'endroit prealablement marqué. B. Faites glisser les joints d'étanchéité dans les montants muraux avec le côté long vers l'extérieur. A.
4 B A. Apply a bead of silicone inside the U-channels. Insert the return and fixed panels on the wall jambs; glass bottom exterior corner first then slide into the wall jamb. Make sure the panels are leveled (use shims if needed) and aligned with the bottom bracket. B. Insert the flexible PVC in the wall jamb extrusions on the inside of the shower to secure the glass panels in place. Push with fingers, first insert top and bottom and push the rest in. C.
5 A. Install the header with an equal distance between the 2 glass edges at the top and bottom. Fasten the set screws. You may have to readjust it after the door is installed. B. Mount the door on the door supports. Make sure is leaning on the 4 door supports in the upper and lower holes of the panel. Replace the door holders with the hinge bushings one at a time. Two people are recommended for this step. A. Installer la barre de soutien avec une distance égale entre les 2 bords de verre en haut et en bas.
6 A A. Insert the magnetic extrusions on door and return panel edges as shown. B. Install the handles on the doors as shown. A. Insérer les joints d'étanchéités magnétiques sur les bords de la porte et du panneau de retour, comme indiqué. B. Installer les poignées sur les portes comme indiqué. A. Inserte las juntas de estanqueidad magnéticas en los bordes de la puerta y del panel de retorno como se muestra. B. Installar las manijas sobre las puertas como se indica.
7 A. Test closing and opening the door. If required, release the header and adjust. Once magnets are aligned, secure header screws. If additional adjustment is required, remove the gaskets and pull on the glass panels. Replace the gaskets. B. Install header caps in position as shown. C. Insert the vertical gasket on the hinged side of the door with the lip facing inside the shower. D.
8 A. Apply silicone around the outside of the frame, between the wall and the wall jambs, along the bottom rail and below the fixed panels. A. Appliquer du silicone autour du cadre extérieur, entre le mur et les montants muraux, le long du rail inférieur et au-dessous des panneaux fixes. A. Aplique silicona alrededor del exterior del marco, entre la pared y los montantes murales, a lo largo del riel inferior y debajo de los paneles fijos. 24H Wait 24 hours before using the shower.
LIMITED WARRANTY GARANTIE LIMITÉE GARANTÍA LIMITADA MAAX Bath Inc. (hereafter “MAAX”) offers an express limited warranty on each of its products. This warranty extends only to the original owner/end-user for personal household use. For commercial uses, additional limitations apply. MAAX Bath Inc. (ci-après “MAAX”) offre une garantie limitée expresse sur chacun de ses produits. Cette garantie s’adresse uniquement au propriétaire/utilisateur original pour un usage personnel domestique.
www.maax.com Technical Services / Service technique / Servicio técnico T. 1 877 GET-MAAX (1 877 438-6229) F. 1 888 361-2045 © 2008 MAAX Bath Inc.