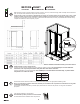
FOR RIGHT AND LEFT SIDE DOOR INSTALLATION (LEFT SIDE SHOWN) POUR INSTALLATION DE PORTE CÔTÉ DROIT ET GAUCHE (CÔTÉ GAUCHE ILLUSTRÉ) PARA LA INSTALACIÓN DE LA PUERTA DEL LADO DERECHO E IZQUIERDO (SE MUESTRA INSTALACIÓN AL LADO IZQUIERDO) INSTALLATION INSTRUCTIONS GUIDE D’INSTALLATION GUÍA DE INSTALACIÓN MODEL • MODÈLE • MODELO Sliding shower door and return panel Porte de douche coulissante et panneau de retour Puerta corrediza de ducha y el panel de retorno 137310 • 137311 • 137312 Read all instructions
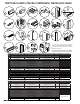
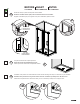
PARTS INCLUDED | PIÈCES COMPRISES | PIEZAS INCLUIDAS 33 2 4 3 8 5 13 7 14 11 9 6 12 15 10 18 16 17 20 19 32 29 26 27 25 21 28 24 You will have unused parts depending of your configuration. Il y aura des pièces inutilisées selon votre configuration. Habrá piezas no utilizadas, dependiendo de su configuración.
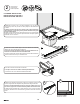
PARTS AND COMPONENTS 9 PIÈCES PIEZAS ET COMPOSANTES Y COMPONENTES You will have unused parts depending of your configuration. Il y aura des pièces inutilisées selon votre configuration. Habrá piezas no utilizadas, dependiendo de su configuración.
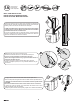
TOOLS OUTILS HERRAMIENTAS REQUIRED Level Niveau Nivel REQUIS NECESARIAS Pencil Crayon Lápiz Electric drill Perceuse électrique Taladro eléctrico ¼''ceramic drill bit Clear silicone sealant Silicone claire Sellador de silicona transparente Hand-file Lime Lima Hacksaw Scie à métaux Sierra para metal Cutting pliers Pince coupante Alicate de corte Utility knife Couteau à lame rétractable Cuchillo multiuso Security equipment Équipement de sécurité Equipamiento de seguridad 4 Mèche à céramique de ¼
BEFORE AVANT YOU BEGIN DE COMMENCER ANTES DE COMENZAR NOTE | REMARQUE | NOTA Boxed image shows configuration that will be installed. Follow the same steps for the mirror installation. L'image encadrée montre la configuration qui sera installée. Suivre les mêmes étapes pour l'installation opposée. La imagen enmarcada muestra la configuración que se instalará. Siga los mismos pasos para la instalación opuesta.
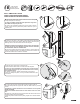
BEFORE AVANT YOU BEGIN A DE COMMENCER ANTES DE COMENZAR Make sure that the door and panel fit within the shower enclosure. To do so, measure the height, width and depth of the shower threshold, and compare these measures to those of the door and panel. S’assurer que la porte et le panneau s’ajustent bien par rapport à l’ouverture prévue pour la douche. Pour ce faire, il faut mesurer la hauteur, la largeur et la profondeur du seuil et comparer les mesures prises à celles dans l'encadré ci-dessous.
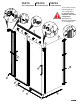
BEFORE AVANT YOU BEGIN DE COMMENCER ANTES DE COMENZAR Double the studs (2x4) where the wall jambs will be installed. E Doubler les montants de bois (2x4) là où les montants muraux seront installés. Duplique los montantes (2x4) en los lugares en los que se instalarán las jambas murales. E E Doubled stud Montant double Montante doble TOP VIEW VUE DE DESSUS VISTA SUPERIOR F G Verify that the shower base is perfectly leveled. Vérifier que la base est parfaitement de niveau.
1A Parts required: Pieces requis: Partes requeridas: 23 8 7 x1 x4 x4 WALL JAMB INSTALLATION INSTALLATION DU MONTANT MURAL INSTALACIÓN DEL MONTANTE MURAL A3 A. Place the wall jamb on the middle of the threshold and against the shower wall and verify that is leveled. Mark the position of the wall jamb fastening holes on the shower wall. Remove the wall jamb. A. Mettre le montant mural au milieu du seuil et contre le mur de douche et valider qu'il est de niveau.
1B Parts required: Pieces requis: Partes requeridas: 8 23 6 x1 7 x1 x4 WALL JAMB INSTALLATION INSTALLATION DU MONTANT MURAL INSTALACIÓN DEL MONTANTE MURAL x4 A A A. File both wall jamb bottom to fit the radius of the base. Keep the L-shape wall jamb for a next step. A. Limer les montants muraux afin qu'ils épousent le rayon de la base. Mettre de côté pour plus tard. A. Limar los dos montantes murales para que se ajuste al radio de la base.
2 Parts required: Pieces requis: Partes requeridas: 28 26 x1 x1 U-CHANNEL INSTALLATION INSTALLATION DU RAIL EN U INSTALACIÓN DEL RIEL EN U A. Measure and trace a line on the base threshold at 34 1/2'' (for 36'' return panel) or at 30 1/2'' (for the 32'' return panel) from the finished wall as shown. A. Mesurer et tracer une ligne sur le seuil à 34 1/2 po (pour panneau de retour de 36 po) ou à 30 1/2 po (pour le panneau de retour de 32 po) du mur fini comme indiqué. A.
3 Parts required: Pieces requis: Partes requeridas: 24 23 25 x1 x1 x1 RETURN PANEL INSTALLATION INSTALLATION DU PANNEAU DE RETOUR INSTALACIÓN DEL PANEL DE RETORNO A A. Slide the J-shaped gasket in the wall jamb with the long side facing the outside. A. Faites glisser le joint d'étanchéité en J dans le montant mural avec le côté long vers l'extérieur. A. Deslizar la junta de estanqueidad en J dentro de la jamba mural con el lado largo mirando hacia fuera. B2 B.
If the angle between the base and the wall is squared, start installation at step 4A. If it is rounded start installation at step 4B. Si l'angle entre la base et le mur est carré, poursuiver l'installation à l'étape 4A. Si l'angle est arrondi, poursuiver à l'étape 4B. Si el angulo entre la base y el muro es cuadrado comenzar la instalación en la etapa 4A. Si el angulo es redondo comenzar la instalación en la etapa 4B.
4B Parts required: Pieces requis: Partes requeridas: 2 x1 THRESHOLD INSTALLATION INSTALLATION DU SEUIL INSTALACIÓN DE LA CINTA A. Measure the distance between the shower wall and the corner bracket and add 5/8". A. Mesurer la distance entre le mur de douche et le connecteur du seuil et ajouter 5/8 po. A. Medir la distancia entre el muro de la ducha y el conector de nicho y sumar 5/8". A X+5/8'' B X+5/8'' B. Cut the threshold to the previously taken measure. C. File the threshold lower corners. D.
5A Parts required: Pieces requis: Partes requeridas: 5 x1 LOWER BUMPER INSTALLATION - LEFT CONFIGURATION INSTALLATION DES PARE-CHOCS INFÉRIEURS - CONFIGURATION GAUCHE INSTALACIÓN DE PARACHOQUES INFERIORES - CONFIGURACIÓN IZQUIERDA Bumper installation detail Détail de l'installation du pare-chocs Detalle de la instalación de parachoques A. Remove the tape film behind the bumpers. Install on base against the cap and the walls as shown. A. Enlever la pellicule plastique derrière le pare-chocs.
5B Parts required: Pieces requis: Partes requeridas: 5 x1 LOWER BUMPER INSTALLATION - RIGHT CONFIGURATION INSTALLATION DES PARE-CHOCS INFÉRIEURS - CONFIGURATION DROITE INSTALACIÓN DE PARACHOQUES INFERIORES - CONFIGURACIÓN DERECHA Bumper installation detail Détail de l'installation du pare-chocs Detalle de la instalación de parachoques A. Remove the tape film behind the bumpers. Install on base against the cap and the walls as shown. A. Enlever la pellicule plastique derrière le pare-chocs.
6 Parts required: Pieces requis: Partes requeridas: 8 6 7 x1 x3 WALL JAMB INSTALLATION INSTALLATION DU MONTANT MURAL INSTALACIÓN DE LA JAMBA MURAL x3 A A. Temporarily place the wall jamb in position. A. Placer temporairement le montant mural en position. A. Colocar temporalmente la jamba mural en su posición. B. Level the wall jams and mark the position of the each holes. Remove the wall jambs. B B. Mettre de niveau le montant mural et marquer la position de chacun des trous.
7 Parts required: Pieces requis: Partes requeridas: 8 9 7 x2 32 x4 x4 29 31 30 HEADER SUPPORT INSTALLATION INSTALLATION DES SUPPORTS DE RAIL INSTALACIÓN DE LOS SOPORTES DEL RIEL A. Temporarily place the header support against the wall jamb aligned with the top and mark the position of the holes as shown. A A. Placer temporairement le support du rail contre le montant mural, aligner en haut et marquer la position des trous. A.
8 Parts required: Pieces requis: Partes requeridas: 12 14 x1 13 x4 x2 HEADER CUTTING COUPE DU RAIL CORTE DEL RIEL A A. Measure the distance between the shower wall and the inside side of the return panel and remove 1/2''. X - 1/2''(13mm) A. Mesurer la distance entre le mur de douche et le côté intérieur du panneau de retour et enlever 1/2 po. A. Medir la distancia entre el muro de ducha y el lado interior del panel de retorno y restar 1/2''. B. Cut the header to that measurement. B B.
9 Parts required: Pieces requis: Partes requeridas: 10 x2 HEADER INSTALLATION INSTALLATION DU RAIL INSTALACIÓN DEL RIEL A. Slide the header inside the header supports. A. Glisser le rail à l'intérieur des supports de rail. A. Deslizar el riel dentro de sus soportes. A B. Slide the cover on both header supports as shown. B. Glisser le couvercle sur les deux supports de rail comme montré. B. Deslizar la cubierta en los dos soportes de riel como se muestra.
10 Parts required: Pieces requis: Partes requeridas: 16 HEADER LEVELING MISE À NIVEAU DU RAIL NIVELACIÓN DEL RIEL A Leveling the header is critical to the proper functioning of the doors. La mise de niveau du rail est essentielle au bon fonctionnement des portes. Nivelar el riel es crítico para el buen funcionamiento de las puertas. A. Verify that the header is leveled. The bubble must be centered. A. Vérifier que le rail est de niveau. La bulle doit être centrée. A.
11 Parts required: Pieces requis: Partes requeridas: 21 x2 Ø⅛ HEADER FIXATION FIXATION DU RAIL FIJACIÓN DEL RIEL A. With a 1/8'' drill bit predrill the header using the middle hole on top of the brackets. A. Pré-percer le rail en utilisant un forêt de 1/8po dans le trou du milieu sur le dessus des supports. A. Perforar el riel usando una broca de 1/8'' en el orificio central en la parte superior de los soportes. A2 A1 Ø⅛ Ø⅛ B. Fasten the selftapping screw on each side of the track. B.
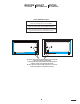
12 Parts required: Pieces requis: Partes requeridas: 4 x1 DOOR GUIDE INSTALLATION INSTALLATION DU GUIDE DE PORTE INSTALACIÓN DE LA GUÍA DE PUERTA A1 L A. Measure the distance between the shower wall and the return panel, divide that distance in two and mark it on the threshold. A. Mesurer la distance entre le mur de douche et le panneau de retour, diviser cette distance en deux et la marquer sur le seuil. A.
13 Parts required: Pieces requis: Partes requeridas: 15 x2 DOOR PANEL INSTALLATION PREPARATION PRÉPARATION À L'INSTALLATION DES PANNEAUX DE PORTE PREPARACIÓN DE LA INSTALACIÓN DE LOS PANELES DE PUERTA A1 A. Insert the wall jamb gasket in the wall jamb and the return panel gasket in the return panel, as shown. A2 A. Insérer le joint dans le montant mural et le joint du panneau de retour dans le panneau de retour, tel que montré. A.
14 Parts required: Pieces requis: Partes requeridas: 11 x2 DOOR PANEL INSTALLATION PREPARATION - CONTINUED PRÉPARATION À L'INSTALLATION DES PANNEAUX DE PORTE - SUITE PREPARACIÓN DE LA INSTALACIÓN DE LOS PANELES DE PUERTA - CONTINUACION A Outside Extérieur Exterior A. Install drip shields on doors as shown. A. Insérer les déflecteurs au bas des portes comme montré. A. Instalar los deflectores en la parte inferior de las puertas. B. Place one of the door panel inside the shower. B.
15 Parts required: Pieces requis: Partes requeridas: 8 7 18 x1 16 x1 x1 UPPER BUMPER INSTALLATION INSTALLATION DES PARES-CHOCS SUPÉRIEURS INSTALACIÓN DE LOS PARACHOQUES SUPERIORES A A. Temporarily place the bumper against the header support aligned with the top and mark the position of the hole as shown. A. Placer temporairement le pare-chocs contre le support de rail, alignez-les tel que montré et marquer la position du trou. A.
16 A two person installation is recommended. Parts required: Pieces requis: Partes requeridas: Une installation par deux personnes est recommandé x4 Se recomienda realizar la instalación entre dos personas. x4 DOOR PANEL INSTALLATION INSTALLATION DES PANNEAUX DE PORTE INSTALACIÓN DE LOS PANELES DE PUERTA A Install inside panel first. A. Engage the inside panel on the door guide as shown. Installer le panneau intérieur en premier. A.
17 Parts required: Pieces requis: Partes requeridas: 14 x4 DOOR PANEL LEVELING MISE À NIVEAU DES PANNEAUX DE PORTE NIVELACIÓN DE LOS PANELES DE PUERTA A. Adjust the excentric nut to level the doors, as shown. A. Ajuster l'écrou excentrique pour mettre de niveau les portes, tel que montré. A. Ajustar la tuerca excéntrica para nivelar las puertas como se muestra. A B B. Insert the screw covers in position, parallel to the panels as shown. B.
18 19 20 Parts required: Pieces requis: Partes requeridas: x1 x2 HANDLE AND GASKET INSTALLATION INSTALLATION DE LA POIGNÉE ET DES JOINTS D'ÉTANCHÉITÉ INSTALACIÓN DE LA MANIJA Y DE LAS JUNTAS DE ESTANQUEIDAD A1 A. Assemble the handles on the glass panels as shown. A. Assembler les poignées sur les portes. A2 A. Ensamblar las manijas sobre las puertas. A3 B. Insert door side gasket on the outside side of the outer panel, as shown. B.
19 APPLICATION OF THE SILICONE APPLICATION DU SILICONE APLICACIÓN DE LA SILICONA A. From outside the shower apply a bead of silicone along the wall jambs, the threshold on the base and on the side of the door guide as shown. A. De l'extérieur de la douche, appliquer un joint de silicone le long des montants muraux, le seuil à la base et sur le côté du guide de porte comme indiqué. A.
LIMITED WARRANTY GARANTIE LIMITÉE GARANTÍA LIMITADA MAAX Bath Inc. (hereafter “MAAX”) offers an express limited warranty on each of its products. This warranty extends only to the original owner/end-user for personal household use. For commercial uses, additional limitations apply. MAAX Bath Inc. (ci-après “MAAX”) offre une garantie limitée expresse sur chacun de ses produits. Cette garantie s’adresse uniquement au propriétaire/utilisateur original pour un usage personnel domestique.
Notes / Notes / Nota 31
www.maax.com Technical Services / Service technique / Servicio técnico T. 1 877 GET-MAAX (1 877 438-6229) F. 1 888 361-2045 www.maax.com © 2018 MAAX Bath Inc.