
Installation Guide

16
6
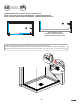
Parts required:
Pieces requis:
Partes requeridas:
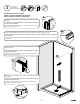
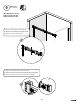
WALL JAMB INSTALLATION
INSTALLATION DU MONTANT MURAL
INSTALACIÓN DE LA JAMBA MURAL
6 7
x 1 x 3 x 3
A. Temporarily place the wall jamb in position.
A. Placer temporairement le montant mural en position.
A. Colocar temporalmente la jamba mural en su posición.
B
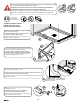
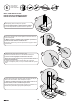
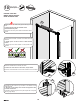
C. Drill the holes. Apply silicone inside the holes.
*Insert the wall anchors if there is no stud behind the wall jamb.
C. Percer les trous. Appliquer du silicone dans les trous.
*Insérer des ancrages muraux s'il n'y a pas de montants en bois à
l'arrière du montant mural.
C. Taladrar los agujeros. Aplique silicona dentro de los agujeros.
*Inserte los anclajes de pared, si no hay montantes detras de la jamba
mural.
B. Level the wall jams and mark the position of the each holes. Re-
move the wall jambs.
B. Mettre de niveau le montant mural et marquer la position de
chacun des trous. Retirez le montant du mur.
B. Nivelar la jamba mural y marcar la posición de los agujeros. Retire
la jamba mural.
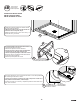
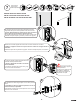
C1
C2
*C3
A
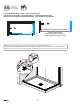
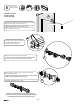
D. Place the wall jams back against the walls and fasten with the pro-
vided screws. At the bottom, screw wall jamb to bumper.
D. Placez le montant mural contre les murs et xer avec les vis
fournies. En bas, visser le montant aux pare-chocs.
D. Coloque la jamba mural contra la pared y sujetar con los tornillos sumi-
nistrados. En la parte inferior, jar la jamba al parachoques.
D2
D1
8