
Installation Guide


SAVE THESE
INSTALLATION INSTRUCTIONS FOR FUTURE REFERENCE
AND IN THE EVENT YOU NEED TO ORDER A REPLACEMENT PART
.
RECORD THE MODEL#___________________GLASS____________FINISH__________
FROM THE PRODUCT LABEL ON THE PACKAGE
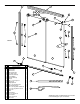
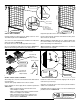
Installation
Instructions
Frameless Tub /
Shower Enclosure
Unpacking: Care should be taken when unpacking your Shower Enclosure. Place the Glass Panels in an upright, safe
location to avoid damage.
Cleaning: Never use scouring powder, pads or sharp instruments on metal work or Glass Panels. We recommend the use
of a squeegee after each shower to eliminate water spots on the inside of the Glass Panels. An occasional wiping down
of the Glass Panels and anodized aluminum parts with a mild detergent, diluted in water, is all that is needed to keep your
Shower Enclosure looking brand new.
CAREFULLY READ THE INSTALLATION INSTRUCTIONS BEFORE YOU START. THIS WILL ENABLE YOU TO
BECOME FAMILIAR WITH THE INSTALLATION SEQUENCES AND THE REQUIRED TOOLS.
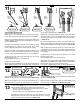
Tools Required - For installation of your Shower Enclosure, you will need the following tools:
Materials Required - For installation of your Shower Enclosure, you will need the following materials:
A - Masking tape.
B - Silicone sealant.
A - Safety glasses.
B - Measuring tape.
C - Pencil.
D - Hack saw (with 32 teeth per inch blade).
E - Miter Box or Square.
F - Level.
G - Electric Drill.
H - Center punch.
I - Drill Bit
1/8” (for installation on a fiberglass enclosures)
1/4” masonry (for installation on ceramic tiles or marble)
J - Power screwdriver
K - #2 phillips screwdriver
L - Caulking gun
K1064-0708E 5mm
IF YOU NEED REPLACEMENT PARTS OR HAVE INSTALLATION QUESTIONS,
PLEASE CALL OUR CUSTOMER SERVICE REPRESENTATIVES.
W
HEN CALLING FROM USA, CALL 800-355-5397
MONDAY - FRIDAY 8:30am - 4:00pm EASTERN TIME.
W
HEN CALLING FROM CANADA, CALL 888-304-4388
MONDAY - FRIDAY 8:00am - 5:00pm EASTERN TIME.
TUB / SHOWER ENCLOSURE