
Installation Guide


10
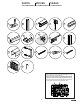
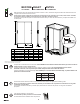
Parts required:
Pieces requises:
Partes requeridas:
3
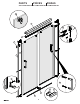
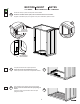
INNER HEADER INSTALLATION
INSTALLATION DU RAIL INTÉRIEUR
INSTALACIÓN DEL RIEL INTERIOR
X-13/16''
A
4
x 1
5
x 2
C
C
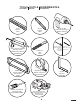
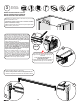
C. Insert a header retainer on each edge.
C. Insérer un dispositif de retenue à chaque bout du rail.
C. Insertar un dispositivo de retención en cada extremo del riel.
A. Measure the distance wall to wall at the top of the wall
jambs and substract 13/16".
A. Prendre la mesure de mur à mur en haut des montants
muraux et soustraire 13/16 po.
A. Medir la distancia de pared a pared en la parte superior de las
jambas murales y restar 13/16".
B. Take the measurement taken in step 3a and
mark it on the inner header. Insert the cutting jig and
align the slot in the middle with the mark on the hea-
der. Fasten the set screw to fix the jig while cutting.
NOTE: The set screw must be attach to the seg-
ment of the header that is going to be discarded.
Cut the header and remove jig.
B. Prenez la mesure prise à l'étape 3a et marquez-
la sur le rail intérieur. Insérez le gabarit de coupe
et alignez la fente au milieu avec la marque sur le
rail. Fixez la vis de xation pour xer le gabarit
tout en coupant. REMARQUE: La vis de pression
doit être xée au segment du rail qui va être jetté.
Couper le rail et retirer le gabarit.
B. Tome la medida tomada en el paso 3a y már-
quela en el riel interior. Inserte la plantilla de corte
y alinee la ranura en el medio con la marca en el
riel. Apriete el tornillo de jación para jar la plantilla
mientras corta. NOTA: El tornillo de jación debe
estar conectado al segmento del riel que se va a
descartar. Cortar el riel y quitar la plantilla.
B2
B3
x 1
18
-13/16"
The set screw must be attached to the
segment of the header that is going to be
discarded.
La vis de serrage doit être xée au
segment du rail à jetter.
El tornillo de jación debe estar conectado al
segmento del riel que se va a desechar.
B1