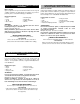
00567 / #8154 100568 / #8554 S N O A Q N 1 C F T 2 E/E1 D T R N B P INSTALLATION INSTRUCTIONS GUIDE D’INSTALLATION GUÍA DE INSTALACIÓN S E/E2 F K G L M K M G F F J I H See part list on next page Voir la liste des pièces à la page suivante Ver la lista de componentes a la pagína siguiente 10003149
# DESCRIPTION DESCRIPTION DESCRIPCIÓN A LEFT FIXED PANEL PANNEAU FIXE GAUCHE PANEL FIJO IZQUIERDO B RIGHT FIXED PANEL PANNEAU FIXE DROIT PANEL FIJO DERECHO C LEFT PIVOTING PANEL PANNEAU PIVOTANT GAUCHE PANEL PIVOTANTE IZQUIERDO D RIGHT PIVOTING PANEL PANNEAU PIVOTANT DROIT PANEL PIVOTANTE DERECHO E E1 E2 WALL JAMB LEFT WALL JAMB RIGHT WALL JAMB #8 X 1 1/4" (32 mm) SCREW PAN QUADREX SILL RIGHT BLOCK CENTRAL BLOCK LEFT BLOCK DOOR STOP FLAT HEAD SCREW #8-32 X 1/2" (13 mm) SET SCREW 8-32 X
PLEASE READ INSTRUCTIONS CAREFULLY BEFORE PROCEEDING POR FAVOR LEA CUIDADOSAMENTE LAS INSTRUCCIONNES ANTES DE PROCEDER Before starting Upon reception, check if your shower and shower door are in good condition and make sure that all parts are included. If you have a problem, please contact immediately your distributor. Antes de comenzar Cuando haya recibido su pedido, verifique si la cabina de ducha y la puerta están en buenas condiciones y asegúrese de que todas las piezas estén incluídas.
STEP 1 - WALL JAMBS INSTALLATION a) With a pencil, mark off a length of 2½" from the inside edge of the bathtub. Fig. 1.1. b) Align inside (flat edge) of wall jambs (E) with marks. The rounded edge must be facing the outside of bathtub wall. c) With a pencil, mark the location of the holes in wall jambs. d) Drill the side of the bathtub with a 1/8" bit. e) On each wall jamb (E), apply a bead of silicone on the wall jamb surface that will be in contact with the bathtub wall. Fig. 1.2.
STEP 3 - FIXED PANELS INSTALLATION (DOOR 100568) a) Remove the glass from the post of fixed panel. b) Insert the glass into the wall jamb. c) Align the ring (S) and the post. Then push it into the hole while inserting the glass into the slot. Fig. 3.1. d) Ensure that the finish ring (S) is flat against the bathtub ceiling. e) Repeat steps a) to d) with the other panel. FIG. 3.1 S A/B ÉTAPE 3 - INSTALLATION DES PANNEAUX FIXES (PORTE 100568) a) Enlevez le verre du poteau du panneau fixe.
STEP 5 - CENTRAL BLOCK INSTALLATION (I) a) Align central block (I) with the 2 drilled holes. b) Fasten central block (I) to the edge of the bathtub with #8 x 1¼" screws (F). Fig. 5.1. A I ÉTAPE 5 - INSTALLATION DU BLOC CENTRAL (I) B a) Alignez le bloc central (I) avec les 2 trous déjà percés. b) Fixez le bloc central (I) sur le rebord de la baignoire avec les vis #8 x 1¼" (32 mm) (F). Fig. 5.1.
STEP 7 - PIVOTING PANELS INSTALLATION IMPORTANT: Remove the red tubes located at the bottom of the pivoting panel and throw them out. a) Insert washer (S) around the pivot screw (pivot support assembly (Q). Fig. 7.1. b) Unscrew the pivot screw from the bottom pivot support assembly (R). Fig. 7.2. c) Maintain pivoting panel (D) parallel to fixed panel (B). Open the door completely. Position right hand pivoting panel (D) to insert the upper pivot screw into the panel hinge. Fig. 7.3.
STEP 8 - ADJUSTING HINGES a) Unscrew slightly (5 turns maximum - SEE *NOTE*) the hinge screws on fixed panels (A, B) to adjust the height of the waterproof joint at the bottom, until it is slightly compressed. Tighten upper screw. b) Repeat step a) with left panel. c) By pivoting from left to right the bottom hinges, adjust the pivoting panels (C, D) until the magnets are in full contact (Fig. 8). Tighten the hinge screws. Repeat the operation on the other side.
STEP 10 - SEALING a) Once door is in place, apply silicone on the outside of the door as shown in Fig. 10 and Fig. 10.1. Do not apply silicone on the inside of the shower, between the bottom rail and the shower base, or water will be trapped under the rail. b) ALLOW 24 HOURS FOR THE SILICONE TO SET BEFORE USING THE SHOWER. ÉTAPE 10 - SCELLEMENT a) Une fois la porte bien en place, appliquez de la silicone du côté extérieur de la porte tel qu’illustré aux Fig. 10 et Fig. 10.1.
LIMITED WARRANTY GARANTIE LIMITÉE GARANTÍA LIMITADA MAAX Inc. (hereafter “MAAX”) offers the following express limited warranty on each of its products. This warranty extends only to the original owner/end-user for personal household use. For commercial uses, additional limitations apply. MAAX Inc. (ci-après “MAAX”) offre la garantie limitée expresse suivante sur chacun de ses produits. Cette garantie s’adresse uniquement au propriétaire/utilisateur original pour un usage personnel domestique.
EXCEPT AS OTHERWISE PROVIDED ABOVE, MAAX MAKES NO WARRANTIES, EXPRESS OR IMPLIED, INCLUDING WARRANTIES OF MERCHANTABILITY AND FITNESS FOR A PARTICULAR PURPOSE OR COMPLIANCE WITH ANY CODE. In any case, MAAX cannot be liable for any amount over and above the purchase price paid for the product by the owner/end-user, contractor or builder.
Save this manual for future reference Conservez ce manuel pour usage ultérieur Conserve este manual como referencia HEAD OFFICE / SIÈGE SOCIAL MAAX Inc. 640 Cameron, Sainte-Marie Quebec G6E 1B2 Canada After Sales Service / Service Après-Vente / Servicio Posventa Tel.: 1 877 GET MAAX (1 877 438-6229) Fax: 1 866 819-1324 www.maax.com WESTERN CANADA WESTERN U.S.