USB2.0 Hi-Speed/ SATA II Enclosure for 3.
CONTENTS INTRODUCING USB2.0/SATA II ENCLOSURE About this Guide System Requirements Package Contents Safety Precautions 3 3 3 4 4 HARDWARE BASIC 6 HARDWARE INSTALLATION 7 SOFTWARE INSTALLATION FOR MAC SATA Connection for MacOS X 10.
Introducing SATA II/USB2.0 Enclosure Thank you for choosing the PHR-100SU aluminum SATA II/USB2.0 3.5" Hard Drive Enclosure. This is an aluminum enclosure which supports 3.5” SATA I or SATA II hard drive. It is simple to install and comes with all the parts you need to create an external SATA II/USB2.0 device. Based on SATA II, SATA I, USB2.0 and USB1.1 specifications the transfer rates are up to: SATA II - 3.0Gb/s SATA I - 1.5Gb/s USB2.0 - 480Mb/s USB1.
Package Contents The PHR-100SU aluminum SATA II/USB2.0 3.5" Hard Drive Enclosure package includes the following items: • • • • • The software CD contains the drivers and manual USB2.0 cable Serial ATA cable SATA II/USB2.0 3.5" Hard Drive Enclosure AC/DC Adapter Safety Precautions ON INSTALLATION 1. To reduce the risk of fire or electric shock, do not expose this product to rain, water or moisture. 2. Do not place any containers with liquids (drinking glass, flower vase, etc.
ON TRANSPORTATION Save the packing materials as you may need to repack and transport the unit at a later date. Always remove the disc before moving the unit. ON POWER SOURCES When you are not using the unit for a long time, disconnect the power cord from the unit. To unplug the AC power adapter from the wall outlet, grasp the adapter itself. Do not pull the cord.
Hardware Basic Precaution: Please make sure your hand is dry and remove static from your body by touching metal parts of your computer chassis.
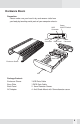
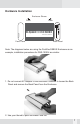
Hardware Installation Enclosure Sleeve Front Back Hi-Speed USB2.0/SATA II PHR-100SU for SATA Drive Front Panel Back Panel Note: The diagrams below are using the FireWire/USB2.0 Enclosure as an example, installation procedures for PHR-100SU are similar. 1. Do not connect AC Adapter to the enclosure. unscrew to loosen the Back Panel and remove the Back Panel from the Enclosure. 2. Use your thumb to push the Base Plate out.
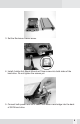
3. Set the Enclosure Sleeve aside. 4. Install 4 white Anti-Shock Mounts w/10mm screw into both sides of the hard drive. Do not tighten the screws yet. 5.
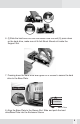
6. (1)Slide the hard drive into the front Base Plate first and (2) press down on the hard drive, make sure all 4 Anti-Shock Mounts sit inside the Support Slot. 7. Pressing down the hard drive and tighten all 4 screws to secure the hard drive to the Base Plate. Front Sleeve hard drive Base Plate 8. Align the Base Plate to the Sleeve Slot.
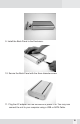
9. Install the Back Panel to the Enclosure.. 10. Secure the Back Panel with the 5mm diameter screw 11. Plug the AC adapter into the Enclosure to power it on. You may now connect the unit to your computer using a USB or SATA Cable.
Software Installation for Mac SATA Connection for MacOS X 10.2 and above At the time when this manual is written, none of Mac computers has built-in external SATA port accessible to connect PHR-100SU enclosure. In order to take advantage of high performance via SATA connection, current solution is to add a third-party Mac compatible SATA II or SATA I host controller adapter with external SATA port with “L” shaped key type.
It is important to note that different SATA host adapters handle the power sequence in different way. Some support all five power sequence modes, the other can only support Hot Boot. PHR-100SU supports all five power sequence modes. To find out what your SATA host adapter is capable of, please contact the manufacturer of SATA host adapter, or simply try all power sequence mode yourself.
Software Installation for PC SATA Connection for Windows 2000/XP/Server 2003 Some PC computers nowadays are equipped with external SATA ports for peripheral connectivity, or provide a SATA cable and bracket to route internal SATA port on motherboard to external port. Otherwise, to take advantage of high performance SATA connection, you need to add a third-party SATA II or SATA I host controller adapter with external SATA port the “L” shaped key type).
USB Connection for Windows 2000/XP/Server 2003 Plug the USB cable into any available port, Windows 2000, XP or Server 2003 will start installing the proper driver. Please follow the on-screen instruction to complete the driver installation. (You may need the Windows CD during this installation.) USB Connection for Windows 98SE Power on the USB2.0 Enclosure and plug the USB cable into your USB2.0 port. The “Add New Hardware Wizard” should automatically appear as shown above.
Select on the “Specify a location” option and type in “x:\PHR-100SU\DRIVERS” where “x” is the letter of the CD-ROM drive with the Drivers CD inserted or click on “Browse” to choose the corresponding driver folder in the CD. Then click “Next”. Windows will search the location and find the appropriate driver from the Drivers CD. Click “Next”. The window shown above indicates that the driver installation has been completed. Click “Finish” to end the installation.
Note: If you don’t see the new drive letter added in My Computer after driver is loaded properly, the reason could be the hard disk has no partition and format yet, please partition and format the drive in the enclosure before using it. Hard Drive Partition and Format procedures in PC: It is recommended to do the partition and format under “USB connection”. For Windows 98SE If a new hard disk icon dose not appear in “My Computer”, check device manager under system in the control panel.
For Windows 2000/XP/Server 2003 If you can see a new entry under Disk drives of Device Manager, you are ready to partition and format the drive. Please open Control panel, “Administrative Tools” and “Computer management”, click on “Disk Management”. Follow the on-screen instruction to continue, make sure to select the unallocated (newly added) disk to partition and format.
It is worthwhile to mention a new type of SATA receptacle and plug(without “L” shaped key), called eSATA for external SATA connectivity. If you have an eSATA port, you need to purchase a SATA-to-eSATA cable in order to use PHR-100SU in SATA connection. Q2.
Q3. How is SATA compared to USB and Firewire in speed? What performance gain can one expect by using SATA connection? A3: Following chart shows the specification data rate(MBps) and Overhead among USB, Firewire and SATA. Next table compares real world benchmark between USB, Firewire and SATA drives: USB 1394 Serial Raw Interface speed 480Mbps 400Mbps 1500Mbps Benchmark comparison 64K read 31.6MB/sec 34.8MB/sec 42.4MB/sec Benchmark comparison 64K write 26.5MB/sec 26.7MB/sec 56.