Mobile Wi-Fi Hard Drive User’s Manual www.macally.
Macally Product Information Warranty Macally Peripherals warrant that this product is free from defect in materials and manufacturing workmanship for the period of One (1) Year from the date of purchase. If the product is found to be defective, as your sole remedy and as the manufacturer's only obligation, Macally will repair or replace the product.
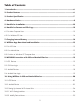
Table of Contents 1. Introduction ..............................................................................................................6 2. Product Features ...................................................................................................... 6 3. Product Specification ................................................................................................7 4. Hardware Basics ………………………………………………………..............…………………....8 5. Hard Drive Installation ........................
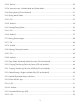
10.3.3. Security ....................................................................................................................................................25 10.3.4. Internet Access - Wireless Mode and Wired Mode............................................................................26 10.4. Playing Music (iOS and Android) ............................................................................................................31 10.5. Playing Movie/Video ....................................
10.15.2. Android ...................................................................................................................................................53 11. WIFIHDD Connection with Windows PC and Mac ...................................................54 11.1. Wireless LAN Connection with PC ............................................................................................................54 11.1.1. WiFiStor for Windows...................................................................
12.7.4. Internet Settings ........................................................................................................................................69 12.8. Network Services .......................................................................................................................................70 12.8.1. Windows Sharing Services ....................................................................................................................71 12.9. System Settings ............
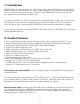
1. Introduction WIFIHDD allows to wirelessly access your videos, music, photos, data and stream it to your iPad, iPhone, tablets, smartphones, and notebooks - no cords or cables to tangle. With the internal hard drive storage, there is no need to worry about running out of space on your mobile devices and the built-in USB 3.0 port makes the file transfer easier and much faster. For maximum portability, the Wi-Fi Disk has a built-in rechargeable battery.
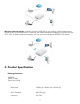
Wireless internet mode: wirelessly connecting WIFIHDD to your existing wireless router to have internet access as illustrated below. Connecting your tablet/smartphone/computer to WIFIHDD through Wi-Fi, then on tablet/smartphone/computer you can access the storage of WIFIHDD and internet. 3. Product Specification Package Contents: WIFIHDD USB 3.0 cable Dimensions: 130mm (L) X 82mm (W) X 25mm (H) Wi-Fi Standard: 802.
Speed: 72Mbps at 20MHz 150Mbps at 40MHz Network Interface: USB Interface: 100Mbps Ethernet RJ45 Micro USB 3.0, for data transfer and charging Battery Capacity: 3000mAh Operating temperature: The normal operating temperature of the device is between 5 and 35 Degrees Celsius. Internet Connection PC Operating System Requirements Windows: XP/Vista/Windows 7/Windows 8 Mac: OS X 10.6.0 and later PC Web Browser Windows: Supports Internet Explorer 7.0 and higher version Mac: Supports Safari 3.
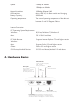
RJ45 Ethernet Port Use optional RJ45 cable to link WIFIHDD to another router/switch to connect WIFIHDD to the internet. This is very handy or sometime the only internet option in hotel room etc. Micro USB 3.0 Port The built-in Micro USB 3.0 is for faster data transfer and charging the internal battery when connected directly into the computer’s USB port or wall chargers. This works only under Power Off mode.
Solid Light: Stand-by Connected into USB 2.0 Port Flashing: Read/Write activities Blue LED: Solid Light: Connected into USB 3.0 computer Flashing: Read/Write activities Wi-Fi LED: Blue Color: Flashing: Starts the Initialization process Solid Light: Initialization process completed Ready to use LED Off: The device is switched off Internet LED: No LED: No connection established 5. Hard Drive Installation Note: If the WIFIHDD comes with a pre-installed hard disk drive, please go to Section 6.
5.2 Note: Carefully read and follow the manufacturer's instructions on how to properly handle the hard drive to avoid electrical shock. Electrical shock can cause damage to the hard drive. drive with the holes on the metal tray. Use the four screws and the shock mounts to secure the hard drive in place.
5.3 After securing the hard drive into the metal tray, place the hard drive on an angle and align it care fully into the SATA connector on the enclosure circuit board. Push the hard drive all the way in to secure it in place. Make sure the hard drive is properly seated on the mounting slots as seen on the image below. 5.4 Make sure the WIFIHDD is powered off. Connect the WIFIHDD into any available USB Port on your Mac or PC. Follow the steps under Section 6. Hard Drive Format and File Copy.
Note: You must power off the WIFIHDD prior to connecting it into a computer. For the first time use, you must connect the WIFIHDD into any available USB Port on your computer to format the hard drive to work with the OS in your computer. For Apple or Mac computers, see Section 6.1. For PC, see Section 6.2. USB 3.0 Cable(included) Power Off 6.1.
6.2. For Windows PC user: Note: If the WIFIHDD comes with a 2.5” hard drive pre-installed, it should contain a NTFS format and mount in My Computer automatically. You may skip formatting steps below, proceed to create folders and copy multimedia files into the WIFIHDD. Connect WIFIHDD (status: Power Off) to a Windows XP/Vista/7/8 Computer using the included USB cable. select the new disk volume, click Action from Menu bar, select All Tasks, choose Format and select NTFS format to proceed.
you can turn Wi-Fi drive on and use it. When the battery is fully charged, the battery LED turns off, you can keep the Wi-Fi drive connected to charger, or remove it to take it on the go. USB 3.0 Cable(included) USB Charger or Computer 8. WiFiStor App Download and Installation devices. For computer users, client applications “WiFiStor for Mac” and “WiFiStor for Windows” are available to download in Macally website.
3. Click on Wi-Fi. Inside the Wi-Fi Networks, WIFIHDD-XXXX should appear on the list. Click on the WIFIHDD-XXXX Enter the password (default: 12345678) Once the WIFIHDD-XXXX is selected, a check mark will appear before the SSID and the Wi-Fi logo will appear after the device name on the top left of the display. 9.2.
1. Click on the WiFiStor icon to launch the app as seen on the image. 2. Enter the Admin password that you assigned during the configuration process (blank by default). The password is only required during the first login. The device remembers the password and there is no need to enter it again the second time you login. 3. Once the password has been entered correctly, you will be automatically connected into the WIFHDD.
9.3. Android Devices 1. Turn-on the WIFIHDD. Wait for a few minutes to complete the initialization process. The blue Wi-Fi LED on the device should remain solid indicating that the initialization process has been completed. 2. Click on the “Settings” icon on your desktop as seen on the screenshot.
3. Switch the Wi-Fi to ON position. Inside the Wi-Fi networks, the WIFIHDD-XXXX should appear on the list. Click on the WIFIHDD-XXXX and enter your password (default: 12345678). 4. The word “Connected” will appear under the SSID name of which is an indication that the Android Device is connected to the WIFIHDD. 9.4. Android User Login 1. Click on the WiFiStor icon to launch the app as seen on the image below. 2. Enter the Admin password that you assigned during the configuration process (default: blank).
3. Once the password has been entered correctly, you will be automatically connected into the WiFiStor menu. 10. Using WiFiStor in iOS and Android Devices 10.1. iOS Device Once you have successfully connected to the WIFIHDD, by default, you will be inside the WiFiStor menu. “My Device” is the iOS device that you are using to access the “WIFIHDD”. Few buttons that can be found inside the Main Screen as listed below.
My Device Main Screen View - By default, the Documents folder, Music folder, Photos Folder, Movies folder and iPhone Photos folder are available to easily organize your files inside the My Device.
Home Button - back to the main screen. View Button - change to List or Thumbnail view. Settings Button - change the WIFIHDD configuration. Back Button - back to previous screen Manage Button - to choose one or more files My WiFiDisk - the WIFIHDD Storage My Device - the device that you are using to access the WIFIHDD or the Local Storage, e.g. iPad/iPhone/iPod touch Status Button - to view the Transfer status list, About information, and now playing music 10.2.
My Device Main Screen View - By default, the Documents folder, Music folder, Photos Folder, Videos folder and SDCard folder are available to easily organize your files inside the My Device.
Home Button - back to the main screen. View Button - change to List or Thumbnail view. Settings Button - change the “WIFIHDD” configuration. Back Button - back to previous screen Manage Button - to choose one or more files “ My WifiDisk”- the WIFIHDD Storage My Device - the Android device that you are using to access the WIFIHDD or the Local Storage Status Button -to view the Transfer status list, About information, now playing music and exit the app 10.3. Setting Up Internet Wi-Fi Access Point 10.
10.3.2. Modify Device Name Please press on icon to modify the device name if you want to change Wi-Fi network name. After input the new device name, the “Set” button appears, click on the “Set” button to save the new device name. 10.3.3. Security Under WiFi HDD Settings the security options appear. The Wi-Fi Disk supports the following security modes: None、WPA-PSK、WPA2-PSK、Mixed WPA/WPA2-PSK.
10.3.4. Internet Access – Wireless mode and Wired mode As described in Section 2. Product Features, although your phone/tablet/computer connect to WIFIHDD for streaming wirelessly, they are also allowed to keep internet access simultaneously utilizing WIFIHDD’s internet pass-through capability. WIFIHDD must be set up to use your existing Wi-Fi internet Access Point (wireless mode), or connect to your internet router/network hub with a RJ-45 cable(wired mode). Open WiFiStor, tap “Settings” icon.
Wireless Access Mode After selecting Wireless Access mode, all available Wi-Fi Network would be listed. Select your previously used network Access Point and input correct password, then tap on “Join” button. Once a check mark appears in front of the selected Wi-Fi Network, it indicates Wi-Fi Access Point to internet is set up successfully. WIFIHDD internet pass-through set up is completed, Internet LED on WIFIHDD will light up green, user may test internet connection via iOS or Android web browser.
In WiFiStor, tap “Wireless Access” under Internt Settings to display Wired Access option. Tap to select “Wired Access” and then “Set” to finish “Wired Access” selection.
Click OK to confirm change and return to main screen of WiFiStor. Next, user needs to manually restart WIFIHDD by turning off WIFIHDD and turning power back on. Please note, during WIFIHDD restart, your phone or tablet will probably switch to other Wi-Fi Network automatically. After WIFIHDD is fully restarted, user needs to change Wi-Fi network back to WIFIHDD in phone or tablet. Then launch WiFiStor again, go to main screen, select Settings, “Wired Access” should be displayed under Internet Settings.
LED on WIFIHDD will light up green, user may test internet connection via iOS or Android web browser. If DHCP is not available, user may manually input IP settings by tapping “Static” and input a correct IP Click “Set” button and then click “Back”, user may see the screen as below again.
Press “OK” button to return to WiFiStor Main Menu page. Please power off WIFIHDD and power it back on for the static network settings to become in effect, WIFIHDD internet pass-through set up is completed, Internet LED on WIFIHDD will light up green. Due to WIFIHDD power off and back on, user’s phone or tablet will probably switch to other Wi-Fi Network automatically. User needs to change Wi-Fi Network back to WIFIHDD in phone or tablet, then test internet connection via iOS or Android web browser. 10.4.
Note: Please consult your device manual to check whether it will support the music/audio files that you would like to play. -When clicked it will play the previous music - When clicked, it will play the next song. -When clicked, it will start playing the music or audio file. Click again, the will pause/stop playing the music. -When clicked, it will exit the music player interface. (for android device and iPhone) Five play modes: a. -Play current song: the music ends after playing current song b.
“WIFIHDD” for ease of use and file organization. The movie or video files can be played regardless if you are inside the ““My WiFiDisk” or “My Device”. Simply locate the movie or video file that you would like to play. Click on the file and your movie will automatically play as seen on the screenshot below. Note: Please consult your device manual to check whether it will support the movie or video files that you would like to play. By default, the video playback is in the landscape mode.
7. -When clicked, it will start playing or resume playing the movie. 8. -When clicked, it will pause the movie from playing. 10.5.2. Android Tip: It is highly recommended to create a folder or folders where to copy all your movie files into the WIFIHDD for ease of use and file organization. The movie or video files can be played regardless if you are inside the “My WiFi Disk” or “My Device”. Simply locate the movie or video file that you would like to play.
The supported images can be viewed as thumbnails or as a list as seen on the screenshot below. Any images that are not supported can be viewed as a generic thumbnail or icon. Click on any pictures or images and it will automatically play. Afterwards the menu bar shall appear as shown on the picture below.
There are few functions available to control the slideshow. You can swipe your finger across the screen to manually view the pictures or images or click the button, to automatically play the slideshow. . Background music can be added while playing the slideshow. Click the screenshot below. button as seen on the search and locate the file or files that you would like to play as the background music. Click on the to return to the slideshow as seen on the screenshot below.
By default, this option is switched-off. 10.6.2. Android Tip: It is highly recommended to create a folder or folders where to copy all your pictures into the WIFIHDD for simply use and file organization. Note: Please consult your device manual to check whether it will support the photo files that you would like to play. The supported images can be viewed as thumbnails or as a list as seen on the screenshot below. Any images that are not supported can be viewed as a generic thumbnail or icon.
Thumbnail view List view There are a few functions that are available to control the slideshow. You can swipe your index finger across the screen to manually view the pictures or images or click the button, to automatically play the slideshow.
Background music can be added while playing the slideshow. Click the screenshot below. Click on the button as seen on the to return to the slideshow as seen on the screenshot below.
By default, this option is switched-off. 10.7. Sharing photos 10.7.1. iOS There are a few options to share photos/image to your friends and family; by email, saving to the device Photo Album and upload to Facebook. Note: Internet connection is required to share photos/images via email or accessing any social media network. Click on the button located at the top right of the screen to show the three options available to share your photos/images. Click the button to return from the previous screen.
2)Add to photo - when selected, the selected photo/image will be saved into the Photo Album of the device. 3)Upload to Facebook - when selected, you will be directed to the Facebook login screen. The Face book app must be installed on your device. Facebook login and password is required. 10.7.2. Android Sharing photos/images using your Android device will vary depending on the apps installed on your device.
Click the button to return from the previous screen or to exit. Click the button located at the top right of the screen to show the 2 options available to share your photos/images. 1) Share button- when selected, a list of app installed on your Android will appear as seen on the screenshot below. You may select from the list which app to launch. 2) Save Photo button - when selected, the selected photo/image will be saved into the device Photo 10.8. Opening/viewing documents 10.8.1.
To open or view any documents, simply click on the file. This will automatically open the supported file. Click the button to return from the previous screen or click the via email as seen on the screenshot below.
Note: Internet connection is required to send emails. Click the “E-Mail” button, the default email app will launch automatically and the selected document will be sent as an attachment. Once the email is sent, there will be a message “Email sent successfully.” located in the center - of the screen. This is an indication that the email was sent successfully. 10.8.2. Android To open/view a document using your Android device, simply click on the file that you wish to open/view.
To open/view a document using your Android device, simply click on the file that you wish to open/view. This will automatically open the file using the default viewer or the installed app on your Android device as seen on the screenshot. Note: Internet connection is required to send emails. 10.9. Copy, Delete, Download, Upload functions You may click on the button at any time to share, delete, download, and upload files. As seen on the screenshots below, the clicked.
At the bottom of the screen, there are new icons. See below for their functions. - Click once, all the files will be selected. The icon will turn into yellow color and a check mark will appear on every file. - Click once again, all the files will be unselected. The check marks are invisible. Tip: You may select a single or multiple files by clicking on the thumbnail.
Once you get connected into the WiFiStor, you can copy/transfer a single or multiple files into the local storage (My Device). 1. Click on . 2. Use your index finger to select one or more files. You may use the copied / transferred. 3. Click on to select all files to be . 4. Select the folder where you want the files to be copied or transferred. click on the “Create Folder” button.
button as seen on the screenshot below. The folder name can be minimum 1 character in length and maximum of 26 characters. Click the “Cancel” button to exit. 5. Click on the “Confirm” button to start copying/transferring files as seen on the screenshot below. Note: Successfully copied/transferred files will be listed below inside the “Successful Transfers” window as seen on the left screenshot. Click on the “Clear” button to remove or clear the list. 6.
1. Click on . 2. Use your index finger to select one or more files. You may use the copied/transferred. 3. Click on to select all files to be . 4. Select the folder where you want the files to be copied or transferred. click on the “New Folder” button. Enter the new folder name inside the box and click the “Create” button as seen on the screenshot below. The folder name can be minimum 1 character in length and maximum of 26 characters. Click the “Cancel” button to exit.
5. Click on the “Confirm” button to start copying/transferring files as seen on the screenshot below into the WIFIHDD. 6. Click anywhere on the screen or “x” button, you will return to the previous screen. Once done, click on the to exit. 10.12. Delete/erasing a single or multiple files One or more files can be easy deleted/erased whether you are in “My Device” or in “ My WiFiDisk” 1. To delete files, click on the .
2. Use your index finger to select a single or multiple files. You may click on the files to delete/erase. 3. Click on the to select all to delete or erase the selected file or files. A warning message will appear on the screen to confirm file deletion as seen on the screenshot below. Click OK to continue deleting files. 10.13.
10.14.2. Android To exit from using the WiFiStor App Android mobile devices, simply click on the and select the “Exit” button. A warning “Are you sure you want to exit this applet ?” message will appear. Click “OK” to continue or existing click “Cancel”. 10.15. Uninstall WiFiStor App 10.15.1. iOS To uninstall the app from your Apple Mobile Devices, click and hold the WiFiStor app for few seconds. An “X” mark will appear on all the icons on your mobile device as seen on the screenshot.
10.15.2. Android To uninstall the WiFiStor app from your Android mobile devices, see the instructions below. Note: Uninstalling app on the Android devices will vary. Please consult your mobile device manual prior to removing any application. 1. Click on the Settings icon from your desktop. 3. Locate and select the WiFiStor app. 4. Click on the “Uninstall” button. 5. A warning appears: WiFiStor This application will be uninstalled.
11. WIFIHDD Connection with Windows PC and Mac 11.1. Wireless LAN connection with PC Switch-on WIFIHDD by pressing the power button at the front panel. Wait for few minutes until the Wireless LED stops blinking. Enable the Wi-Fi feature on your PC and open the Wireless Network Connection. Select the WiFiHDD wireless connection (default wireless SSID: WIFIHDD-XXXX and password: 12345678). Note: For your own safety, please change your password after successful connection.
If you do not find the WIFIHDD on the list of devices connected in your network, click on the “Refresh” button to update the device list. Select the WIFIHDD on the list, and then click on the “Log In” button to enter the web Interface. 11.1.2. My Storage Click “My Storage” button. The above shown window will appear. After input the correctl user name (admin) and password (blank by default), you may access the WIFIHDD. For your own safety, please change the password after successful connection.
11.2. Wireless LAN connection with Mac Switch-on the WIFIHDD by pressing the power button at the front panel. Wait for few minutes until the Wireless LED stops flashing. Enable the Wi-Fi feature on your Mac and open the WIFIHDD wireless Network Connection. Select the WIFIHDD wireless connection (Mac default wireless SSID: WIFI-XXXX and password: 12345678).
11.2.2. My Storage Select WiFiStor for Mac and click “My Storage” button. A pop-up window appears. After input the correctly user name (admin) and password (blank by default), you may access the WiFiHDD by samba. You may operate all files and directories on WIFIHDD by samba, such as: create, edit, delete, copy, move, rename. Furthermore you can transfer the data between Mac and the WIFIHDD, such as upload the data from Mac into the WIFIHDD, or download the data from the WIFIHDD into Mac. 11.3.
Click on the “Log In” button to access the Web Management Interface. Startup Wizard During the initial setup, our Wizard will automatically run and will guide you through the step-by-step process on configuring the WiFiDisk as seen on the screenshot above. You may cancel this process by clicking on the “X” at the top right corner of the window. If you cancel the Wizard, it will keep the factory default settings of your WIFIHDD. Click on the “Next” button to continue.
You can choose between two available Internet Access options- By default Wired Access is selected (as you can see on the picture). A. Wireless Access: Connecting the WIFIHDD to another wireless network to have internet access. B. Wired Access: Directly connecting the WIFIHDD to the available port on the back of the router to connect to another network. Selecting Wired Access By selecting Wired Access, the Dynamic IP is selected as the default setting.
: allowable SSID length. The default setting is set to Auto. There are 13 channels available to choose from. : (802.10b), 54Mbps (802.10g) and 150Mbps (802.10n). The None, WPA-PSK, WPA2-PSK, Mixed WPA/WPA2-PSK (default) are available. : Minimum 8 (Maximum 63) characters. : The default IP address is set to 10.10.10.254 with subnet mask of 255.255.255.0. The IP address can be changed. Click on the “Next” button to change the admin default password.
12. Using WiFiStor in Windows PC and Mac Our built-in Web Management software is a unique web-based utility stored inside our WIFIHDD product. No software is needed to install on your Personal Computer to use this utility. Simply launch our “WiFiStor for Mac” or WiFiStor for Windows, or open your web browser and enter the default 10.10.10.254 IP address. Available sub menus: Allows the user to change the admin password. Provides information of the internal hard disk drive.
Refresh button - to refresh the display. Upload button - to upload file or files into a specific folder. Create Folder - to create a new folder. Maximum folder name is 26 characters in length. Copy button - to copy file or files and paste them into another folder. Move button - to move a file or files from one location to another. Open / Download button - to open or download a file or files into a specific location.
2. On the folder level, you can right-click using your mouse and a pop-up menu will appear. You may Open, Copy, Cut, Delete or Rename the folder as seen on the screenshot below. 3. Selecting multiple files and right-click on the mouse will allow the user to either Copy, Cut or Delete files as seen on the screenshot below. 4. Right-clicking at the bottom of the window as seen below will allow the user to either Paste, Create or Upload file or files.
Function Overview: - Open Command: Select a folder and right-click. Inside the pop-up menu, select “Open” to view the contents or open the folder. - Copy Command: Select a folder or a file and then right-click. Inside the pop-up menu, select “Copy” to make a copy of the entire folder or a file and paste into another location or folder. - Cut Command: Select multiple files or folders and then right-click. Inside the pop-up menu, select “Cut” and then paste the files or folders into another folder.
and Delete Key. 12.4. Drag and Drop A single file drag and drop is supported by our built-in Web Management Interface, simply click and hold on the file inside the main window and drag it to any folders available inside the Folders tree. 12.5. Information Provides detail information regarding the hardware condition, network status and storage information. 12.5.1. Device Information Information about CPU, Model and Hostname 12.5.2.
12.5.3. Network Information IP address, gateway etc. 12.6. Settings 12.6.1. User Settings Click on the “User” thumbnail. This window will allow you to modify the admin password as seen on the screenshot below. The password should be at minimum of 5 characters to maximum 32 characters in length. Click on the “Save” button the password has been changed. The default User Name is admin and the password is blank by default. Click on the “X” to cancel and exit. 12.6.2.
As seen on the screenshot below, the Volume screen provides information regarding the File System used to format the internal hard disk drive, total and available capacity. Click on the “X” to exit. 12.7. Network Settings 12.7.1. Host Name The Hostname is a name that is assigned to a device connected to a computer network. It must begin with a letter and followed by a combination of letters and numbers. Length must be between 2 and 8 characters.
Click on the “Save” button to confirm changes. Click on the “X” to exit and cancel. 12.7.2. Wi-Fi & LAN The settings inside the Wi-Fi & LAN can be modified based on your needs. See the screenshot below for the available options. : : acters. Type-in the combination of letters and numbers only. 32 characters is the maximum allowable SSID length The default setting is set to Auto. There are 13 available channels to choose from. (802.11b), 54Mbps (802.11g), and 150Mbps (802.11n).
12.7.3. DHCP Server The DHCP or Dynamic Host Configuration Protocol is a network protocol that allows a server to automatically assign an IP address to a computer connected into a network. By default, the DHCP Server option is enabled. This option can be disabled if needed and the IP address can be manually assigned. Click the “Save” button after making any changes. Click on the “X” to exit and cancel.
…through another connection with an available network You can choose between 2 available Internet Access options. By default Wired Access is selected. A. Wireless Access: Connecting the WIFIHDD to another wireless network to have internet access. B. Wired Access: Directly connecting the WIFIHDD to the available port on the back of the router to connect to another network. Selecting Wired Access By selecting Wired Access, the Dynamic IP is selected as the default setting.
12.8.1. Windows Sharing Services Data sharing and accessing the WIFIHDD makes it simple by enabling the Samba Service. By default, this feature is already enabled as see on the screenshot below. 12.9. System Settings 12.9.1. Time Settings The time settings can be changed based on your current time-zone. You can choose to synchronize time with the Internet or the time on your PC.
12.9.2. Backup Settings Creating a backup as seen on the screenshot below can save the WIFIHDD system configuration. Please note that this process will not create a backup of the WIFIHDD. Simply click on the “Save” button to create the backup. This process will create a .bin.gz or. bin file of which can be used to restore the current settings of the WIFIHDD. Click the “Save” button to save the backup file on your computer as seen on the screenshot below.
To restore the backup, click the folder icon. Locate and select the .bin or .bin.gz file. The backup file will appear below the folder as seen on the screenshot below. Click default the “Save” button to restore. A warning message will appear as seen on the screenshot below. The device will reboot automatically once the restore process has been completed and will return to login screen. 12.9.3. Firmware Upgrade The device firmware can be upgraded by following the simple steps below.
1. Download and save the latest firmware version on your computer. 2. Click on the folder icon, search and locate the firmware file on your computer and then click on the “Open” button as seen on the screenshot below. 3. The latest firmware update file will appear at the bottom of the folder. Click on the “Save” button to continue updating the firmware. Note: If you select wrong file format to upgrade, there is a warning message ap peared.
12.9.4. Resetting to factory defaults Resetting to factory defaults will reset all your customized settings or whatever changes you made back to its original settings. Simply click on the round button after the “Restore to Factory Default Settings”. Click on the “Save” button to continue. The Warning Message window will appear. The WIFIHDD will automatically reboot once the restoring to the factory default settings have been completed. See the screenshot below.