Model T2810C Instruction Manual Congratulations on purchasing your Trio Personal Media Player! To get the most out of your purchase, please take the time to carefully read through this manual. Foreword If any problems occur during while using your Trio, please feel free to contact Mach Speed technical support at 580-272-0035, or sending an email to mssupport@machspeed.com.
Information in the manual is subject to change without notice and is subject to copyright protection. Copying or otherwise reproducing this material without prior written consent is prohibited. Due to Firmware changes, some of the pictures and functions described in this manual may not be the same as are included with your player. Do not dispose of this product in Fire. Batteries inside this Product may explode or leak.
Connect the equipment to an outlet on a circuit different from that to which the receiver is connected. Consult the dealer or an experienced radio/TV technician for help. Caution • • • • • • • • • • Do not use the player in exceptionally cold or hot, dusty, damp or dry environments. Do not drop, strike, or throw your player. Physical damage to your player will void ALL warranties.
Basic Operations Powering ON To power the player on, press and hold the silver button on the front of the device for 5 seconds. Powering OFF To power the player off, press and hold the silver button on the front of the device for 5 seconds. You will get a message which states “double tap to power off”. Tap this message twice to power down Charging the Player To charge the player, simply connect it to a powered USB port, or external AC adapter.
Inserting: Ensure that the player is powered off, and disconnected from the computer. Hold the Micro SD card face up (side with words aligned in the opposite direction of the display screen), and slide the card into the socket on the player, slightly past flush. When you hear the card click into place, you can access the card. Removing: Ensure that the player is powered off, and push the SD card just past flush. When you hear the click, release pressure, and the card will slide out.
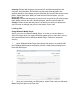
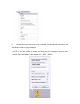
3. Drag your music to the sync list (on the right of the screen) from the list on the left. Once you have selected the music you wish to add to the player, press Sync. 4. Windows Media player will load the songs on to your player.
5. Once all the songs you have added are synced to the unit, and Windows Media Player says that is safe to disconnect your MP3 player, disconnect the device. COPY AND PASTE Note- This alternate method is used to load videos, pictures, and ebook files as well as audio files 1. Connect the MP3 player to a working USB port.
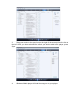
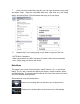
2. When the unit is connected to your computer, it will create a gray and green icon in the system tray (lower right hand corner of your desktop). The icon will be called safely remove hardware. 3. Go to the “My Computer” section of your computer. In there you will find a section called “devices with removable storage” 4. Locate the drive created by the unit, generally just called Removable Disk, with a letter in Parenthesis. Drive letters vary depending on your system configuration. 5.
6. Locate the music stored on your computer. Generally this is stored in the “My Music” folder of your computer. NOTE: if you are unable to locate the music on your computer, click on start, search, files and folders, then search for “*.MP3, *.WMA”.
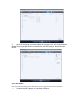
7. Once you have located the song files, you can right click on the song itself, and select “copy”. Open the removable disk drive, right click on in the empty space, and select Paste. This will transfer the song on to your player. 8. Repeat step 7 for as many songs as you want to copy on to the unit. NOTE: MAC Computers When connected to your MAC computer, the device will act as a removable drive. Simply drag your files to the device.
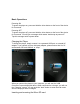
Delete icon- touching this icon will delete the currently selected file or folder Date and time- this is generally displayed in the upper left hand corner of the screen and is set in the “system settings” mode Battery Indicator- this is generally located in the upper right hand corner of the screen, and indicates how “full” the battery is Touching one of the mode icons on the main menu will enter that mode. Music Mode The Music mode is a catch all audio playback mode.
Icon explanation (from top to bottom) File count- displays the number of the file you are on and the total number of files. Playmode icon- allows you to adjust your playmode. Chose from play all, play by rating, play one, repeat one, and repeat all Shuffle icon- Allows you to select your shuffle mode. Choose from Shuffle or Play in order Equalizer setting- this will allow you to select from one of several equalizer presets, or a user defined preset.
Volume bar- you can drag the slider forward or backward to increase or decrease the volume. Previous and Next icons- located next to the Play button, touching these icons will skip the previous or next file. Play/Pause icon- when you enter the music mode, your song will begin playing automatically. Tap this icon to pause or resume playback. Music Menu There are several icons at the bottom of the screen which are your menu icons. Browser- this will allow you to select files using one of several options. A.
Video Mode Video mode will allow you to watch your movie and video files loaded on the player. • Note- this player will playback files which are in AVI (XVID), WMV (non encrypted), and FLV formats. If you are having a hard time viewing your video files, please convert them using the AVI conversion tool included with the player. Icon Explanation (Left to right) Browse- this will allow you to select files using one of several options. A. Main Dir- select files loaded on the player’s memory B.
Play- when you enter video mode, the player will automatically begin playing your file, and you will see the play icon displayed. If you touch this icon, it will pause the file and the icon will change to the Pause icon. Tap it again to resume playback. Volume- touch this icon to change the progress bar to a volume adjustment bar. Drag the slider left or right to decrease or increase the volume.
When you enter photo mode, you will see a list of thumbnail images to browse through. Tap one of the thumbnails to view the image. Tapping the “List” icon will change your view from thumbnails to a simple list of files. Icon explanation (Left to right) Slideshow- tap this icon to alternate from manual image viewing to slideshow mode.
Browse- this will allow you to select files using one of several options. A. Main Dir- select files loaded on the player’s memory B. Card Dir- select files loaded on the SD card Slideshow timer- set the time that an image is displayed before changing to the next in slideshow mode. Previous and Next icons- touching these icons will skip the previous or next file.
When you enter eBook mode, a list of text files are displayed, and you can tap the one you wish to view. Icon Explanation (Top, Left to right) Slideshow- tap this icon to alternate from manual image viewing to slideshow mode.
Slideshow timer- set the time that a page is displayed before changing to the next in slideshow mode. Bookmark- allows you to set a bookmark on your current file, or to recall a bookmark you have previously set. Skip to- select this item to skip ahead in the current eBook file. Icon Explanation Continued (Bottom, Left to right) Browser- this will allow you to select files using one of several options. A. Main Dir- select files loaded on the player’s memory B.
Camera Interface 1. Desktop- Return to the Main Menu. 2. Self-timer- off, 5 sec, 15 sec, 20 sec. Default is off. 3. Space- Shows the remaining number of pictures you can take in your current settings, until the memory is full.
4. Swap- Swap between Camera and video recorder mode. 5. Picture Mode- Takes you to picture mode, and allows you to browse pictures you have taken. 6. Settings- Allows you to adjust the settings, including Special effects such as lens filters, File save path, Whether there is a shutter sound, and whether you wish to have a date stamp added to your photos. 7. Resolution- Allows you to adjust the resolution of pictures you take.Options are1280x960, 1024x768, 640x480, 320x240.Default is 1280x960. 8.
PC Camera When the Player is powered on, select PC camera, and connect the device to your computer’s USB port. Your computer will run a setup and install the device as a PC camera, which will allow you to use the device as a webcam. Explorer When you select the Explorer option in the main menu, all of the compatible files you have loaded on the player will be displayed in a standard folder structure. You can access or delete the files of your choice in this mode.
Applications The Applications item on the main menu allows you to access one of several “extra” applications on the player. Please note that applications may be added or removed as firmware changes on the player, so not all items shown in this section may be available for use, or some applications not described in this manual may be available on your player. For instruction on using any application loaded to the player which is not described in the manual, please contact our technicians at 580 272 0035.
This will display information about your player, including the firmware version, memory, and number of files. Set Time This will allow you to adjust the date and time, which is displayed on most screens of the player. Setting the 24 hour time to on or off will change the way time is displayed, for example, 3PM will display as 15:00 if set to on, and 3:00 if set to off. Tap the or icons next to each item (year/month/day/etc) to adjust the value of that item.
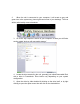
Video Conversion If your video files will not play on your Trio player, you can convert them using the conversion tool which is included with the device. To do so, you will need to first install the software. When you connect the player to your computer, it will act as a removable disk drive. Open the drive, as described in the Copy and Paste section of the manual. Inside, there is a folder called “Tools & Manual”. Open this folder, and then the “Tools” folder. Inside is a Setup.exe application.
quality, you simply need to select the “Begin” button convert the file for you. and the player will Please note that if the player is connected to your computer when you open this tool, you will see an additional window to the right of the main window. This is the media player window. Please note that the window will display the drive letter assigned to your player; if you have multiple players connected, it will have an option for each drive.
model) at Mach Speed Technologies option, without charge for either parts or labor. This warranty shall not apply if the product is modified, tampered with, misused, physically damaged, or subjected to abnormal working conditions (including, but not limited to, electrical, fire, and water damage). THIS WARRANTY DOES NOT GUARANTEE YOU UNINTERRUPTED SERVICE. REPAIR OR REPLACEMENT AS PROVIDED UNDER THIS LIMITED WARRANTY IS THE EXCLUSIVE REMEDY OF THE PURCHASER.
4. Mach Speed Technologies will make every reasonable effort to deliver on time however; Mach Speed Technologies will not be liable for late or lost shipments. Consequential Damages and Limitations: 1.