TCH-843 User’s Manual
Specifications: 4.3” TFT touch screen Excellent sound effect performance; supports MP3/WMA/FLAC/APE,PLAY FX sound effect Supports TF card Supports video: AVI、RM、RMVB、FLV、DAT and more formats. Photo viewer JPEG、BMP、GIF formats Insert MIC,Supports long time recording. Supports Multi-languages High speed USB2.
• • • • • • battery loosening, or other hardware damage. The following conditions indicates a low battery level and signifies that the player should be charged: o The battery icon displays in normal operation with low battery prompt. o Where there is no response when pressing keys and the battery icon displays . o The player turns off automatically. Static electricity may cause damage to interior hardware of the player.
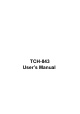
Power on To power your player on, push the power switch up and hold it there for 5 seconds. A welcome screen will display, and then you will be at the main menu. Power off To power off your player, move the power switch bottom and hold it there for 5 seconds and then the screen will power off. Once the screen is dark, the player is powered down. HOLD When listening to music or watching a video, it can be easy to accidentally touch the screen and interrupt your session.
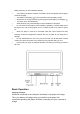
Music Menu Icons The music menu icons located at the bottom edge of the music screen each have a different application. • Return- Touching this icon will return you to the Media Library. • Shuffle Mode- Allows you to alternate between normal and shuffle modes • Display- Switch between an equalizer and lyric display NOTE- lyrics will only display if you have installed the corresponding .lrc file. • Play Mode- Allows you to change your play mode.
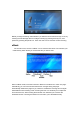
Calculator On the main menu, touch the “Calculator” icon to enter Calculator Mode. This is a standard calculator. Touch the icon to return to the main menu. Photo On the main menu, touch the “Photo” icon to enter Photo Mode. You will enter your media Library, which allows you to select the file you wish to view. Touch the Previous or Next icons to view the previous or next photo. You can rotate the current photo either left or right by touching the rotate icons.
Before you begin recording, select whether you want the record rate set to high or low, by touching the low rate/high rate icons. Begin recording by pressing the Play icon, and pause it by pressing the pause icon. Touch the “disk” icon to save the current recording. eBook On the main menu, touch the “eBook” icon to enter the text viewer. You will enter your media Library, which allows you to select the file you wish to view.
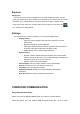
Explorer Playing files On the main menu, touch the “Explorer” icon to enter the Explorer menu. You will enter your media Library, which allows you to select the file you wish to view. This mode will allows you to access all files on the player. Pictures will open in picture viewer, songs in the music mode, etc. To delete a file, touch the file once, then touch the icon. Select yes to delete the file. Settings On the main menu, touch the “Settings” icon to enter the Settings Menu.
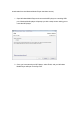
downloaded from the Windows Media Player download service.) 1. Open Windows Media Player and connect the MP3 player to a working USB port. Windows Media player will prompt you with a setup screen asking you to name the MP3 player. 2. Once you have named your MP3 player, select Finish, and your Windows Media Player will open to the Sync tab.
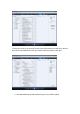
3. Drag your music to the sync list (on the right of the screen) from the list on the left. Once you have selected the music you wish to add to the player, press Sync. 3. Windows Media player will load the songs on to your MP3 player.
4. Once all the songs you have added are synced to the unit, and Windows Media Player says that is safe to disconnect your MP3 player, disconnect the device.
COPY AND PASTE 1. Connect the MP3 player to a working USB port. 2. When the unit is connected to your computer, it will create a gray and green icon in the system tray (lower right hand corner of your desktop). The icon will be called safely remove hardware. 3. Go to the “My Computer” section of your computer. In there you will find a section called “devices with removable storage” 4. Locate the drive created by the unit, generally just called Removable Disk, with a letter in Parenthesis.
clicking to open the option menu then left click on the desired drive. 6. Locate the music stored on your computer. Generally this is stored in the “My Music” folder of your computer. NOTE: if you are unable to locate the music on your computer, click on start, search, files and folders, then search for “*.MP3, *.WMA”.
7. Once you have located the song files, you can right click on the song itself, and select “copy”. Open the removable disk drive, right click on in the empty space, and select Paste. This will transfer the song on to your MP3 player.
8. Repeat step 7 for as many songs as you want to copy on to the unit.
When connected to your MAC computer, the device will act as a removable drive. Simply drag your MP3 files to the device. Specifications: Screen Connect computer Memory 4.3inch TFT with Running time Recording USB2.0(HIGH SPEED) 1GB-16GB 3.