Trio V430 Manual
Features: 3.0-inch supporting 400*240 resolution Supports MP3, WMA, and most other common audio formats Supports Micro SD cards, to expand your storage Support for AVI, RM, RMVB, and FLV video formats Supports JPEG, BMP, GIF format images Built-in microphone for long recordings at high quality Energy-saving settings, brightness adjustment, automatic shutdown A variety of sound and equalizer options Supports FM radio Support multiple languages High-speed USB2.
• • • • • • Static electricity may cause damage to interior hardware of the player. Do not disconnect the player while formatting, uploading, or downloading files to the player, as it may cause program errors, or cause the unit to be unable to power on. When the player is used as a removable hard disk, users should store files following correct file management methods. We are not liable for any data loss or damage. Do not disassemble the unit in any way as this will void all warranties.
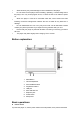
PLAY button for 5 seconds. To power the player off, Press and hold the PLAY button for 5 seconds, then set the power switch to the OFF position. • Volume control: In the music player and video player, pressing the V- or V+ buttons will decrease or increase the volume. • Fast forward and rewind: When playing a file in Music Mode or Video Mode, pressing and holding the Previous or next buttons will rewind or fast forward the current file.
Once you select the Music Mode, you will enter the Media Library, which allows you to select the file you wish to play. Once you have selected a file, press the PLAY button to begin playing the file. While a file is playing, press the PLAY button to pause it, or quickly press the Mode button to return to your media library. Pressing and holding the Mode button will open the Music Mode Submenu as displayed blow. 1. Repeat Mode- Allows you to set your repeat mode.
Video Mode: Once you select the Video Mode, you will enter the Media Library, which allows you to select the file you wish to play. Once you have selected a file, it will begin to play automatically. While a file is playing, press the PLAY button to pause it, or quickly press the Mode button to return to your media library. Note 1: The maximum supported resolution for RM/RMVB video files is 720*576. Files with a larger resolution will not play.
EBook Mode: Once you select the eBook Mode, you will enter the Media Library, which allows you to select the file you wish to view. Once you have selected a file, it will display automatically. While viewing a file, press the PLAY button to enter the Photo Mode Submenu. While in your text viewer, pressing the Next or Previous buttons will skip to the next or previous page, while using the V- or V+ buttons will advance by line.
1. Search by hand- Allows you to search manually through frequencies. This is the default search mode. 2. Auto Search- Automatically scans all channels and saves any w9ith a strong channel as a preset. You will then enter preset mode. 3. Preset Mode- Switched your scan mode to preset mode. Pressing the Next or Previous buttons will switch between saved presets. 4. Save Channel- Saves the current channel as a preset 5. Delete Channel- Delete a Preset channel 6.
SETTINGS 1. 2. 3. 4. 5. 6. Display settings- Adjust your display settings System Settings- Adjust your system settings Desktop- Select one of several desktop pictures Language- Select your display language. System Information- Displays your system information. Auto Shut time- Set up t a timer to power the player down COMPUTER COMMUNICATION Using Windows Media Player (Note: you must use Windows Media Player 10 or later to use this feature.
2. Once you have named your MP3 player, select Finish, and your Windows Media Player will open to the Sync tab. 3. Drag your music to the sync list (on the right of the screen) from the list on the left. Once you have selected the music you wish to add to the player, press Sync. 3. Windows Media player will load the songs on to your MP3 player.
4. Once all the songs you have added are synced to the unit, and Windows Media Player says that is safe to disconnect your MP3 player, disconnect the device.
1. Connect the MP3 player to a working USB port. 2. When the unit is connected to your computer, it will create a gray and green icon in the system tray (lower right hand corner of your desktop). The icon will be called safely remove hardware. 3. Go to the “My Computer” section of your computer. In there you will find a section called “devices with removable storage” 4. Locate the drive created by the unit, generally just called Removable Disk, with a letter in Parenthesis.
6. Locate the music stored on your computer. Generally this is stored in the “My Music” folder of your computer. NOTE: if you are unable to locate the music on your computer, click on start, search, files and folders, then search for “*.MP3, *.WMA”.
7. Once you have located the song files, you can right click on the song itself, and select “copy”. Open the removable disk drive, right click on in the empty space, and select Paste. This will transfer the song on to your MP3 player.
8. Repeat step 7 for as many songs as you want to copy on to the unit. NOTE: MAC Computers When connected to your MAC computer, the device will act as a removable drive. Simply drag your MP3 files to the device. Product specifications: TFT colored display Date transmission speed Storage media Usable time of battery Record 3.0 TFT,diagram(400*240) High speed USB 2.
Max.output power Music player Working temperature Language support Supporting operating system (L)10mw+(R )10mw(32ohm) MP3 bit rate 64Kbps 320Kbps WMA bit rate 64k bps 384k bps Frequency 20Hz---20KHz response SNR >90DB Distortion rate 0.