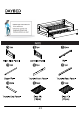
Thank you for your purchase! We hope you enjoy this new addition to your home for many years to come. Our commitment to providing quality products does not simply end when you purchase our product. We fully stand behind our products from start to finish. CHECK BEFORE STARTING Are you missing anything? Check out our Quick Tips! Double-check all parts, hardware and accessories listed on Page 6 are accounted for. We recommend reviewing the pre-assembly handouts.
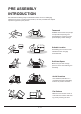
PRE ASSEMBLY INTRODUCTION We understand building ready-to-assemble furniture can be a challenging experience for some. To help avoid confusion, we have provided some helpful tips that may speed up the process. Teamwork ALWAYS have at least two people to help with transporting and assembling the product to avoid potential injury and/or damage. Suitable Location Assembling near the area of the intended location is highly recommended.
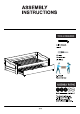
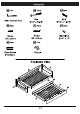
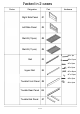
Packed in 2 cases Carton Disignation Part Right Side Panel #1 Left Side Panel #2 Slat Kit (13pcs) #8 Slat Kit (11pcs) #9 Rail #3 Hardware " #Ax 1pc 0 #Bx 12pcs ©-II � Upper Rail #4 � #C x 8pcs #D x 8pcs #Ex 48pcs #F x 12pcs Trundle Front Panel #5 Trundle Rear Panel #6 Trundle End Panel #7 7 / 11 � � #G x 6pcs � #H x 4pcs
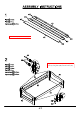
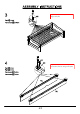
Insert dowels (#G) to the rails (#3,4). Align rails (#3,4) to the side panels (#1,2), then secure by using bolts (#B) onto barrel nuts (#F).
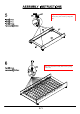
Align slats (#8) to the rails, then secure by using screws (#E). Align wheels (#H) to the trundle panels (#5,6), then secure by using screws (#D).
Align trundle end panels (#7) to the trundle panels (#5,6), then secure by using bolts (#C). Align slats (#9) to the trundle, then secure by using screws (#E).
7