
User Manual


8
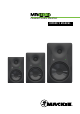
MR524 • MR624 • MR824 Powered Studio Monitors
MR524 • MR624 • MR824 Powered Studio Monitors
A bit less high-frequency energy usually fixes this, and
the mix may be forced in this direction by reducing the
high-frequency output of the monitors by using the –2 dB
position of the switch.
Conversely, if the mixes are consistently too bright,
then adding some additional high-frequency energy in
the monitors satisfies your ears, and the resultant mix
has less HF content.
It’s a real rush to mix really loud. But remember that
the resulting mix only sounds good when you play it at
least that loud. However strange it may sound, mixes
made at lower levels sound even better when played
loud, perhaps even a bit bigger than life.
Get that sound level meter out. Decide what level to
mix at and use the meter to help keep mixing at that
level. Your ears will thank you, and your mixes will be
better for it.
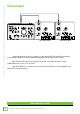
6. Input Level
The MR studio monitors expect a line-level signal
at its input. Use this control to adjust the sensitivity
of the input section according to the signal strength
at its input.
• The MR studio monitors are designed to operate
with a +4 dBu signal when the input level control
is in the normal (fully clockwise) position. In other
words, wide open.
• Refer to the Quick Start section on page 5 for the
level-setting procedure.
7. Custom-Tuned Rear Port
The custom-tuned rear port uses the radiation from
the rear of the woofer cone to extend the low-frequency
response of the speaker. The size of the port is carefully
designed with respect to the volume of the cabinet
and the characteristics of the woofer to produce
low-frequency extension.
Front Panel Description
8. Front Panel LED
This LED will illuminate solid green to indicate
that signal is present in the MR studio monitor.
8
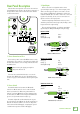
Unbalanced RCA
Hot (+) Tip
Shield (Ground) Sleeve
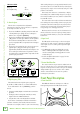
4. Acoustic Space
This is a three-way switch that adjusts the
low-frequency response of the monitors to compensate
for their placement in the room.
• If you use the MRs free-standing, away from walls and
corners (whole space [4A]), set the acoustic space
switch to the “A” position (NORMAL).
• If you place the MR monitors against a wall (half space
[4B]), set the acoustic space switch to the “B” position.
This activates a shelving filter to reduce the low-fre-
quency output by 2 dB to compensate for the half-space
placement.
• If you place the monitors into the corners of your room
(quarter space [4C]), the low-frequency output
approximately doubles from what it is in half space. Set
the acoustic space switch to the “C” position to reduce
the low-frequency output by 4 dB to compensate for the
quarter-space placement.
5. High Frequency Filter
This switch tailors the high-frequency response
by ±2 dB at 3 kHz and above on all three MR models.
Leave this switch in the “0 (NORMAL)” position
unless:
• You want to subtly brighten or darken the sound of the
speakers.
• Perhaps you have hearing loss caused by too many
nights in front of a Marshall full stack.
• You just like to mix on the bright side or dull side.
If the mixes consistently sound dull or dark when
you listen elsewhere, this usually indicates that the
monitors are too bright, relative to your normal hearing.
TIPSLEEVETIPSLEEVE
RCA Unbalanced Connectors
4 5 6