Powered Studio Monitors OWNER’S MANUAL
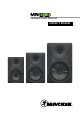
MR524 • MR624 • MR824 Powered Studio Monitors Important Safety Instructions 1. Read these instructions. 17. Warning: This apparatus has been designed with Class I construction and must be connected to a mains socket outlet with a protective earthing connection (the third grounding prong). 2. Keep these instructions. 3. Heed all warnings. 18. This apparatus has been equipped with a rocker-style AC mains power switch.
MR Features Important Safety Instructions............................................................2 • Table Of Contents..............................................................................3 Features...........................................................................................3 Introduction......................................................................................4 Quick Start.......................................................................................
MR524 • MR624 • MR824 Powered Studio Monitors Introduction MR Series Powered Studio Monitors offer professional performance, clarity and superior mix translation so you can listen with confidence knowing your mix will sound great anywhere. Drawing from Mackie’s extensive studio monitor design experience, MR Series monitors are precision tuned to stay true to your mix whether it’s dialogue, hip hop, rock and beyond.
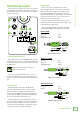
We realize that you can’t wait to hook up your MR Studio Monitors and try them out. Nevertheless, please take the time to read this page NOW, and the rest can wait until you’re good and ready. 1. Turn the input level control on the back of the cabinet down (fully counterclockwise) before turning on the monitor for the first time. 2. Set the power switch on the back panel off. This will prevent you from accidentally connecting a hot signal source to the monitor and getting a rude surprise. 3.
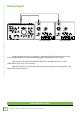
MR524 • MR624 • MR824 Powered Studio Monitors Hookup Diagram MR524, MR624, MR824 Connecting MR studio monitors is quite easy, so let’s take a quick look at a fairly typical setup. In this example, whatever sources you desire are plugged into the Big Knob Studio’s inputs. Next, the main L/R outputs from a Big Knob Studio are connected to the inputs of a pair of MR studio monitors using 1/4" connectors. Yeah, that’s all there is to it! Now that connections have been made, it’s time for playback...
3. Signal Inputs This is where the signal is connected to the monitor and adjustments are made to the frequency response of the speakers to match the monitor’s location and the room’s environment. 7 3 Connect the line-level signal from the mixer (or other signal source) to one of these input jacks. There are three types of input connectors to choose from: balanced XLR, balanced/unbalanced 1/4" and unbalanced RCA.
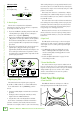
MR524 • MR624 • MR824 Powered Studio Monitors Unbalanced RCA Hot (+) Shield (Ground) A bit less high-frequency energy usually fixes this, and the mix may be forced in this direction by reducing the high-frequency output of the monitors by using the –2 dB position of the switch. Tip Sleeve SLEEVE TIP SLEEVE Conversely, if the mixes are consistently too bright, then adding some additional high-frequency energy in the monitors satisfies your ears, and the resultant mix has less HF content.
There are several protection mechanisms designed into the MR studio monitors to safeguard the speakers and amplifiers from inadvertent damage. CAUTION: The protection circuits are designed to prevent damage to the speakers under reasonable and sensible conditions. Should you choose to ignore the warning signs (i.e., excessive distortion), you can still damage the speakers in the MR studio monitors by overdriving them. Such damage is beyond the scope of the warranty.
MR524 • MR624 • MR824 Powered Studio Monitors Appendix A: Service Information If you think your MR Studio Monitor has a problem, please check out the following troubleshooting tips and do your best to confirm the problem. Visit the Contact Tech Support section of our website (www.mackie.com/support) where you will find lots of useful information such as FAQs and other documentation. You may find the answer to the problem without having to send your MR away.
Owner’s Manual Repair For warranty service, please refer to the warranty information on page 15. Non-warranty service is available at a factoryauthorized service center. To locate the nearest service center, visit www.mackie.com/support/servicelocator. Service for MRs living outside the United States may be obtained through local dealers or distributors.
MR524 • MR624 • MR824 Powered Studio Monitors Appendix B: Technical Information MR Specifications AC Power Requirements Acoustic Performance Frequency Response (–3 dB): 57 Hz – 20 kHz [MR524] 45 Hz – 20 kHz [MR624] 38 Hz – 20 kHz [MR824] Frequency Response (–10 dB): 45 Hz – 20 kHz [MR524] 38 Hz – 20 kHz [MR624] 35 Hz – 20 kHz [MR824] Sound Pressure Level @ 1 meter, +4 dBu into Balanced Input: 102 dB SPL @ 1m [MR524] 105 dB SPL @ 1m [MR624] 107 dB SPL @ 1m [MR824] Maxim
7.1" / 180 mm 8.7" / 221 mm WEIGHT 10.2 lb / 4.6 kg 11.1" / 281 mm Owner’s Manual MR524 Dimensions MR624 Dimensions 8.3" / 210 mm 11.2" / 284 mm WEIGHT 16.5 lb / 7.5 kg 12.9" / 328 mm MR824 Dimensions 10.1" / 256 mm 12.6" / 320 mm WEIGHT 23.0 lb / 10.4 kg 15.
1/4" BALANCED / UNBALANCED LINE INPUT XLR BALANCED LINE INPUT RCA UNBALANCED LINE INPUT 1 3 2 FUSE POWER ACOUSTIC SPACE A B C ©2017 LOUD Technologies Inc. All Rights Reserved.
Please keep your sales receipt in a safe place. This Limited Product Warranty (“Product Warranty”) is provided by LOUD Technologies Inc. (“LOUD”) and is applicable to products purchased in the United States or Canada through a LOUD-authorized reseller or dealer. The Product Warranty will not extend to anyone other than the original purchaser of the product (hereinafter, “Customer,” “you” or “your”). For products purchased outside the U.S. or Canada, please visit www.mackie.
220 Wood-Red Road NE Woodinville, WA 98072 • USA Phone: 425.487.4333 Toll-free: 800.898.3211 Fax: 425.487.4337 www.mackie.