DL806 and DL1608 Owner’s Manual Important Safety Instructions 16. Do not overload wall outlets and extension cords as this can result in a risk of fire or electric shock. 1. Read these instructions. 2. Keep these instructions. 17. The MAINS plug or an appliance coupler is used as the disconnect device, so the disconnect device shall remain readily operable. 3. Heed all warnings. 18.
DL806 and DL1608 Owner’s Manual Table of Contents Important Safety Instructions....................................................................................................... 2 Table Of Contents........................................................................................................................... 3 Chapter 1 : Welcome.......................................................................................................................
DL806 and DL1608 Owner’s Manual Chapter 1 : Welcome Hello everyone! This is the DL806 and DL1608 Owner’s Manual...we hope you like it! Instead of one massive document containing detailed information about the hardware and software, we have divided them into separate manuals. Simply decide if you need assistance with the hardware or software and dive on in. The water here is warm and crystal clear.
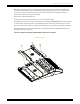
DL806 and DL1608 Owner’s Manual Chapter 2 : Mixer Hardware – DL Series : Front Panel Introduction We’re going to start things off with a look at the front panel of the mixer: its features, how and where to make connections and signal flow. Let’s kick off our front panel hardware discussion with the iPad dock connector. iPad Dock Connector On the far left of the mixer (outlined by the vertical green rectangle below) is the iPad dock connector.
DL806 and DL1608 Owner’s Manual iPad Tray and Tray Inserts The largest area on the mixer is the iPad tray with the dock to its left. The iPad tray is a part of the DL Series mixer and cannot be removed. The iPad slides into the tray and mates with the dock connector on the mixer. One of the really cool things about these mixers is that it seamlessly transitions from wired to wireless operation. Therefore, the tray is highly-durable to withstand repetitive insertion and removal of an iPad.
DL806 and DL1608 Owner’s Manual With different dimensions than the other iPads, the iPad mini, iPad mini 2, iPad mini 3 and iPad mini 4 don’t fit the included iPad tray...it’s too small! Don’t fret, though; we’ve got you covered. As mentioned on the previous page, an iPad mini may be docked to a DL Series mixer with a Lightning connector, but it requires a mini tray insert (sold separately).
DL806 and DL1608 Owner’s Manual The iPad Air and iPad Air 2 also do not fit the included iPad tray. Again, though; we’ve got you covered. As mentioned two pages ago, an iPad Air may be docked to a DL Series mixer with a Lightning connector, but it requires an Air tray insert (sold separately). Here’s how to install the iPad Air tray: (1) remove the four screws from the mixer, as seen in the illustration on the previous page.
DL806 and DL1608 Owner’s Manual If you had been mixing with an iPad mini, iPad mini 2, iPad mini 3, iPad mini 4, iPad Air or iPad Air 2, but would rather use an iPad 2, iPad (3rd generation) or iPad (4th generation), the included iPad tray will need to be reinstalled. The iPad tray insert only needs to be reinstalled if you are mixing with the iPad 2, iPad (3rd generation) or iPad (4th generation).
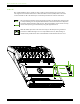
DL806 and DL1608 Owner’s Manual PadLock™ Also included with the mixer is a PadLock. This is used to lock the iPad into place on the mixer. One might use this for fixed installs where a dedicated iPad is used and (Pad)locked to the mixer. Or leave the PadLock off so the iPad may be conveniently transferred in and out of the mixer. After docking the iPad (not shown), the PadLock needs to be attached by moving it right to left [horizontal green arrows], NOT downward.
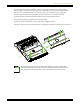
DL806 and DL1608 Owner’s Manual DL1608 Front Panel Front Panel Introduction Each DL1608 mixer is outfitted with 16 gain knobs, 16 sig / OL LEDs, one phones output jack and one phones knob. Each DL806 mixer is outfitted with eight gain knobs, eight sig / OL LEDs, one phones output jack and one phones knob. Let’s take a look at each of these features, starting with the gain knobs. Gain Knobs The gain knobs adjust the input sensitivity of the mic and mic/line inputs.
DL806 and DL1608 Owner’s Manual DL806 Front Panel Phones Output Jack This 1/4" TRS connector supplies the output to stereo headphones. The volume is controlled with the phones knob located right below the output jack. The phones output follows standard conventions: RING SLEEVE Tip = Left channel Ring = Right channel Sleeve = Ground SLEEVE RING TIP TIP RING TIP SLEEVE Phones Knob This knob is used to adjust the volume from the phones output jack, from off to maximum gain (max).
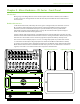
DL806 and DL1608 Owner’s Manual Chapter 3 : Mixer Hardware – DL Series : Rear Panel DL1608 Rear Panel Barrel Connector Locking Outer Ring The Power Block Rear Panel Introduction Each DL Series mixer is outfitted with a power connector, a power switch (and corresponding LED), a phantom power switch (and corresponding LED), L/R XLR main output jacks, a Kensington lock, a network connector and a force update button.
DL806 and DL1608 Owner’s Manual DL806 Rear Panel Power Switch Press the top of this rocker switch in to turn the mixer on and press the bottom of this switch to turn the mixer off. As a general guide, the mixer should be turned on first, before any external power amplifiers or powered speakers. As such, it should also be turned off last. This will reduce the possibility of any turn-on or turn-off thumps in the PA. Power LED This LED will illuminate green when the mixer is turned on.
DL806 and DL1608 Owner’s Manual Phantom Power LED This LED will illuminate red when phantom power is engaged. If it does not turn on, confirm that the phantom power switch is on, that The Power Block and line cord are connected correctly (to each other, the mixer and the AC outlet), the local AC mains supply is active and that the power switch is on. It takes approximately 15 seconds for the phantom power to shut off completely.
DL806 and DL1608 Owner’s Manual L/R Main Outs The male XLR connectors provide a balanced line-level signal that represent the end of the mixer, where the fully mixed stereo signal enters the real world. Connect these to the left and right line-level inputs of powered speakers or to the left and right line-level inputs of an amplifier (with speakers already attached).
DL806 and DL1608 Owner’s Manual Kensington Lock An optional Kensington Lock provides an extra level of security should the mixer be left alone, unwatched. There are a wide variety of cable apparatuses to choose from to secure your mixer via the Kensington Lock security slot. Feel free to decide on what type works best for you by perusing the Kensington website: http://www.kensington.com/ While the Kensington cable and lock provide some level of security, it is NOT foolproof or guaranteed protection.
DL806 and DL1608 Owner’s Manual Force Update Button The force update button is tucked in right between the power connector and network connector. In a perfect world, this button would just sit there without a care in the world, umbrella drink in hand, beach, surf and sun on a daily basis. In all likelihood, this button will live his / her dream out, while the rest of us can only dream of such a life.
DL806 and DL1608 Owner’s Manual Appendix A : Hookup Diagrams Live Sound: House Engineer Microphones Transmitters for in-ear monitors SRM450v3 Powered Monitors Wireless Router (Wi-Fi) Headphones Keyboard Mackie DLM12 powered loudspeaker Mackie DLM12 powered loudspeaker Drums Mackie DLM12S powered subwoofer Mackie DLM12S powered subwoofer Here’s a pretty common setup utilizing the DL1608. Drums are mic’d up and sent to input channels 1-7.
DL806 and DL1608 Owner’s Manual Live Sound: Coffee Shop Mackie DLM8 powered loudspeaker Mackie DLM8 powered loudspeaker Mackie DLM8 Powered Monitors Wireless Router (Wi-Fi) Headphones Keyboard Now the band wants to pare down to play the local cafe. Because the venue size is much smaller, there is no need to crank up a big PA, nor do you need to mic the drum set, bass cabinet or guitar cabinets.
DL806 and DL1608 Owner’s Manual Live Sound: Self-Engineered Wireless Router (Wi-Fi) Vocalist Guitarist Engineer’s Headphones Keyboardist Bassist Drummist DJist Here’s a setup for all the musicians out there who whine for “more me” in the mix. Set up and connect each musician’s instrument, the PA and monitors just like they would be in any other live situation.
DL806 and DL1608 Owner’s Manual Live Sound: Two Mixers, One iPad Mackie SRM650 Loudspeaker and SRM1850 Subwoofer POWER CONSUMPTION 200W POWER CONSUMPTION 200W POWER CONSUMPTION 200W Mackie SRM650 Loudspeaker and SRM1850 Subwoofer Mackie SRM550 (for monitors) Monitor Mixer Wireless Router (Wi-Fi) Headphones So you say you have a snake. We prefer dogs, cats or fish for pets, but snakes are cool, too.
DL806 and DL1608 Owner’s Manual Live Sound: Two Mixers Linked So the club down the street is running sound through a DL Series mixer and you want to one-up them? That’s easy! How about running sound through TWO DL Series mixers?! No, it won’t be twice as loud, but you will have nearly twice as many inputs which means you’ll probably have twice the talent playing at your venue in no time. Start by setting up and connecting each musician’s instrument just like they would be in any other live situation.
DL806 and DL1608 Owner’s Manual Rack Mounted Wireless Headphones Wireless Router Wireless Headphones This hookup diagram illustrates that the mixer doesn’t just have to eat up desk space...rack mount it instead! Before doing so, though, it would be a good idea to review the Rack Mount Kit Installation Instructions that were included with the Rack Mount Kit. The dog ate them, you say? Likely story, actually.
DL806 and DL1608 Owner’s Manual Appendix B : Technical Information Specifications General Digital Sample Rate:..................................................................................................................................................................................................48 kHz A/D/A Bit Depth:........................................................................................................................................................................................
DL806 and DL1608 Owner’s Manual Specifications Continued... Analog Inputs Connectors:...................................................................................1-12: XLR Balanced, 13-16: Combo XLR / TRS Balanced [DL1608] 1-4: XLR Balanced, 5-8: Combo XLR / TRS Balanced [DL806] XLR Mic Pre:......................................................................................................................................................................................................
DL806 and DL1608 Owner’s Manual Specifications Continued... Networking Connector:..................................................................................................................................................................................100 MB Ethernet Control:.....................................................................................................................................................................................................
DL806 and DL1608 Owner’s Manual Specifications Continued... Dimensions Width:...........................................................................................................................................................................................11.5 in / 291 mm Height (Front):................................................................................................................................................................................1.6 in / 40 mm Height (Rear):..........
DL806 and DL1608 Owner’s Manual DL806 Lightning Dimensions Weight 6.9 lb / 3.1 kg 15.4 [391] 11.5 [291] 3.7 [95] 1.6 [40] 1.5 in / 38 mm 2.1 in / 53 mm 59.1 in / 1500 mm 4.
DL806 and DL1608 Owner’s Manual DL1608 Lightning Dimensions Weight 7.9 lb / 3.6 kg 15.4 in / 391 mm 11.5 in / 291 mm 3.7 in / 95 mm 1.6 in / 40 mm 1.5 in / 38 mm 2.1 in / 53 mm 59.1 in / 1500 mm 4.
DL806 and DL1608 Owner’s Manual DL806 30-pin Dimensions Weight 6.9 lb / 3.1 kg 15.4 [391] 11.5 [291] 3.7 [95] 1.6 [40] 1.5 in / 38 mm 2.1 in / 53 mm 59.1 in / 1500 mm 4.
DL806 and DL1608 Owner’s Manual DL1608 30-pin Dimensions Weight 7.9 lb / 3.6 kg 15.4 in / 391 mm 11.5 in / 291 mm 3.7 in / 95 mm 1.6 in / 40 mm 1.5 in / 38 mm 2.1 in / 53 mm 59.1 in / 1500 mm 4.
DL806 and DL1608 Owner’s Manual DL806 and DL1608 Dimensions Continued... Nine rack spaces 19.0 in / 483 mm 0.354 in / 9 mm [iPad 1 bottom] 0.520 in / 13.2 mm [iPad 2 bottom] 0.535 in / 13.6 mm [iPad 3 bottom] 1.5 in / 39 mm 0.6 in / 16 mm 3.0 in / 77 mm 15.
DL806 and DL1608 Owner’s Manual DL806 and DL1608 Dimensions Continued... 2.0 in / 52 mm 11.9 in / 302 mm 1.5 in / 37 mm 9.0 in / 228 mm 1.3 in / 32 mm 1.
DL806 and DL1608 Owner’s Manual Appendix C : Service Information Troubleshooting If you think your DL Series mixer has a problem, please check out the following troubleshooting tips and do your best to confirm the problem. Visit the Support section of our website (www.mackie.com/support) to get some ideas or contact our technical support heroes. You may find the answer to the problem without having to send your DL Series mixer away.
DL806 and DL1608 Owner’s Manual Noise / Hum • Are all the connections good and sound? Make sure all of the connecting cables work and are securely connected at both ends. Try the same source signal in another channel, set up exactly like the suspect channel. • Are you using unbalanced cables? Swap them out with balanced cables to see if that fixes the problem. • Turn the input gains down one-by-one. If the offending noise disappears, it’s either that input or whatever is plugged into it.
DL806 and DL1608 Owner’s Manual Appendix D: Glossary Of Terms The glossary contains brief definitions of many of the audio and electronic terms and acronyms used in discussions of sound mixing and recording.
DL806 and DL1608 Owner’s Manual Glossary Of Terms Continued... Condenser — Another term for the electronic component generally known as a capacitor. In audio, condenser often refers to a type of microphone that uses a capacitor as the sound pickup element. Condenser microphones require electrical power to run internal amplifiers and maintain an electrical charge on the capacitor. They are typically powered by internal batteries or phantom power supplied by the mixer. Console — Another term for mixer.
DL806 and DL1608 Owner’s Manual Glossary Of Terms Continued... EIN — Equivalent Input Noise. A specification that helps measure the “quietness” of a gain stage by deriving the equivalent input noise voltage necessary to obtain a given preamp’s output noise. Numerically, it’s the output noise at a given gain setting minus the gain. EIN is usually measured at a maximum gain and typically ranges from -125 to -130 dBu. EQ — Short for equalization.
DL806 and DL1608 Owner’s Manual Glossary Of Terms Continued... Ground — Also called earth. Ground is defined as the point of zero voltage in a circuit or system, the reference point from which all other voltages are measured. In electrical power systems, ground connections are used for safety purposes, to keep equipment chassis and controls at zero voltage and to provide a safe path for errant currents. This is called a safety ground.
DL806 and DL1608 Owner’s Manual Glossary Of Terms Continued... Mic Amp — See Mic Preamp. Mic Level — The typical level of a signal from a microphone. A mic level signal (usually – but not always – coming from a microphone) is generally lower than –30 dBu. With a very quiet source [a pin dropping?] the signal may be –70 dBu or lower. Some microphones, notably vintage or vintage-style condenser mics, deliver a higher signal level than this for the same sound pressure level.
DL806 and DL1608 Owner’s Manual Glossary Of Terms Continued... Nyquist Sampling Theorem — This theorem states that, when an analog signal is converted to a digital signal, it must be sampled at a frequency that is at least twice the highest audio frequency present in the analog signal. If the audio frequency should exceed one-half the sampling frequency, aliasing may result. Thus, if an analog-to-digital converter is sampling at 44.1 kHz, the audio signal should not exceed 22.05 kHz.
DL806 and DL1608 Owner’s Manual Glossary Of Terms Continued... Reverberation, Reverb — The sound remaining in a room after the source of sound is stopped. It’s what you hear in a large tiled room immediately after you’ve clapped your hands.
DL806 and DL1608 Owner’s Manual Glossary Of Terms Continued... Stereo — Believe it or not, stereo comes from a Greek word that means solid. We use stereo or stereophony to describe the illusion of a continuous, spacious sound field that is seemingly spread around the listener by two or more related audio signals. In practice, stereo often is taken to simply mean two channels. Tinnitus — The ringing in the ears that often results from prolonged exposure to very loud sound levels.
DL806 and DL1608 Owner’s Manual Warranty Statement Please keep your sales receipt in a safe place. This Limited Product Warranty (“Product Warranty”) is provided by LOUD Technologies Inc. (“LOUD”) and is applicable to products purchased in the United States or Canada through a LOUD-authorized reseller or dealer. The Product Warranty will not extend to anyone other than the original purchaser of the product (hereinafter, “Customer,” “you” or “your”). For products purchased outside the U.S.