
User manual

Introduction
This Install Rack Kit allows a DL32R mixer to be mounted
in a standard 19" rack in a variety of ways. The alternate
recessed front rack ears allow connections to be made in
a rack with a closing front door. The rear rack ears can be
used with either front ear configuration, and, when added,
provide extra stability for installs and touring systems.
These allow the DL32R to be mounted in racks with
rear rack rails between 19.5" – 24.75" [using the recessed
front rack ears] or 16" – 21.125" [using the standard front
rack ears] from the front rails measuring from mounting
surface to mounting surface.
Parts
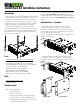
DL32R Rack Ear Kit Contents – Part No. 2042160:
Recessed Front Rack Ear (2) – Part No. 2042158
Rear Adjustable Rack Ear (2) – Part No. 2042154
Rear Rack Ear Bracket Adapter (2) – Part No. 2042153
2 mm Hex Key (1) – Part No. 2046096
M3 Hex Screws (4) – Part No. 2035377
M4 Screws (4) – Part No. 2046407-08
M4 Lock Washers (4) – Part No. 0021407
This instruction sheet (1) – Part No. 2042161
Tools
Required Tools (not included):
Phillips screwdriver
Getting Started
Before doing anything else...
• Turn off the mixer.
• Disconnect all cords.
• Remove mixer from the rack (if applicable).
• Place the mixer on a soft and dry flat surface.
• Unscrew and remove the four feet on the bottom
of the mixer (if applicable).
If only the rear rack ears will be attached, please continue
on with the Rear Rack Ears – Procedure instructions on
the next page. If the recessed front rack ears will be attached,
as well, please start with the Front Rack Ears – Procedure
below.
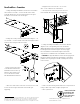
Front Rack Ears – Procedure
1. Using the Phillips screwdriver, remove the eight
screws – four screws on each side – on the front side of
the mixer, as shown below. Hang on to these eight screws
as they will be necessary when attaching the new, recessed
rack ears (which is the next step!).
Place the removed rack ears in a safe place should you ever
decide to use them again.
2. Using the Phillips screwdriver, attach the two new,
recessed rack ears – one on each side – on the front side
of the mixer using the same screws that were just removed.
Handle Rack Ear Recessed Rack Ear
Install Rack Kit Installation Instructions