
User guide

Tracktion 4 Reference Manual
165
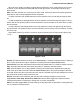
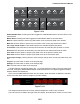
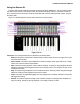
Enable/disable lters: Pressing this button toggles the enable/disable state for all of the lters on the
selected track.
Master lters: Pressing this button toggles the enable/disable state for all master lters.
Mark in: Click this button to set the loop-start marker to the current play-head cursor location.
Mark out: Click this button to set the loop-end marker to the current play-head cursor location.
Cut / Copy / Paste / Delete: These buttons perform the standard clipboard operations.
Fit all tracks: Click this button to vertically resize all tracks such that they are all visible on screen.
Zoom out: Click this button to horizontally zoom the edit out such that the entire edit is visible.
Prev mark: Click this button to jump the play-head cursor to the previous marker point.
Next mark: Click this button to jump the play-head cursor to the next marker point.
Insert tempo change: Click this button to insert a tempo change at the current play-head cursor posi-
tion.
Projects: Click this button to switch to the projects page.
Settings: Click this button to switch to the settings page.
Edit: Click this button to switch to the edit page.
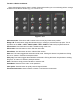
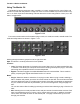
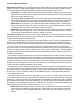
The MCU features a large time display (Fig. 7.4.13) that shows the location of the play-head cursor
in the edit. Clicking the SMPTE/BEATS button located just below the time display toggles the display
between SMPTE and beats/bars.
To the left of the SMPTE/BEATS button is a CPU button. When this button in depressed, the MCU
shows information about resource usage on your MCU display.
The assignment eld shows the currently selected assignment mode for easy reference.
The rude solo LED, located to the right of the time-display, illuminates when a track is in solo mode.
FILTERS MASTER
FILTERS
MARK
IN
MARK
OUT
CUT COPY PASTE DELETE
FIT ALL
TRACKS
ZOOM
OUT
PREV
MARK
NEXT
MARK
INSERT
TEMPO
CHANGE
PROJECTS SETTINGS EDIT
EDIT
SCREEN SELECT
ENABLE/DISABLE
Figure 7.4.12
Figure 7.4.13