
User Guide


26
H U I R E F E R E N C E G U I D E
Bad Input
• Is an
INPUT
assigned for output to a con-
nected output device? (i.e., speakers or
head- phones)
• Is the proper
FADER
up? Is the proper
FADER
assigned?
• Try unplugging any insert devices from the
INSERT
jacks.
• Make sure anything plugged into an
INSERT
is plugged in correctly (i.e., to first click or
second click, depending on what type of
plugs you’re using).
• Is the
MASTER VOLUME
turned up?
• Are the input and output assignments set
correctly?
• Try the same source signal in another
INPUT
, set up exactly like the suspect input.
Bad Output
• Are any of the MUTE switches turned on?
• Is an
OUTPUT
selected?
• Is HUI connected to your studio monitors or
other such speakers?
• Check your cables to make sure they’re all
working properly.
• Try multiple source and destination substi-
tutes.
• Check your signal flow and gain staging.
Note: The
LEVEL
controls for the
MONI-
TOR OUTPUTS
use high-quality DCAs
(Digitally Controlled Amplifiers). Due to the
discrete nature of a DCA, if you change the
level quickly you may perceive a “zippering”
effect as the volume ramps up or down. This is
normal, and should not present a problem for
normal monitoring purposes.
Fader Touch-Circuits
The fader’s touch-circuits are designed to
disengage the fader motor as soon as you touch
the fader knob. When you release the knob,
HUI again takes control over the fader (motor
engages).
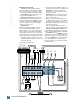
The fader knob is electrically conductive,
and when your finger touches the knob, HUI
senses your touch and sends a message to the
DAW through the MIDI connection. The DAW
reacts by sending a message back to the HUI
to disengage the motor. You can observe the
MIDI port IN and OUT LEDs blink on the MIDI
interface when you touch a fader.
When you release the fader, HUI sends an-
other message to the DAW, via MIDI.
Depending on how the DAW is configured for
that channel, it may send a message back to
HUI to turn on the fader motor. Again, you can
observe the MIDI message activity by watching
the MIDI interface I/O LEDs blink.
If the motors continue to operate when you
touch the knobs, HUI may not be properly
grounded.
• Make sure the AC linecord is plugged into a
“3-prong” outlet. The outlet should be prop-
erly wired and grounded. If you’re not sure,
test it with a three-wire AC outlet tester,
available at most fine hardware stores or
electronics supply shops. It will tell you if
the polarity of the hot and neutral wires is
reversed and if the safety ground is discon-
nected.
• Try another AC outlet if you’re still not sure
if the outlet is properly wired.
• Make sure the plug’s ground pin is not by-
passed with a “3-pin to 2-pin” adapter. This
is important not only for product safety, but
to insure that HUI has an “earth” ground
reference for proper operation of the touch-
circuits.
If the touch circuits still fail to operate properly:
1. Try touching the HUI’s chassis with one
hand to connect your body to the HUI’s ground
reference, and touch the fader knob with the
other hand.
2. Try installing an anti-static mat from an
electronic supply shop, and connect the ground
wire between the mat and the ground lug on
the HUI (located just above the Power switch
on the rear panel.)
3. Try installing a conductive metal sheet
beneath the carpet at your workstation. Con-
nect a wire between the metal sheet and the
ground lug on the HUI.
If none of the above suggestions fix the
problem, try the self-test on page 25. If that
doesn’t work, and you’re sure it’s not a digital/
MIDI-related problem (see next section), refer
to “Service” on the next page.
Digital/MIDI
HUI is a MIDI device. It must be able to
send and receive MIDI data to work with your
DAW. HUI uses a type of active sensing to let
you know that MIDI communication is estab-
lished. This is indicated by a blinking LED in
the bottom right corner of the Time Code Dis-
play. Once MIDI communication is established,
any interruption in the incoming MIDI data
causes “OFFLINE” to be displayed in the VFD,
and the LED to stop blinking.
TROUBLESHOOTING