
Owner's Manual


~
Q)
......
CJ)
~
Q)
-
.c
ca
CJ
,_
I
......
CJ)
~
~
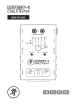
Front
&
Rear
Panel
Descriptions
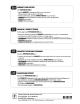
- ml
1.
Various
Inputs
Connect
one
end
of
the
cable
to
the
proper
input
jack
and
the
other
end
of
the
cable
to
the
proper
output
jack.
2.
6-Way
Switch
Rotate
this
knob
to
check
the
cable
conductor's
continuity
and
connection.
It
also
checks
the
status
of
the
battery
and
ground
connection.
3.
Multi-colore'
Lms
These
LEOs
illuminate
to
indicate
what
input
pins
are
connected
to
what
output
pins.
An
illuminated
pair
of
LEOs
indicate
that
the
corresponding
pins
are
connected
correctly.
An
illuminated
ground
LED
indicates
that
the
corresponding
contact
and
chassis
are
properly
grounded
.
An
illuminated
battery
check
LED
indicates
if
the
battery
is
charged
(bright)
or
low
(dim).
An
illuminated
banana
I
continuity
LEO
and
tone
indicate
continuity.
4.
Battery
[not
included]:
Provides
9V
of
power
(accessible
by
sliding
and
removing
the
battery
case
cover).
Descripcion
del
panel
frontal
y
trasero
-
ID
1.
Entradas
diversas
Conecte
un
extreme
del
cable
a
Ia
toma
de
entrada
adecuada
y
el
otro
extremo
a
Ia
toma
de
salida.
2.
lando
de
6
posicietes
Gire
este
man
do
para
comprobar
Ia
continuidad
y
conexion
del
conductor
del
cable.
Tam
bien
le
permite
comprobar
el
estado
de
Ia
pila
y
conexion
a
tierra.
3.
Pilotes
malticolor
Estos
pi
lotos
LED
se
iluminan
para
indicarle
que
puntas
de
las
entradas
estan
conectadas
a
que
puntas
de
salida.
Un
par
de
pilotos
iluminados
indican
que
las
puntas
correspondientes
estan
conectadas
correctamente.
Un
piloto
de
tierra
iluminado
indica
que
el
correspondiente
contacto
y
el
chasis
estan
correctamente
conectados
a
tierra.
Un
piloto
de
pila
iluminado
indica
que
Ia
pila
esta
cargada
(brillante)
o
descargada
(tenue).
Un
piloto
de
continuidad
I
banana
I
y
tono
indican
continuidad
de
Ia
senal.
4.
Pila
[no
incluida]:
Suministra
9V
de
corriente
(puede
acceder
a
ella
deslizando
y
separando
Ia
tapa
del
receptacula
de
Ia
pila}.
6
MTest-1
Cable
Tester
Description
des
faces
avant
et
arriere
-
Ill
1.
Entrees
diverses
Connectez
une
extremite
du
cable
a
I'
entree
corrcspondante
et
l'autre
a
Ia
sortie
correspondante.
2 .
Sllecteur
6
pesitions
Utiliscz
ce
selcctcur
pour
tester
Ia
continuitc
ct
Ia
conncxion
du
conductcur
du
cable.
Vous
pouvcz
cgalcmcnt
tester
l'etat
de
Ia
pile
et
de
Ia
connexion
a
Ia
terre.
3.
LEOs
multicolores
Ces
LEOs
s'allument
pour
indiquer
Ia
connexion
entre
les
broches
d'entnie
et
de
sortie
.
Les
LEOs
s'allument
par
paires
pour
indiquer
que
les
broches
correspond
antes
sont
connectees
correctement.
La
LED
Ground
s'allume
pour
indiquer
que
le
contact
correspondant
et
le
chassis
sont
correctement
relies
a
Ia
terre.
La
LEO
Battery
Check
s'
allume
pour
indiquer
que
Ia
charge
de
Ia
pile
est
suffisante
(brillant)
ou
basse
(faible).
La
lED
BananaiContinuity
LEO
s'allume
et
un
son
est
produit
pour
indiquer
Ia
continuite
electrique.
4.
Pile
[non
fournie]:
Fournit
une
tension
de
9V
necessaire
au
fonctionnement
de
Ia
pedale
(accessible
en
faisant
glisser
et
en
retirant
le
cache
du
compartiment
de
Ia
pile).
Vorder-
&
Riickseite
-
OlJ
1.
Verschiedene
Eingi1ge
Verbinden
Sie
ein
Kabelende
mit
der
korrekten
Eingangsbuchse
und
das
andere
Kabelende
mit
der
korrekten
Ausgangsbuchse.
2.
6-Weg
Schalter
Ore
hen
Sie
diesen
Regier,
um
den
Ourchgang
und
die
Anschlusse
sowie
den
Batteriestatus
und
die
Masseverbindung
zu
prufen
.
3.
Mehrfarbige
LEOs
leuchtende
LEOs
zeigen
an,
welche
Eingangspole
mit
welch
en
Ausgangspolen
verbunden
sind.
Ein
leuchtendes
LED-Paar
zeigt
an.
dass
die
entsprechenden
Pole
korrekt
verbunden
sind.
Die
leuchtende
Ground
lEO
zeigt
an
,
dass
der
entsprechende
Kontakt
und
das
Chassis
korrekt
geerdet
sind.
Die
leuchtende
Battery
Check
LEO
zeigt
an,
ob
die
Batterie
voll
(hell)
oder
fast
leer
(schwach)
ist.
Die
leuchtende
Banana
I
Continuity
LEO
und
der
Signalton
zeigen
einen
korrekten
Ourchgang
an.
4.
Batterie
[nicht
enthalte1]:
liefert
9V
Spannung
(zum
Einsetzen
der
Batterie
verschieben
und
entfernen
Sie
den
Batteriedeckel)
.
.,
%,
.,
BANANA
I
CONTINUITY
..
,,,
....
GROUND
Ct