
Owner's Manual


Getting
Started
-
1m
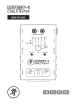
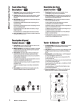
1.
Read
and
understand
the
Important
Safety
Instructions
on
page
2.
2.
Insert
9 V
battery.
3.
Connect
one
end
of
the
cable
to
the
proper
input
jack
and
the
other
end
of
the
cable
to
the
proper
output
jack.
4.
Rotate
the
knob
to
verify
cable
I
battery
I
ground
status.
Puesta
en
marcha
- 1B
1.
lea
completamente
las
lnstrucciones
importantes
de
seguridad
de
Ia
pag.
3.
2.
lntroduzca
una
pila
de
9
V.
3.
Conecte
un
extrema
del
cable
en
Ia
toma
de
entrada
adecuada
y
el
otro
extremo
en
Ia
salida
que
correspond
a.
4.
Gire
el
mando
para
comprobar
el
estado
del
cable
I
pila
I
toma
de
tierra.
Mise
en
muvre
-
01
1.
Lisez
et
assurez-vous
de
bien
comprendre
les
consignes
de
securite
importantes
en
page
4.
2.
lnserez
une
pile
9
V.
3.
Connectez
une
extremite
du
cable
a
!'entree
correspondante
et
l'autre
a
Ia
sortie
correspondante.
4.
Utilisez
le
selecteur
pour
verifier
l'etat
du
cable/de
Ia
pile/de
Ia
connexion
a
Ia
terre.
Erste
Schritte
-
llJ
1.
lesen
und
befolgen
Sie
die
wichtigen
Sicherheitshinweise
auf
Seite
5.
2.
lnstallieren
Sie
eine
9
V-Batterie.
3.
Verbinden
Sie
ein
Kabelende
mit
der
korrekten
Eingangsbuchse
und
das
andere
Kabelende
mit
der
korrekten
Ausgangsbuchse.
4.
Drehen
Sie
den
Regier,
urn
den
Kabel/
Batterie
I
Masse-Status
zu
uberprufen.
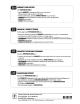
Technical
Specifications
I
Especificaciones
tecnicas
Caracteristiques
techniques
I
Technische
Daten
All
specifications
subject
to
change
femelle
symetriquc
-
asymetrique
•
Buchse
symmctrisch
-
unsymmetrisch
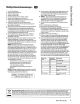
Banana
I
Continuity
-1/B"-
1/4"-
MIDI
- RCA- XLR-
Speakon
Banana
I
Continuity
-
3,5
mm
-
6,35
mm
-
MIDI
-
RCA-
XLR-
Speakon
Internal:
9 V
Battery
Inferno:
Pila
de
9 V
Interne
:
Pile
9 V
Intern:
9
V-Banerie
2.7
X
6.5
X
4.8
in
69 x
165
x
122
mm
1.41b
0.6kg
Todas
estas
especificaciones
estan
sujetas
a
cam
bios
sin
previo
aviso
Les
caracteristiques
peuvent
etre
modifiees
Technische
Anderungen
und
Erganzungen
vorbehalten
c
s::
n
"
(/)
-+
0)
..,
-+
C)
c:
c.
CD
Quick
Start
Guide 1