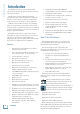
2 X 800W PROFESSIONAL POWERED MIXER PPM1008 OUTPUT POWER: @ 4 OHMS, 800 WATTS PEAK PER CH MINIMUM LOAD: 4 OHMS PER CHANNEL 8-Channel, 2 x 800 W Professional Powered Mixer OWNER’S MANUAL 2 X 800W PROFESSIONAL POWERED MIXER / FX FOOT SWITCH
PPM1008 Important Safety Instructions 1. 2. 3. 4. 5. 6. 7. Read these instructions. Keep these instructions. Heed all warnings. Follow all instructions. Do not use this apparatus near water. Clean only with a dry cloth. Do not block any ventilation openings. Install in accordance with the manufacturer’s instructions. 8. Do not install near any heat sources such as radiators, heat registers, stoves, or other apparatus (including amplifiers) that produce heat. 9.
We realize that you must be keen to try out your new powered mixer, but please read the safety instructions on page 2, and this page first. Ready, steady, go! 1. Turn the channel level, mon 1, and FX/mon 2 controls fully down. 2. Turn down the compressor controls (ch. 1–4). 3. Set all the EQ controls to the center, including the graphic EQ sliders. Setup 4. Turn down the main level and monitor 1 level controls. The PPM1008 powered mixer is designed to be easy to operate, and to be set up quickly. 5.
PPM1008 Introduction It is possible that only one person will read this manual all the way through. Hello mom. Here's another manual from your boy. • Independent 9-band graphic EQs with constant-Q filters on main and monitor outputs • Tape/CD stereo RCA outputs Thank you for choosing a Mackie professional powered mixer. These powerful mixers are designed to meet the needs of almost any small to medium-sized club, meeting room, sanctuary, or outdoor gathering.
IMPORTANT SAFETY INSTRUCTIONS......................... 2 READ THIS PAGE!..................................................... 3 INTRODUCTION....................................................... 4 HOOKUP DIAGRAMS............................................... 6 REAR PANEL FEATURES.......................................... 10 1. POWER CONNECTION.............................. 10 2. POWER SWITCH...................................... 10 3. SPEAKER-LEVEL OUTPUTS........................ 10 4.
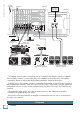
PPM1008 Hookup Diagrams Front Panel Power Amp Mode switch set to Stereo Mains Rear Panel Microphones press HI-Z button press HI-Z button Adjust Vocal Compression Keyboards Portable Recorder SRM450 v2 Powered Stage Monitors (plays mon 1 output) C300z Passive Speakers (plays stereo main mix) HD1801 Powered Subwoofers (plays main mix below 100 Hz) This diagram shows microphones attached to channels 1 and 2, electric guitars connected directly to channels 5 and 6 (with hi-z switch pressed in), and a
Acoustic Guitar and Mic Front Panel Power Amp Mode switch set to Mains/Mon 1 Rear Panel press HI-Z button Adjust Vocal Compression Owner’s Manual Microphones Drum Machine Power Amplifier dual-mono mode C300z Passive Stage Monitors (plays mon 1 output) Keyboards SRM150 Powered Monitor (plays mon 1 output) Passive Subwoofers (plays main mix below 100 Hz) C300z Passive Speakers House System (plays mono main mix) This diagram shows microphones attached to the mic inputs of channels 1 to 4, an elect
PPM1008 Wireless Microphone Microphones Front Panel Power Amp Mode switch set to Stereo Mains Rear Panel Graphic EQ iPodTM Docking Station Wireless Mic Receiver Mackie d.
Front Panel Power Amp Mode switch set to Mon 1/Mon 2 Rear Panel press HI-Z buttons Adjust Vocal Compression Owner’s Manual Microphones Send Guitar Processor Return (connected to INSERT) HD1531 Powered Speaker HD1531 Powered Speaker C200 Passive Stage Monitors (plays mon 2 output) Keyboards C300z Passive Stage Monitors (plays mon 1 output) Electronic Drum Kit HD1801 Powered Subwoofer (plays right main mix) HD1801 Powered Subwoofer (plays left main mix) This diagram shows microphones attached t
PPM1008 Rear Panel Features 2 X 800W PROFESSIONAL POWERED MIXER 6 4 2 3 1 6 OUTPUT POWER: @ 4 OHMS, 800 WATTS PEAK PER CH MINIMUM LOAD: 4 OHMS PER CHANNEL 5 1. POWER CONNECTION 3. SPEAKER-LEVEL OUTPUTS This jack accepts the supplied 3-prong IEC AC power cord. These output connections provide speaker-level output power from the internal power amplifiers to your passive speakers. The power output of the PPM1008 is 500 watts rms per channel into 4 ohms.
• Channel A is the monitor 1 mix, and channel B is the monitor 2 mix. In this setup, the internal power amplifiers are powering two independent passive stage monitor systems. 1/4" TS outputs are wired Tip positive, and Sleeve negative. SLEEVE SLEEVE TIP TIP Make sure that the front panel FX send/mon 2 send switch [51] is pressed in (mon 2) , or there will be no monitor 2 signal to the internal power amplifier channel B.
PPM1008 Front Panel Features 2 X 800W PROFESSIONAL POWERED MIXER / 11 12 8 9 10 14 FX 13 7 FOOT SWITCH Patchbay section This is where you plug in things such as: microphones, line-level instruments, guitars, and effects, a recorder, PA system, powered monitors, powered subwoofer etc. (The speaker-level outputs from the internal power amplifiers are on the rear panel.) Check out the hookup diagrams for some connection ideas.
Do not plug instrument outputs into the mic XLR input jacks with phantom power on, unless you know for certain it is safe to do so. 8. MONO LINE INPUTS (CH. 1 to 4) These 1/4" jacks share circuitry (but not phantom power) with the mic preamps, and can be driven by balanced or unbalanced sources. To connect balanced lines to these inputs, use a 1⁄4" Tip-Ring-Sleeve (TRS) plug. To connect unbalanced lines to these inputs, use a 1⁄4" mono (TS) phone plug or instrument cable.
PPM1008 / 15 17 FX FOOT SWITCH 16 15. FX/MON 2 SEND OUTPUT This 1/4" TRS line-level output can be used to feed an external effects processor (FX) or another set of stage monitors (mon 2). The output here is a copy of what goes into the internal FX processor, being the careful mix of all channels whose FX/mon 2 control [22] is turned more than minimum. 19 20 18 If they want “more me, and less Keith,” you can turn up their channel's FX/mon 2 control, and turn down Keith's.
“Serial” means that the entire channel signal leaves the mixer (insert [12] send), is routed through the effects device, and returns to the mixer (insert return). Examples: compressor, limiter, graphic equalizer. Line-level sources can also be patched through a serial effects device before connection to the mixer. “Parallel” means that a portion of the signal in the mixer is tapped off to the device, processed, and returned to a spare channel of the mixer to be mixed with the original “dry” signal.
PPM1008 2 X 800W PROFESSIONAL POWERED MIXER 21 22 23 24 26 25 27 29 31 30 32 / 33 34 Channel Controls The eight vertical channel strips look very similar, with only a few differences between them. Each channel works independently, and just controls the signals plugged into the inputs directly below it. Mono Channels 1 to 6 • Channels 1 to 6 are mono channels, and their controls affect either the mono mic input or the mono line-level input.
23. HIGH EQ This control allows you set up a nice monitor mix, independent of the main mix or the monitor 2 mix. Adjust these controls on each channel until your band is happy with the stage monitor mix. The controls are off when turned fully down, deliver unity gain at the center detent, and can provide up to 15 dB of gain turned fully up. Adjustments to the channel level or main mix level will not affect the monitor output, but channel EQ and gain [32] will.
PPM1008 2 X 800W PROFESSIONAL POWERED MIXER 21 22 23 24 26 25 27 29 31 30 32 / 33 34 29. LOW EQ 32. GAIN SWITCH The low EQ provides up to 15 dB of boost or cut below 0 80 Hz. The circuit is flat (no boost or cut) at the center detent position. This frequency represents the punch in bass drums, bass guitar, fat synth patches, and some really serious male singers who eat raw beef for breakfast. +15 +10 +5 –5 –10 –15 20Hz 100Hz 1kHz 10kHz 20kHz 30.
+20 Channels 1 to 4 have an in-line compressor circuit with a variable threshold. This is very useful for compression of vocals, for example. Dynamic range is the difference in level between the quietest part of your song and the loudest part. Using a compressor, you are able to squeeze the dynamic range, resulting in an overall steadier, more constant volume level for the signal. It helps sources such as vocals “sit” properly in the mix, and it is very useful for live sound as well.
PPM1008 Master Controls 35 2 X 800W PROFESSIONAL POWERED MIXER 37 36 38 40 39 42 41 43 49 / 51 44 54 35. POWER LED 46 47 48 This LED comes on when the powered mixer is plugged into the correct-voltage AC mains supply, FX and the rear panel FOOT power switch [2] is on. SWITCH If the LED does not turn on, make sure the AC power is live, both ends of the power cord are correctly inserted, your electricity bill has been paid, and the lights in town are still on. 36.
The main mix signals are off with the level fully down, the “U” marking is unity gain, and fully up provides 12 dB of additional gain. This additional gain will typically never be needed, but once again, it’s nice to know it’s there. The level control is stereo, as it affects both the left and right of the main mix equally. This is the control to turn down at the end of the song when you want “The Great Fade-Out.” 39.
PPM1008 amplifiers, so only loudspeakers connected to the rear panel speaker-level outputs [3] will be affected. 2 X 800W PROFESSIONAL POWERED MIXER 48. POWER AMP LIMITER LEDs These independent LEDs turn on when power amplifier channel A or B is being overloaded internally and its internal automatic limiter (which is always in the signal path) is actively working. The LED will pulse in time with how much the limiter is being used in the signal path. 52 53 50 49 / 51 54 46.
51. FX SEND (POST)/MON 2 SEND (PRE) This switch lets you choose which signal path is used to feed the internal effects processor (and the FX/mon 2 output [15]) as follows: 53. PRESET SELECTOR, TAP DELAY and LED Rotate this endless control to select one of the 24 preset effects. When you stop the rotation, that preset will be loaded and become operational. The current preset number is shown in the display [52]. The different presets are shown in this table and marked on the panel silkscreen.
PPM1008 Appendix A: Service Information If you think your powered mixer has a problem, please check out the following troubleshooting tips and do your best to confirm the problem. Visit the Support section of our website (www.mackie.com) where you will find lots of useful information such as FAQs, and documentation. You may find the answer to the problem without having to send your mixer away.
XLR Connectors Mackie mixers use 3-pin female XLR connectors on all microphone inputs, with pin 1 wired to the grounded (earthed) shield, pin 2 wired to the “high” (”hot” or positive polarity) side of the audio signal and pin 3 wired to the “low” (“cold” or negative polarity) side of the signal. See Figure A. This is all totally above board and in full accord with the hallowed standards dictated by the AES (Audio Engineering Society).
PPM1008 TRS Send/Receive Insert Jacks Speakons Mackie’s single-jack inserts are the three-conductor, TRS-type 1⁄4" phone. They are unbalanced, but have both the mixer output (send) and the mixer input (return) signals in one connector. See Figure E. When using the Speakon outputs to connect your loudspeakers, wire the Speakon connectors as shown below: 1– tip ring SEND to processor (TRS plug) sleeve “tip” 1+ COLD This plug connects to one of the mixer’s Channel Insert jacks.
Specifications Distortion (THD + N) 9-Band Graphic EQ (1 kHz, 30 kHz bandwidth) Main and Monitor 1: Mic mono: <0.007% / <0.005% Line mono: <0.005% Line stereo <0.
WEIGHT 25.2 lb 11.4 kg 12.3 in/ 314mm PPM1008 Dimensions 19.3 in/ 490 mm 28 PPM1008 11.
R Stereo Channels 7-8 Mic L R phtm phtm L Hi-Z (Channel 5-6 only) -or- Line Mono Channels Mic OL HI-Z LINE Gain - Efx sum + Mic:+25~+45dB 1 Meg Gain - Mic: +25 ~ +45dB Line: 0 ~ +20dB + OL tap delay display select/tap FX level Post/Pre Comp OL EFX footswitch Sig Insert 80 12K HI 12K HI 48V Break 2.5K MID 2.
PPM1008 Appendix D: Table of Effects Presets No. Title Description Example of its use 01 Plate Reverb This preset emulates vintage mechanical reverberation that was generated with a metal plate. Its sound is characterized by lots of early reflections and no pre-delay. Perfect for thickening percussive instruments, such as a snare drum, or tight vocal arrangements.
Please keep your sales receipt in a safe place. This Limited Product Warranty (“Product Warranty”) is provided by LOUD Technologies Inc. (“LOUD”) and is applicable to products purchased in the United States or Canada through a LOUD-authorized reseller or dealer. The Product Warranty will not extend to anyone other than the original purchaser of the product (hereinafter, “Customer,” “you” or “your”). For products purchased outside the U.S. or Canada, please visit www.mackie.
16220 Wood-Red Road NE • Woodinville, WA 98072 • USA United States and Canada: 800.898.3211 Europe, Asia, Central and South America: 425.487.4333 Middle East and Africa: 31.20.654.4000 Fax: 425.487.4337 • www.mackie.com E-mail: sales@mackie.