Pleiades USB/LAN External Storage Enclosure for 3.5” Hard Drive User Manual & Installation Guide v1.
Table of Contents CHAPTER 1 - INTRODUCTION -1- CHAPTER 4 – LAN DISK SETUP - 11 - ICON KEY -1- NETWORK INSTALLATION ON A PC - 11 - THE PLEIADES USB/LAN -1- NETWORK INSTALLATION ON A MAC - 11 - PACKAGE CONTENTS -1- CONFIGURING THE LAN DISK - 11 - SYSTEM REQUIREMENTS -2- LOGIN ON A PC - 11 - PC REQUIREMENTS -2- LOGIN ON A MAC - 11 - MAC REQUIREMENTS -2- SYSTEM INFORMATION - 12 - INTERFACE INFORMATION -2- MAINTENANCE - 12 - SMB SERVER - 13 - FILE ACCESS ON A PC - 13 - FILE AC
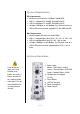
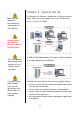
Chapter 1 - Introduction Icon Key Throughout this manual you will see icons on the left margin that denote either Notes or Special Remarks as outlined below: General Notes and Tips Remarks for PC users and Microsoft Windows OS Remarks for Mac users and Apple Macintosh OS The Pleiades USB/LAN The External Storage Enclosure “Pleiades USB/LAN” is made of high quality aluminium, excellent for heat-dissipation.
System Requirements PC Requirements • • • • Minimum Intel Processor II 350MHz, 64MB RAM USB 1.1 equipped PC; WinME, Win2000, WinXP USB 2.0 equipped PC; WinME, Win2000, WinXP 10 Mbps, 100 Mbps or 10/100Mbps Fast Ethernet card, or a USB-to-Ethernet converter equipped PC; Win2000, WinXP Mac Requirements • • • • Minimum Apple G3 processor, 64MB RAM USB 1.1 equipped Mac; Mac OS 9.1, 9.2, 10.1.5, 10.2, 10.3 USB 2.0 equipped Mac; Mac OS 10.2, 10.
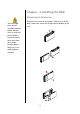
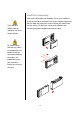
Chapter - 2 Installing the HDD Preparing the Enclosure Your unit might come with an installed hard drive. Before opening such an enclosure, please read the warranty and any other notes from your vendor carefully before doing so, as this might void your warranty. Remove the 4 screws on the bottom, slide the case off the body, remove the screws for the top cover and open up the case.
Hard Drive Assembly The hard drive jumper settings should be master or factory default. Connect the ATA cable and the power line to your hard drive. Install the hard drive and fasten the screws. Align the top cover with the body and fasten the screws, before you slide it back into the casing. Fasten the 4 screws on the bottom and connect your power adapter and interface cable.
Chapter 3 - System Set Up Make sure your computer is connected to the same network as your LAN disk. In LAN mode, the Pleiades is attached to an Ethernet switch or router. Each user on the network can use the LAN disk and access it using FTP or SMB. Do not connect the USB and Ethernet cables at the same time! To assure optimum performance on the network, only use network switches and routers.
Installation on a PC using USB 2.0 Win2000 or WinXP with a USB connection: If the system doesn’t recognize the drive, turn on the power first, before connecting the USB cable.
Installation on a Mac using USB 2.0 Mac OS 9.x or Mac OS 10.x with a USB connection: If the system doesn’t recognize the drive, turn on the power first, before connecting the USB cable. • • • • Turn on your computer and start Mac OS Connect the Pleiades and turn it on No driver installation required The external drive will mount and show up on your desktop** Mac OS 10.2 or above with a USB 2.0 connection: For Mac OS 8.6, the USB extension has to be at least v1.41.
Partitioning & Formatting You can choose to create several partitions through USB but be aware that only the first partition will be recognised on the network (LAN disk function). Be aware that this will destroy all your existing data on the drive, so make sure you have a backup! This step is usually only required the first time you install a factory new hard drive, if you change the format or want to erase all data on your drive.
PC running Win2000 or WinXP: Disk Management Program The drive has to be formatted using the FAT32 file system. If NTFS is used, the drive will only be recognised on USB. • Right click on “My Computer” and choose “Manage” • Select “Disk Management” • Choose the drive you want to format and right click on it for further commands (Choose New Partition) • Follow the Partition Wizard and create a FAT32 partition If you use Win2000 or WinXP and FAT32, the biggest single partition you can create will be 32GB.
Mac OS: The drive has to be formatted using the FAT32 file system (MS-DOS). If Mac OS extended is used, the drive will only be recognised on USB. Mac OS9.2 and earlier, does not support creating partitions on an external drive. To do that, you would need to purchase additional 3rd party software, connect the drive to the internal IDE bus or upgrade to OS X. For Mac OS X, use the Disk Utility to format and create partitions on your external disk.
Chapter 4 – LAN Disk Setup Network Installation on a PC To connect the LAN disk to your network, an additional switch, router or hub may be required.
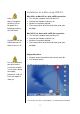
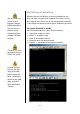
A pop-up dialog box will appear prompting you for your username and password. If you forgot your personal login, press and hold the reset button, turn on the device and wait for ten seconds before releasing it. This will reset the device to its factory default setting. Default Settings Username: admin Password: admin We strongly suggest you to change this, as soon as you are logged in, to prevent unauthorized access. After login, you are able to configure and customize all your settings from that screen.
SMB Server The public folder is created by default. You may access it immediately after the system is ready, without any further setup or login. Make sure you are connected to the same network as your LAN disk. If you can not access the drive using STORAGE, use the IP address and make sure your firewall is setup to allow the access. If you have assigned a password for your shared folder, please input the correct username and password to access your files.
Make sure you are connected to the same network as your LAN disk. If you have assigned a password for your shared folder, please input the correct username and password to access your files. If the anonymous FTP folder is set to a shared folder with password access, the access will be overwritten and the folder can be viewed without further login. For FTP access to your LAN disk from your client, please use dedicated FTP software. File Access on a Mac Click on “Go” and choose “Network”.
Disk Utility If you don’t use the disk utility to format the drive, make sure that you choose the FAT32 file system, otherwise it won’t be recognised on the network. Formatting the disk will erase all your data on the hard drive. Make sure to backup you files BEFORE you click on “Format”! Please read your warranty carefully, as this may vary between different vendors! If you experience network connection problems, use the IP address instead of the STORAGE name.
For troubleshooting and to upgrade the firmware, connect the LAN disk directly to your computer using the standard Ethernet cable. LAN disk settings do not apply when the disk is mounted via USB connection. If you can not find your city on the time zone list, please set the time manually by changing the numbers for “Time”, then saving the new setting. Q: My HDD is not recognised.