AR6 Pro Digital Signage Player User Manual v1.
AR6 Pro User Guide Table of Contents 1 INTRODUCTION 1.1 1.2 1.3 1.3.1 1.3.2 1.4 1.4.1 1.4.2 1.4.3 1.5 1.6 1.6.1 1.6.2 THE AR6 PRO PACKAGE CONTENTS PLAYBACK FORMATS SUPPORTED MEDIA CARDS PLAYBACK FORMATS CLOSE-UP VIEW FRONT VIEW REAR VIEW BOTTOM VIEW REMOTE CONTROL SYSTEM SETUP TV CONNECTION TV OUTPUT 2 STANDARD TV MODE 2.1 2.2 2.3 2.4 2.5 2.6 2.7 HOME VIDEO MODE MUSIC MODE PHOTO MODE SLIDE SHOW FILE LIBRARY SETUP MENU 3 AUTOMATED PLAYBACK 3.1 3.1.1 3.1.2 3.2 3.2.1 3.2.2 3.3 3.3.1 3.3.2 3.3.3 3.
AR6 Pro User Guide 1 Introduction 1.1 The AR6 Pro The AR6 is an entry-level advertising solution that allows the user to play content from an array of media cards on to a display screen. With a host of features and semi-customizable software, it is an extremely cost-effective digital signage solution. The integrated real-time clock allows you to schedule content delivery to get your message across when you need it most. Product Dimensions: 14.0cm x 8.5 cm x 2.6 cm 5.51” x 3.35” x 1.02” 1.
AR6 Pro User Guide 1.4 Close-up view 1.4.1 Front View X Y 1. CF/MD card reader 2. SD/MS/MMC card reader Z [ 3. Infrared receiver 4. Status LED 1.4.2 Rear View X Y 1. Power switch 2. Power receptacle 3. VGA output Z [ \ ] 4. S-Video output 5. Analog video output 6. Stereo audio output 1.4.3 Bottom View Mounting holes for wall mount.
AR6 Pro User Guide 1.5 Remote Control Power ON/OFF Number keys Return to home page or index Toggle playlist ON/OFF Start or pause playback Stop playback Confirm or play Navigation pad Previous file or page Next file or page Mute sound Volume Up/Down In PHOTO mode, press this key to change between the different transition effects. In MUSIC mode, press this key to toggle between the different equalizers.
AR6 Pro User Guide 1.6 System Setup 1.6.1 TV Connection Find a suitable place for your AR6, within 1.4m of your TV screen, panel or LCD display. Connect the power supply to your device and the power outlet. Included with your AR6 is the standard video cable with RCA connector and the S-Video cable. Plug in your preferred video cable to the video output connector on the AR6 and your screen.
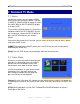
AR6 Pro User Guide 2 Standard TV Mode 2.1 Home On the main screen, you can choose VIDEO MODE to preview all movies (MPEG-1, MPEG2, MPEG-4), MUSIC MODE to display all audio files (MP3, WAV) or PHOTO MODE to display all images (JPG). To see all files sorted by folders as seen on the computer, choose the FILE LIBRARY. To enter the set up menu, choose the SETUP MENU or press the SETUP button on your remote control.
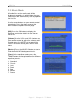
AR6 Pro User Guide 2.3 Music Mode All audio files on the media card will be displayed, regardless in which folder they are stored and it will automatically start to playback the first file. Use the arrow buttons on your remote control to navigate. Press the down arrow or the NEXT button to explore the next page. [OK] Press the OK button to display the equalizer and further details for the chosen music file.
AR6 Pro User Guide 2.4 Photo Mode All images on the media card will be displayed, regardless in which folder they are stored. A preview with small thumbnail images will be shown. Use the arrow buttons on your remote control to navigate. Press the down arrow or the NEXT button to explore the next page if you have a lot of images and use the OK key to display the photo of your choice.
AR6 Pro User Guide 2.6 File Library In the file library, the data on the media card is displayed showing the folders and structure as seen on the computer. Only supported media files will be displayed. Use the arrow buttons on your remote control to navigate and preview the files. Press OK to display the selected file in full screen mode.
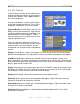
AR6 Pro User Guide 2.7 Setup Menu To access the player’s preferences and advanced settings, go to the HOME screen and press the SETUP key. To set the time, alarm clock and Auto ON/OFF function, press the DISP key. [Photo Setup] Settings for the thumbnail preview matrix (4/9/16/25 images on one page), transition mode (fast or slow) and display orientation (default or ignore).
AR6 Pro User Guide [Advanced Setup] Settings for scheduled playback and timer functions. Playlist: Set to OFF when using the standard and automated modes or select one of the playlists. Single uses a single playlist only, Date uses one list per day, Time depends on the time with up to 24 lists per day and Date+Time depends on both the date and time. You can also turn the Single playlist mode on or off by pressing the INFO button on the remote control.
AR6 Pro User Guide 3 Automated Playback 3.1 Slideshow Setup The slideshow is an easy way to play all files or only images with background music and automatically start when the power is turned on. 3.1.1 Auto Play When this function is enabled, it will play all files (video, audio, images) continuously as soon as the player is turned on. After turning it ON, exit the setup menu and press the HOME key. 3.1.
AR6 Pro User Guide 3.2.2 Editing a playlist To view the current single playlist, select the PLAY file in the file library and open it or refer to the file names that are red instead of black, to see which of the files are currently on the list. To edit a single playlist, files can be removed or added by using the ADD LIST and DEL LIST keys on the remote control or with the context menu. Alternatively, the play.lst file can also be modified with a text editor on the computer. 1.
AR6 Pro User Guide 3.3 Multiple Playlist Mode 3.3.1 Playlist by Date In order to have different playlists throughout the week without having to manually update them every day, you can create daily playlists based on the date. Example: 20070101.lst (year, month, date) 1. On your computer, create a playlist with the file structure like the single playlist. 2. Rename the file from play.lst to the date when that list should be used.
AR6 Pro User Guide 3.3.2 Playlist by Time In order to use different playlists throughout the day without having to manually update them, you can create up to 24 different playlists based on the time. Example: _0900_1800.lst 1. On your computer, create a playlist with the file structure like the single playlist. 2. Rename the file from play.lst to the time when that list should be used. As an example, for the files to be played from 9AM to 6PM, rename the file _0900_1800.lst.
AR6 Pro User Guide 3.3.3 Playlist by Date+Time In order to use different playlists throughout the day and also depending on the date without having to manually update them, you can create playlists based on the date&time. Example: 20070101_0900_1200.lst (year, month, day, time) 1. On your computer, create a playlist with the file structure like the single playlist. 2. Rename the file from play.lst to the date+time when that list should be used.
AR6 Pro User Guide 3.4 Playing Mode This is the play mode that is used when the playlist and slideshow is turned off. By default, it is set to standard and the files on the media player can be accessed with the remote control. 3.4.1 Standard This is the standard browser mode of the AR6 media player. The user is presented with the main screen and can then use the remote control to access and playback the media files. 3.4.2 Repeat This mode is identical to the Auto Play function in the slideshow setup menu.
AR6 Pro User Guide 3.5 Auto ON/OFF For automated daily playback of advertisement or media files, scheduled playback with or without playlist can be set up. Set a time for the unit to turn on and a time for it to turn off again automatically. 1. Press the SETUP key on your remote control to enter the setup menu. 2. Go to the Advanced Setup menu. 3. Select Auto ON/OFF. 4. Turn it ON and exit the setup menu.
AR6 Pro User Guide 3.6 Alarm Set a time for the alarm and choose between the standard beep for the alarm sound or MP3 to play a specific MP3 file instead. 1. Press the SETUP key. 2. Go to the Advanced Setup menu and select Alarm. 3. Select BEEP for the standard alarm sound or select MP3 to play a specific audio file. You will have to store an MP3 file in the root directory of the memory card and rename it “alarm.mp3”. 4. Go to the main page of the setup menu and press the DISP key. 5.
AR6 Pro User Guide 4 Appendix 4.1 FAQ Q: How do I display the file properties? A: Press the DISP button to see the file info and press it again to turn it off. For more details, go to the File Library, select a file, click DISP and choose Properties. Press OK to close the file info. Q: How do I access preferences when it’s greyed out? A: Exit the setup menu, press the HOME key to return to the main screen, press the SETUP key to enter the setup menu again and you will be able to access preferences.
AR6 Pro User Guide Q: My screen is blank and pressing OUTPUT doesn’t change anything! A: The OUTPUT key is locked. Unlock it first and then press the key again until you find the right video signal. Follow these instructions to unlock it: 1. 2. 3. 4. 5. 6. 7.