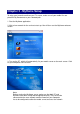
MyHome delivers all the media files stored in your computer through D7 and your home entertainment system. Watch your digital movies, enjoy your music and view your photos, all from the comfort of your couch. With its well-designed and easy-touse interface, you can now navigate all your media and content using the remote control on your TV screen! V1.
Table of Contents CHAPTER 1 - INTRODUCTION -1- THE MYHOME APPLICATION SYSTEM REQUIREMENTS PC REQUIREMENTS INSTALLATION PC -1-1-1-1-1- CHAPTER 2 - MYHOME SETUP -2- HELP GENERAL [THEME] [LANGUAGE] [MEDIA SERVER] SERVICE [MEDIA SERVICE] [WEB BOOKMARK] SYSTEM [SYSTEM] [SECURITY] [MAC ADDRESS] -3-4-4-4-4-5-5-5-6-6-6-6- CHAPTER 3 ADDING THE MYHOME SERVER -7- MANUALLY ADDING NEW SERVER -8- CHAPTER 4 - VIDEO PLAYBACK - 10 - INTRODUCTION [HOME] [GO TO] [SEARCH] [PLAY] [SHUFFLE] [BACK] VIDEO LIBRARY [VI
CHAPTER 8 - ITUNES - 41 - INTRODUCTION SHARING MUSIC VIDEO PODCAST RADIO - 41 - 43 - 44 - 45 - 46 - CHAPTER 9 WINDOWS MEDIA CONNECT - 47 - INTRODUCTION PLAYING WINDOWS MEDIA CONNECT CONTENTS - 47 - CHAPTER 10 - RHAPSODY - 50 - INTRODUCTION PLAYING REALRHAPSODY CONTENTS - 50 - 51 - CHAPTER 11 - NAPSTER - 53 - INTRODUCTION PLAYING NAPSTER CONTENTS - 53 - 54 - CHAPTER 12 WINDOWS MEDIA PLAYER - 56 - INTRODUCTION CREATING A PLAYLIST - 56 - 57 - CHAPTER 13 - WINAMP - 58 - INTRODUCTION CREATI
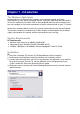
Chapter 1 - Introduction The MyHome Application MyHome delivers all the media files stored in your computer through your home entertainment system. Watch your digital movies, enjoy your mp3s and view your photos, all from the comfort of your couch. With its well-designed and easy-to-use interface, you can now navigate all your media and content using the remote control on your TV screen! Screenshots and descriptions used in this manual are based mainly on Internet Explorer.
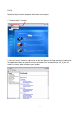
Chapter 2 - MyHome Setup To enjoy your favourite media on your TV screen, make sure all your media files are placed in My Documents or your selected path. 1. Start the MyHome application. 2. Wait a few seconds for the service to start up. You will then see the MyHome welcome screen. 3. Turn on the D7, which will automatically list your media server on the main screen. Click on your computer name to enter.
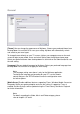
Help MyHome Help includes complete information on all topics. 1. Choose Help > Contents 2. You will see the Contents side menu on the left. Browse the help content to understand the application better or read the manual and other files included on the CD. If you still need assistance, please contact your vendor.
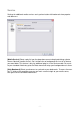
General [Theme] You can change the appearance of MyHome. Choose your preferred theme from the drop down list and click OK to save your setting. MyHome will automatically refresh and switch to your new layout. To change themes directly on your TV screen, click on your computer name on the main screen to login to your media server and select Setting from the MyHome home page. Select your preferred theme from the drop down list and click on the Submit button to save the new setting.
Service Settings for additional media services and synchronisation with bookmarks from popular web browsers. [Media Service] Select a playlist from the drop down menu to be played during a photo album slideshow (media service). Set it to None for no background music at all or choose your own folder. This feature is only for additional plug-ins in the Service mode. For music to your standard slideshow, go to the Photo menu and setup your background music there.
System System information and setup for internet security and access restrictions. [System] Shows system information of your media server. If you need to add the media server on the D7 manually, refer to this tab for computer name and IP address. You also have the option to change the port number in case of conflicts but the default port (8000) will work in most cases, so you will likely not need to change anything. [Security] Option to enable and use a password for login.
Chapter 3 - Adding the MyHome Server Once MyHome is setup and the server is running, turn on D7 and wait for it to start up. It will automatically search for new UPnP devices on the network and list the MyHome server on the main screen. If you have installed MyHome on more than one computer, it will list all servers it can find. Select the one you would like to use and press ENTER to access your shared files on the remote computer. Note: The colour of the MyHome icon changes depending on the status.
Manually Adding New Server If MyHome is not recognised automatically, you can add it manually. 1. Click on the add button on the D7 main screen. The setup wizard will appear and you can add your own MyHome server.
3. Enter the corresponding computer name and IP address. To look up this information on your computer, go to Preferences of your MyHome application. In the System category, both computer name and IP address will be shown. 4. Enable the “Always connect to this MyHome” option, if you want your D7 to directly connect to this MyHome server every time after start up. Note: This option only works when the selected MyHome is the only MyHome server on the network. 6.
Chapter 4 - Video Playback With this feature you can watch your video file collection on the TV screen. By default, MyHome will play all your video files (in MPEG, AVI, DAT format) that are stored in your My Document/My Videos folder. Introduction 1. On D7, login to your media server and select Video. 2. Browse for your files and press Enter to play your movies. 3. If the video library has been updated, go back to the main screen and select Video once more.
Video Library [Video Folder] By default, this path is set to your media files stored in My Documents/My Videos. Browse for a different folder to locate the videos if they are stored elsewhere. [Watch Folder] If you have additional folders with video files on a different drive or in a separate folder, add this folder to the watch list, so that you can access it from D7. These files will not be visible on your computer screen but can be accessed and viewed on the TV screen.
Video Playlist Once the path to your video folder has been set, you will be able to see all your media files in the video playlist. If you have recently updated the content, click on the minus sign on the left hand side of the My Videos folder to collapse the file list, and then expand it again or go to home and back to video. This will refresh the content and list all new files. [Random Playback] Enable this option to play all your video files in random order.
Chapter 5 - Music Playback This feature lets you play your various music files through your home entertainment system. By default, MyHome plays MP3, AAC, OGG, WAV and WMA audio files that are stored in your My Documents/My Music folder. Additionally, you can use MyHome together with Windows Media Player or Winamp. Introduction 1. On D7, login to your media server and select Music. 2. Browse for your files and press Enter to play your audio files. 3.
Music Library [Music Folder] By default, this path is set to your media files stored in My Documents/My Music. Browse for a different folder to locate the songs if they are stored elsewhere. You can retrieve ID3 tags for MP3 songs to show on the TV screen. Enable the scan for song information option and your music library will be categorised into Artist, Genre and Album. If the song title from an ID3 tag exists, it will be displayed instead of the filename.
Music Playlist Once the path to your music folder has been set, you will be able to see all your media files in the music playlist. If you have recently updated the content, click on the minus sign on the left hand side of the My Music folder to collapse the file list and expand it again or go to home and back to music. This will refresh the content and list all new files. [Random Playback] Enable this option to play all your audio files in random order.
Chapter 6 - Photo Playback This feature lets you view photos and enjoy a slideshow of them on your TV screen. By default, MyHome will display all your image files (JPG, BMP, TIF, GIF and PNG format) that are stored in your My Document/My Pictures folder. Introduction 1. On D7, login to your media server and select Photo. 2. Browse for your files and press Enter to see your image files. 3. If the photo library has been updated, go back to the main screen and select Photo once more.
Photo Library [Photo Folder] By default, this path is set to your media files stored in My Documents/My Pictures. Browse for a different folder to locate the images if they are stored elsewhere. [Watch Folder] If you have additional folders with photos on a different drive or in a separate folder, add this folder to the watch list, so it can be accessed from your D7. These files will not be visible on your computer screen but can be accessed and viewed on the TV screen.
Photo Playlist Once the path to your pictures folder has been set, you will be able to see all your media files in the photo playlist. If you have recently updated the content, click on the minus sign on the left hand side of the My Pictures folder to collapse the file list, then expand it again or go to home and back to photo. This will refresh the content and list all new files. [Random Playback] Enable this option to play all your photos in random order.
Chapter 7 - Service Extra features and services let you to do more with MyHome. You can surf the web from the comfort of your living room, access a wide variety of information, or add 3rd party media services. Introduction 1. On D7, login to your media server and select Service. 2. Select the service you would like to access and press Enter. [Web Bookmarks] MyHome will synchronise with your favourites and bookmarks from Firefox or Internet Explorer.
Preferences and Setup [Media Service] Select a playlist from the drop down menu to be played during a photo album slideshow (media service). Set it to None for no background music at all or choose your own folder. This feature is only for additional plug-ins in the Service mode. For music to your standard slideshow, go to the Photo menu and setup your background music there. [Web Bookmark] Select your browser to synchronise your bookmarks.
2. Change the bookmark name if required and then click OK to save the bookmark. 3. Once done, you will see your new bookmark in your favourites list. 4. On your TV under Service, you can now see the new bookmark.
5. Click on your favourite link and you will be able to view the website on TV. 6. Press stop on your remote control to exit the website. Use the navigation keys to browse the website, and the Volume adjustment buttons to scroll up and down. 7. To navigate back to the main screen, press the HOME button on your remote control. That is the A-B button with the yellow house icon. RSS Bookmarks You have to manually add sites that have RSS feeds.
2. Clicking on the icon to display the RSS page. 3. Add the RSS page to your bookmarks by selecting Add to Favourites... from the Favourites menu. 4. Selecting Add to Favourites... will bring up the Add Favourite dialogue. Change the name if required and then click OK to save the bookmark.
5. Once done, you will see your new bookmark in your favourites list. 6. On your TV under Service and Web Bookmarks, you can now see the new bookmark. 7. Click on an RSS feed to read an overview of the news article shown at the bottom of the page.
8. Click on the icon to access the external web site on which the article is hosted. 9. Press stop on your remote control to exit the website. Use the navigation keys to browse the website, and the Volume adjustment buttons to scroll up and down. 10. To navigate back to the main screen, press the HOME button on your remote control. That is the A-B button with the yellow house icon.
Podcast Bookmarks You can find many RSS news feeds with audio files - these sites will play an audio file rather than display text. The RSS news feeds with audio files are often called Podcast stations. 1. Find a Podcast station such as www.podcast.net or similar. 2. You can click on the icon and add it to your bookmarks. If you would like to listen icon to play it (a to the music before adding it to your bookmarks, click on the window will pop up as shown below).
3. Clicking on the icon will bring you to the RSS page. 4. Add the RSS page to your bookmarks by selecting Add to Favourites... from the Favourites menu.
5. Selecting Add to Favourites... will bring up the Add Favourite dialogue. Change the name if required and then click OK to save the bookmark. 6. Once done, you will see your new bookmark in your favourites list.
7. On your TV under Service and Web Bookmarks, you can now see the new bookmark. 8. Click on a link to listen to the radio or news broadcast.
MP3 Bookmarks If you have a direct link to MP3 files, you can also add these as bookmarks. 1. Find a website offering free MP3 files. 2. To add MP3 as bookmark, right click on the file link and select Add to Favourites...
3. Selecting Add to Favourites... will bring up the Add Favourite dialogue. Change the name if required and then click OK to save the bookmark. 4. Once done, you will see your new bookmark in the favourites list.
5. On your TV under Service and Web Bookmarks, you can now see the new bookmark. Click on it to listen to the song. 6.
Radio Playlist (PLS) You can bookmark your favourite radio playlist from a website such as www.shoutcast.com or similar. Instead of downloading the PLS file and saving it in your music library, you can add a link to your bookmarks. 1. Find a website which provides playlists for webradio or other programs. 2. To add the playlist to your bookmarks, right click on the Tune In! icon and select Add to Favourites...
3. Selecting Add to Favourites... will bring up the Add Favourite dialogue. Change the name if required and then click OK to save the bookmark. 4. Once done, you will see the new bookmark in your favourites list.
5. On your TV under Service and Web Bookmarks, you can now see the new bookmark that you have added. Click on it to bring up the list of songs or play the radio station directly if there is only one on the list. 6.
Firefox Live Bookmarks For general bookmarks for Firefox, please refer to the previous pages with examples shown using Internet Explorer. As an example, we show you how to add Live Bookmarks in Firefox. Firefox has feature called Live Bookmarks. Live Bookmarks are special types of bookmarks in the Firefox browser that update themselves with whatever new content is available on the bookmarked site. 1.
3. Selecting an RSS feed will bring up the Add Bookmark dialogue. Select OK and you will see Live Bookmarks with the rest of your bookmarks. 4. Once you have added your site as a Live Bookmark, you will see the list of latest RSS feeds (articles) from the site as a list of bookmarks in that folder. This will get refreshed as RSS feed is getting updated. Note: If a site has an RSS feed, but the icon doesn't show up, you can add the feed manually. Select New Live Bookmark...
5. On your TV under Service and Web Bookmarks, you can now see the new bookmark folder that you have added. Click on it to see the different RSS feeds. 6. Click on an RSS feed to read an overview of the news content, which will show on the bottom of the page.
7. Click on the icon to access the external web site on which the RSS feed is hosted. 8. Press stop on your remote control to exit the website. Use the navigation keys to browse the website and the Volume adjustment buttons to scroll up and down. 9. To navigate back to the main screen, press the HOME button on your remote control. That is the A-B button with the yellow house icon.
3rd party Media Services There are many media services you can download, such as iTunes Music, MSNBC News, Music Radio, Podcast and others. 1. To install a media service, store the new media service in the service folder on your computer. By default, that folder can be found in your Program Files under MyHome\webapps\ROOT\service. 2. Once installed, you can access the service from your TV screen. 3. Click on your preferred service to access that particular website. 4.
Chapter 8 - iTunes Instead of setting up your own music folders, you can use iTunes to manage your media files. Once setup, you can access the iTunes library from your TV screen. Introduction 1. Make sure that you have added or imported your music files (in AAC, AIFF, MP3 and WAV formats) to the iTunes library. 2. Once your iTunes library is setup, close iTunes and start the MyHome application. To start, select Edit and then select Preferences option at MyHome menu bar. 3.
4. Instead of the music playlist, MyHome will now show the iTunes logo. The content will be synchronised with your iTunes library and you will be able to see the files on your TV. 5. On your TV screen, you can now access your files from the iTunes library. Note: If you would like to share your iTunes music library, you can do so in your iTunes preferences.
Sharing Music To share your music files, start iTunes and go to preferences. Select the Sharing tab and enable Share my music. Setup the folders you would like to share and name the share. DO NOT enable the password option.
Video The MyHome application can also play your music and movie files stored in your iTunes library. MyHome supports MPEG4 videos in mov and mp4 formats. Drag your movies into your preferred album. They will be added to your iTunes library. On D7, the movies will be listed under Video. You will see a playlist created by iTunes, and will then be able to access your file from your TV.
Podcast The MyHome application can play podcasts downloaded from the iTunes music store. Start iTunes and access the podcast directory to find new content. Select your preferred podcast and subscribe to it. After adding the new podcast, it will be listed in iTunes under Podcasts. On your D7 under Music, you can click on the podcasts playlist to see and access the files.
Radio The MyHome application supports PLS Radio Playlist files that are downloaded from webradio sites such as www.shoutcast.com. Launch iTunes; click the radio icon on the left and select your preferred radio station. Add the playlist to your library and close iTunes. On your D7 under Music, you can click on the newly added playlist to see and access the webradio stations.
Chapter 9 - Windows Media Connect Windows Media Connect is an exciting new technology and can be supported on many of these devices, including digital audio receivers, digital media receivers, connected DVD players and set-top boxes. Introduction If you are running Windows XP (SP2) and have Windows Media Connect (WMC) installed, MyHome provides an extra option for you to view and stream protected content from WMC.
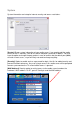
Playing Windows Media Connect Contents 1. Turn on D7, wait for it to boot and WMC will auto detect the new device. 2. Click on the balloon tip and the Windows Media Connect wizard will be pop up. Select the device to be authorised. The D7 must be authorised before the shared content of WMC can be viewed on TV. If there is more than one device available, a list of authorised or available devices can be seen on WMC control panel. 3.
4. Click on it to access your shared media files and browse the content of your computer. 5. The content will be listed according to the media files, folders or playlist. Choose the one suitable for your content.
Chapter 10 - Rhapsody RHAPSODY is a jukebox that gives you unlimited access to thousands of albums right from your PC. It brings together a large legal collection of digital music from around the world, the Internet's best radio, flexible CD burning, and detailed music information - all in one easy-to-use service. Introduction If your machine has RealRhapsody installed, MyHome provides an extra option in preferences for you to view and stream protected content from RealRhapsody.
3. Click the Start button if this is the first time to start the UPnP Server. Note: Enable the “Start UPnP Server once logged in” option to automatically startup the UPnP Server in the future. Playing RealRhapsody Contents 1. Make sure both MyHome and Rhapsody are turned on and running. On the TV screen, go to the Media Service Portal and under Service click on the Rhapsody plugin to access the Rhapsody Media Server.
2. Browse for your files and listen to your music from your living room. 3. The files are sorted and displayed according to your Rhapsody library.
Chapter 11 - Napster Napster is a jukebox that gives you unlimited access to thousands of albums right from your PC. Introduction If your computer has Napster installed, MyHome provides an extra option for you to view and stream protected content downloaded or purchased from Napster via Windows Media Connect (WMC). The detail steps are described as below. 1. Launch Napster. 2. Search for new music and click on buy album or buy track to purchase the song. 3.
4. The downloaded songs will be stored in the My Music folder. Playing Napster Contents 1. Before you can play your purchased songs, you need to start up Windows Media Connect (WMC). See Chapter 9 for details about WMC. Once started, your D7 will be able to access the Napster library. Click on the Windows Media Connect device on your main screen.
2. Once you have logged in, click on the All Music folder to access the Napster music files. 3. Your purchased songs are now visible on your TV screen. Click on a song to playback the music file. Note: To access the Napster library, ensure WMC has authorised your device. The detailed steps for WMC are described in Chapter 9.
Chapter 12 - Windows Media Player Windows Media Player is an all-in-one media player that provides a great experience for discovering, playing and taking your digital entertainment anywhere--on Windows XPbased PCs and a wide choice of portable devices. Introduction MyHome supports playlists that are created in Windows Media Player (WMP). The playlist file formats that MyHome currently supports are .wpl, .asx and .m3u. 1. In MyHome, choose Edit and select Preferences. 2.
Creating a Playlist Creating playlists may differ from version to version. Following example is using Windows Media Player 10. 1. Launch Windows Media Player and create a new playlist by selecting a new Now Playing List from the File menu. Enter a name for the new playlist and press OK. The new playlist is now ready and you can add your favourite files. 2. Drag and drop your music files into the new playlist. 3. To save the playlist, go to File, select Save Now Playing List As... .
Chapter 13 - Winamp Winamp is a jukebox that gives you unlimited access to thousands of albums and other multimedia content right from your PC. Introduction MyHome supports playlists created in Winamp. The playlist file formats that MyHome currently supports are .b4s and .m3u. 1. In MyHome, choose Edit and select Preferences. 2. In the Music category, go to the Music Library tab. 3. Enable the “Scan Windows Media Player/Winamp playlist” option to use the Windows Media Player’s playlist.
Creating a Playlist 1. Launch Winamp and create a new playlist by clicking the Playlists button. A playlist name is automatically created. 2. To rename the new playlist, right-click the playlist and select Rename playlist. Type in a new name and press Enter. The new list will then be displayed in the Playlist Editor. 3. You can now add music files to the new playlist. 4. To save the playlist, click the Playlist button again and select Save playlist as... 5.
Chapter 14 - Appendix FAQ Q: I don't see the Video, Music and Photo Menu. A: You must first install the MyHome application on your computer. Once installed, make sure your firewall is setup properly and then refresh the screen. Your computer should then be recognised and you can access the shared files from the main screen. Q: What music file formats can I use? A: MyHome is able to play audio files of the following format: · MPEG I Layer 1 (MP1) (.mp1, .mpa) · MPEG I Layer 2 (MP2) (.
3. Check the computer's connection to your home network. Ensure that your computer is physically connected to your home network. If your home network includes a shared internet connection, check that your computer is on your home network by opening the internet browser and accessing the internet. 4. Check the D7 connection to your home network. Ensure that your D7 is physically connected to your home network.
Q: An error occurred while browsing Video, Music and Photo content on D7! A: Check following to troubleshoot your device: 1. Check that the content you are playing has not been deleted. If you have moved or deleted some files while D7 is accessing miHome, it may cause an error. If this happened, please refresh (go back to the Home screen) or restart your D7. Additionally, you may also want to restart your MyHome application on your computer to update the playlist content. 2.