Hydra S2 4-Bay Storage Enclosure for 3.5” Serial ATA Hard Drives User Manual v1.
Hydra S2 User Guide Table of Contents CHAPTER 1 - INTRODUCTION CHAPTER 3 - SYSTEM SET UP 9 CONNECTION TO YOUR COMPUTER 9 1 ICON KEY 1 HARD DISK MODE 9 THE HYDRA S2 1 RAID SETUP 9 OTHER AVAILABLE INTERFACES 1 BIG (JBOD SPANNING) 10 DETAILED VIEW 2 FAST (RAID 0 STRIPING+STRIPING) 10 FRONT VIEW 2 SAFE (RAID 1 MIRRORING) 11 REAR VIEW 3 SAFE II (RAID 10 MIRRORING+STRIPING) 11 2TB VOLUME SWITCH 3 INSTALLATION ON A PC 12 SMART FAN 3 REMOVE PROCEDURE 12 SYSTEM REQUIREMENTS 4
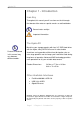
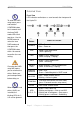
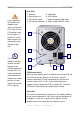
Hydra S2 User Guide Chapter 1 - Introduction Icon Key Throughout this manual you will see icons on the left margin that denote either notes or special remarks as outlined below: General notes and tips. Important information. The Hydra S2 Features mentioned in this manual may vary between different models. Maximise your storage capacity with four 3.5” SATA hard drives with the Hydra 4-Bay SATA Enclosure.
Hydra S2 User Guide Detailed View To enter the RAID setup menu, press and hold the CONFIRM button for 3 seconds until the three RAID mode LEDs blink two times. Use the MODE button to select the new RAID mode and then press the CONFIRM button within 10 seconds to confirm the new setting. Changing the RAID setup will require you to re-format the drives. Make sure you backup all data before doing so. Front View LED indication and buttons as seen beneath the front panel of the Hydra S2.
Hydra S2 If your Operating System does not support single volumes larger than 2TB, make sure the 2TB volume switch on the Hydra is at position B, so that larger volumes are automatically split into two smaller ones. User Guide Rear View 1. Smart fan 2. Security lock slot 3. 2TB volume switch 4. 2TB volume indication 5. eSATA port 6. USB 2.0 port 7. Power receptacle (100-240V) 8.
Hydra S2 User Guide System Requirements PC Requirements • Minimum Intel Pentium III CPU 500MHz, 128MB RAM • eSATA equipped PC with port multiplier; Windows XP/Vista • USB 2.0 (USB 1.1) equipped PC; Windows 2000/XP/Vista Mac Requirements • Minimum Apple G4 processor, 128MB RAM • eSATA equipped Mac with port multiplier; OS 10.4 or above • USB 2.0 (USB 1.1) equipped Mac; Mac OS 10.2 or above Supported Hard Drives • Up to four 3.5" SATA-I or SATA-II hard drives (1.
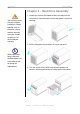
Hydra S2 User Guide Chapter 2 - Hard Drive Assembly Your unit may come with pre-installed hard drives. Before opening such an enclosure, please read the warranty from your vendor carefully, as this could void your warranty. 1. Unlock the switch at the bottom of the case and push the inner chassis from the back until the front panel is out of the housing. 2. Pull the front panel out and then lift it up to remove it.
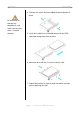
Hydra S2 User Guide 4. Remove the screws that are holding the plastic bracket in place. Be careful not to damage any components, and make sure the hard drive is installed correctly. 5. Install the hard drive as illustrated below with the SATA connector facing away from the front. 6. Mount the drive with the six screws from the side. 7. Repeat the previous 3 steps for each hard drive cassette you are planning to install.
Hydra S2 User Guide 8. Slide the hard drive cassettes back into the HDD rack and fasten the screws by turning them clockwise. Be careful not to damage any components, and do not force the drives into place. If they don’t slide in properly, make sure the drives have been installed in the correct position and that there is nothing out of place.
Hydra S2 User Guide Adding more Hard Drives For the BIG and SAFE mode, it is possible to start with less than 4 drives and install more at a later point. When adding more drives without changing the RAID mode, the hard drives do not have to be re-formatted again. 1. Remove the front panel and install the additional drive(s). 2. Press and hold the CONFIRM button for 3 seconds. The 3 RAID mode LEDs will light up twice at the same time to confirm when the setup mode has been accessed. 3.
Hydra S2 User Guide Chapter 3 - System Set Up Connection to your Computer Only one interface can be used at any given time. Always connect the power cord to your device before you plug it into the wall socket. Changing the RAID setup will require you to re-format the drives.
Hydra S2 If the total capacity exceeds 2TB and your Operating System does not support single volumes over 2TB, set the 2TB switch to position B and it will automatically split the volumes (A+B / C+D). For the FAST mode, hard drives of identical capacities are recommended. If different, the total amount of the space that can be used will depend on the drive with the smallest capacity. User Guide BIG (JBOD spanning) The drives show up as one large single volume.
Hydra S2 For the SAFE mode, hard drives of identical capacities are recommended. If different, the total amount of the space that can be used will depend on the drive with the smallest capacity. If the total capacity exceeds 2TB and your Operating System does not support single volumes over 2TB, set the 2TB switch to position B and it will automatically split the volumes (A+B / C+D). User Guide SAFE (RAID 1 mirroring) The drives show up as two volumes, each representing one set.
Hydra S2 User Guide Installation on a PC Before connecting the device, install the hard drives and set your preferred RAID mode. If the system doesn’t recognise the drive, turn on the power first, before connecting the interface cable or connect the device before booting your Operating System. If the drives have been pre-installed and setup already, you do not need to change anything, unless you prefer a different setup. • • • • Turn on your Computer and start Windows. Connect the Hydra and turn it on.
Hydra S2 User Guide Installation on a Macintosh Before connecting the device, install the hard drives and set your preferred RAID mode. If the system doesn’t recognise the drive, turn on the power first, before connecting the interface cable or connect the device before booting your Operating System. If the drives have been pre-installed and setup already, you do not need to change anything, unless you prefer a different setup. • • • • Turn on your computer and start Mac OS.
Hydra S2 User Guide Partitioning & Formatting If the drive does not appear, make sure the drivers are installed properly and the power is on. Be aware that this will destroy all your existing data on the drive, so make sure you have a backup! This step is usually only required the first time you install a factory new hard drive, if you change the RAID mode or want to erase all data on your drive.
Hydra S2 User Guide Mac OS For Mac OS X, use the disk utility to format and create partitions on your external disk. If the drive does not appear on the desktop, make sure there are no extension conflicts and the power is turned on! If the total capacity exceeds 2TB and your Operating System does not support single volumes over 2TB, set the 2TB switch to position B and it will automatically split the volumes (A+B / C+D).
Hydra S2 User Guide Chapter 4 - Appendix Technical Questions Please read your warranty carefully, as this may vary between different vendors! For RMA and other questions, please contact your vendor or check out their online support area! FAQ Q: What file system should I choose to format my drive? A: This will depend on how you want to use the drive but in general, here is what we recommend: • Windows 2000/XP/Vista Æ NTFS • Mac OS X Æ HFS+ (Mac OS Extended) • To use it on both PC and Mac Æ FAT32 Q: When