
User manual


Your unit might
come with a pre-
installed hard drive.
Before opening
your enclosure,
please read the
warranty and any
other notes from
your vendor
carefully before
doing so, as this
might void your
warranty.
Ensure that the
HDD jumper is set
to Master.
Be careful not to
damage any cables
or components and
double check the
connection between
the cables, the
bridge board and
your hard drive
before replacing the
case cover.
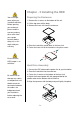
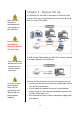
Chapter - 2 Installing the HDD
Preparing the Enclosure
1. Remove the 4 screws on the bottom of the unit.
2. Lift the top cover off the body.
3. Remove the heat sink from the enclosure.
4. Place the hard drive upside down in the heat sink.
5. Fasten the heat sink to the hard drive using four screws
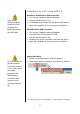
Hard Drive Assembly
1. Connect the IDE cable and the power line to your hard drive.
2. Place the hard drive into the enclosure.
3. Fasten the 4 screws on the bottom of the heat sink.
4. Attach the thermal probe with the tape provided to the
spindle motor on the bottom-side of the drive.
5. Align the top cover with the body and push lightly into place.
- 3 -