NAVIGATION MULTIMEDIA RECEIVER INSTRUCTION MANUALS
Thank you for buying this product, please read through these operating instructions, so you will know how to operate your model properly. After you have finished reading the instructions, put them away in a safe place for future reference. CONTENTS ACCESSORIES ...................................................................................................................................................2 PRECAUTIONS ..........................................................................................
ACCESSORIES Mounting Bracket (Half Sleeve) X1 Removable Trim Ring equipped on the unit X1 Mounting Screw M5 X1 Rubber X1 Remote Control X1 Mount Strap X1 Wire connector X1 User manual X1 AV in cable X1 Screws(M5X6) X4 Screws(M24) X1 Release key X2 Washer X1 Desiccant X1 GPS antenna X1 GB-2
PRECAUTIONS 1. Be sure to connect the color coded leads according to the diagram. Incorrect connections may cause the unit to malfunction or damage the vehicles electrical system. 2. Be sure to connect the speaker (-) leads to the speaker (-) terminal. Never connect the left and right channel speaker cables each other or to the vehicle body. 3.Make sure all the connections are completely correct before turning on your unit. 4.
To enjoy optimum sound and images while playing, handle the discs as follows: ——Handle the disc by its edge to keep the disc clean, and do not touch the surface. PRECAUTIONS This unit can play the following discs only: ——do not use your disc with paste residue or ink attached. ——does not use disc with labels or stickers attached, which may leave a sticky residue while beginning to peel off. (Shown as the picture) Do not attempt to modify the unit, modifying the unit may cause an accident.
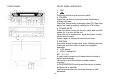
FRONT PANEL OPERATION FRONT PANEL 1. MIC 2. Press this button to open the front panel. 3. VOL/SEL Adjust the volume by turning the knob clockwise or counterclockwise. Press this button briefly to display select TILT item then adjust the viewing angle by rotating the VOL button. 4. POWER/MUTE Press the button to turn on the unit, press and hold the button for 1s to turn off the unit. When the unit is switched on, press the button to shut off the sound output. Press it again to resume previous sound level.
18.OPEN Press to open or close the TFT display. 19. Anti-theft led indicator It will flash when the detachable control panel is removed. 20. RESET Using a sharp object such as a pencil to reset the unit. 21. TFT display 22. TILT /∧/∨ Press ∧ / ∨ button to adjust the angle of TFT display. 23. MENU In DVD mode, press the button to display the DVD SETUP menu. Press and hold to display the SYSTEM SETUP menu. In other modes, press the button to display the SYSTEM SETUP menu. 24. GPS SD CARD slot 10.
☆ ☆☆TIPS FOR MODES SWITCH RADIO OPERATION ☆☆☆ Using the Touch screen In any mode, the controls on the touch screen change dynamically to suit the task at hand. 1/9. Touch once: to seek a station automatically downwards/upwards. 2.station preset button Touch once: to select the preset station. Touch and hold: to store the current station into the preset station position. 3.BAND To switch bands. 4. LOC To select strong or weak stations reception mode. 5.AMS Touch once: to browse preset stations.
MULTI-- PLAYER OPERATION RDS OPERATION In DVD mode, the touch screen displays as following after touch at random position top right/left area. 1. REG To turn on or off the REG function. 2.PTY To switch the RDS program types by ◀ / ▶ . 3.TA to turn on /off TA function 4.AF to turn on /off AF function 5.PTY to search program type 6/7. Seek-/Seek+ Touch to seek a station manually downwards/upwards. 8.RADIO To switch to radio operation page. 1.
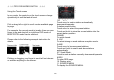
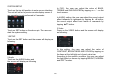
SYSTEM SETUP In FIG.1, the user can adjust the value of BASS, TREBLE and SUB WOOFER by tapping on + / - on the touch screen. Touch on the top left position to enter source interface. The unit will return to previous mode display screen if any operation is not performed in 5 seconds. In AUDIO setting, the user can adjust the sound output effect leftwards or rightwards by tapping ▶ ◀ button; the sound output effect front wards or rearwards by tapping ▲▼ button. 3.
TIME SETTING Tapping on TIME button to turn to time adjust page. LOUD ON: To turn on the LOUNNESS function. OFF: To turn off the LOUDNESS function. RADIO REGION To select the right region as per the user locates. TOUCHSCREEN TIME MODE Set the time display mode(12H/24H). TIME DISPLAY ON: To display the time OFF: To turn off the time display mode. Tapping on TOUCHSCREEN button to turn to time TOUCHSCREEN adjust mode.
REMOTE CONTROL REMOTE CONTROL Installing the battery Slide the tray out on the back of the remote control and insert the battery with the plus (+) and minus (-) poles pointing in the proper direction. Use and care of the remote control Point the remote control in the direction of the front panel to operate to use it. Notes: Using batteries improperly can cause them to explode. Take note of the following points: * Keep the battery out of the reach of children.
8. REMOTE CONTROL OPERATION 1. 2. 3. 4. 5. 6. PWR Press this button to turn on the unit, press and hold it again to turn off the unit. In unit on, press this button to turn on/off MUTE function. ST/AUDIO In radio mode, press to select stereo or mono reception; In DVD mode, press it to change the audio language. LOC/SUB-T In radio mode, press to select local stations or distant stations; Press to change the subtitle language in DVD playback mode.
16. 17. 18. 19. 20. 21. 22. 23. and hold this button to turn REG on or off. SETUP In playback mode, press to display system setting picture, the user can select some relative constant parameters. In other mode, press this button to enter system setup page. II> (Slow forward or slow reward) In playback mode, press the button to select slow forward or slow reward. MENU Press the button to return to the root menu of the disc in DVD playback mode.
performs the same operation. 3. Volume Control Press VOL+ button on the remote control to increase the sound level and press VOL- button on the remote control to decrease the sound level. Rotate VOL button on the head unit also performs the same operation. 4. Turning Loudness On/Off Briefly press LOUD button on the remote control to activate loud function. Press it again to shut down LOUD function. 5.
It is a function for storing up to 6 stations. Follow the two steps: Select the desired band; hold down AMS button, the stations with good reception are stored automatically. There are three ways to tune in a station upwards automatically as below: press >> button on the remote control; press >>I button on the panel; touch on > button on the touch screen. 2.
select the six preset stations. 7.2 To select the exact station, press GOTO button on the remote control then enter the exact frequency numbers. RDS (RADIO DATA SYSTEM) OPERATION The RDS allows you to receive a variety of information such as traffic information, station names, and to retune automatically to a stronger transmitter that is broadcasting the same program.
All types for your selection are listed in table as below:: NEWS CURRENT AFFAIR INFORMATION VARIED POP MUSIC FINANCE CHILDREN COUNTRY NATIONAL ROCK MUSIC OLDIES SPORTS EDUCATION M.O.R. MUSIC LIGHT CLASSIC SERIOUS CLASSIC OTHER MUSIC WEATHER SOCIAL AFFAIR RELIGION PHONE IN FOLK DOCUMENTARY TRAVEL TEST LEISURE JAZZ MUSIC ALARM DRAMA CULTURE SCIENCE place a hands-free call by using a Bluetooth compatible with the mobile phone. *When you place a call, speak loudly and clearly.
performs dial(receiving) a call or hang up a call function *The incoming call will interrupt the sound output through other source, and switch to the hands-free phone screen automatically when it is received. After the call is ended, the unit will be back to the previous mode. * The hands-free phone sounds output through the built-in speakers. When calling, press Audio Transfer button on the screen to switch the mode to receive a call by using mobile phone, and press it again to return to hands-free mode.
*If the disc does not eject, press MODE button to switch to the radio mode, and press and hold EJ button for 3 seconds. will be reconnected automatically. MANUAL: Tap on this button then the unit and the device will be reconnected manually. 3.3 PAIR Tap on this button to pair up the unit and the device. 3.4 RESET Tap on this button to reset the bluetooth setup. 4. BLUETOOTH AUDIO FUNCTION Tap on A2DP PAGE button on the screen shown in FIG.1, the screen will display as following FIG.5.
de-available. Press it again to return to normal playing. Repeat Playing In playback mode, press RPT on the remote control to perform replaying function when you need to repeat the chapter you like.
DVDs can provide audio playback with different language. With DVDs featuring multi-audio recordings, you can press AUDIO button to switch between language and audio systems during playback. Selection options switch as follows: This function is operated by using the remote control. Notes: This function only operates with DVDs featuring multi-audio recordings.
screen in their original format, regardless of which TV display format you select. item in sub-menu or press SETUP button. 1. GENERAL SETUP PAGE To display Setup TV screen format, video type and all DVD functions. 1.2 OSD LANGUAGE On Screen Display (OSD) Language: Users can select the whole setup menu and on-screen display language. 1.1 TV DISPLAY The TV Display which select the different ratio of display format and the screen of TV.
3.2 SUBTITLE SUBTITLE: Sets the preferred subtitle language as the default when playing DVD. (If DVD supports these languages) Users can switch the binaural mode among STEREO, L-MONO, R-MONO and MIX-MONO. 2.1.2 D.R.C Select the provided option to change the Dynamic range setting. 3. PREFERENCE SETUP PAGE The preference setting is active only when disc has been stopped completely, and the setting is effective on next time power on till exchanging the saved setting. 3.
3.4 PARENTAL PARENTAL: The parental control function works in conjunction with the different censorship classes assigned to DVDs. These classes help to control the types of DVDs that the family watches, There are up to 8 censorship classes for DVDs. SYSTEM SETUP Note: The PARENTAL is changeable when4.1 PASSWORD MODE set to OFF. After setting the level of parental control, please set the password as ON to perform the lock of changing. 4. PASSWORD SETUP PAGE 4.
5. EXIT SETUP MENU MP3 OPERATION SETTING THE TV SCREEN SIZE Multi-aspect ratio suits to different TV screen size. Function supported by DVD discs. There are many functions available on DVD discs and the functions vary per player and per manufacturer. Playing a disc, an SD/MMC card or a USB device containing MP3 files Connect a USB device or press OPEN button to release the front panel, insert a disc into the disc slot or SD/MMC card into the card slot.
Repeat playing When playing MP3 files, press the RPT button repeatedly on the remote control to select repeat mode: REPEAT ONE, OFF. While in REPEAT ONE mode, it will play one track repeatedly. The defaulted mode is REPEAT ALL mode, the unit will play all tracks repeatedly. The number buttons Selecting any track directly by using Number button(0-9).For example, if you want to play the 23rd track, just press button 2 and then press button 3 and the corresponding track will be played.
SD card witch stored navigating map. *Long press SRC/NAV button or Touching NAV item on source selection screen also activate the function Calibration To avoid the touching effect function invalid, please calibrate the touchable screen before perform navigating operation For more information regarding the NAV.Operation, please refer to the user manual of navigating electronic map. Please confirm your place is not under the bridge, on the tunnel or near the building which can infect the signal received.
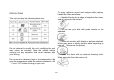
unit might not give its optimum performance. The cords must not cover up the area shown in the figure below. This is necessary to allow the amplifiers to radiate freely. Install the Unit 1. Install the mounting bracket into the dashboard of the car. And adjust the mounting bracket to horizontal 2. Fix the mounting bracket into place by pressing its tags outwards 3.
CABLE CONNECTION Note: 1. The reverse video line should be available while connected to +12 V. 2. The tel mute line should be available while connected to B-. 3. The parking break line should be available while connected to the car break. A wrong connection can be easily detected by our technical service for a repair request under the warranty.
SPECIFICATION GENERAL Power requirement -----------------------------------------------------------------------------------------12VDC (10.
TROUBLESHOOTING Common problems Symptom Power isn’t switched ON. The unit doesn’t operate Cause Remedy Leads and connectors are incorrectly Ensure that all connections are connected. correct A fuse of power cable has blown. Replace the old fuse with a new one with the same capacity; try to determine the cause of the problem. Outside factors are causing the unit to Reset the unit by pressing RESET operate incorrectly. with the tip of a pen. Operation with the remote Battery power is low. Load new batteries.
The pictures stops (pauses) and the unit cannot be operated. There is no sound. The player skips audio or video. The picture is deformed. Reading of data has become impossible After pressing STOP once, start during playback. playback once more. Volume level is low. Raise the volume level This unit is not firmly installed. Check that the unit is installed firmly The disc is dirty or damaged. Clean the disc or change it. The aspect setting is incorrect for the Select the appropriate aspect display.
The picture is extremely The disc features a signal to prohibit Since this unit is compatible with the unclear/distorted and dark copying (some discs may have this). copy guard analogy copy protect during playback. system, when playing a disc that has a signal prohibiting copying, the picture may suffer from horizontal stripes or other imperfections when viewed on some displays.
English Hereby, Macrom , declares that this M-DVD7701 is in compliance with the essential requirements and other relevant provisions of Directive 1999/5/EC. Finnish Macrom vakuuttaa täten että M-DVD7701 tyyppinen laite on direktiivin 1999/5/EY oleellisten vaatimusten ja sitä koskevien direktiivin muiden ehtojen mukainen.
The BLUETOOTH ® world mark and logos are registered trademarks owned by the Bluetooth SIG, Inc. and any use of such marks by ALDINET S.p.A. is under license. The MACROM brand is a registered trade mark of MACROM SA and any use of such marks by ALDINET S.p.A. is under license.