Owner’s Manual M-DVD9900 cover page MACROM M-DVD9900 1din mobile DVD Player OWNER’S MANUAL
FEATURES POWER Operating voltage : 12V +20% DC -10% Low power consumption design. COMPATIBILITY This DVD player can play the following discs: DVD, CD, VCD, DVCD, MP3, CD-R,CD-RW. SYSTEM FUNCTIONS VIDEO OUTPUT SYSTEM System MULTI , NTSC or PAL switchable.
TABLE OF CONTENTS Safety precautions 1 Precautions 2-3 Identification of controls 4-5 When using remote control Connections Loading and unloading a disc 6 7-8 9 Turning the power on and off Switching between DVD and AUX Video Input Adjusting the volume 10 Playing a disc Playing/pausing Tuning the sound on and off 11 Stopping playback Fast-forwarding/ fast-reversing Finding the beginning of chapters or tracks 12 Playing from the desired location 13 Chapter/track/title repeat playback Switchi
SAFETY PRECAUTIONS +20% This digital versatile disc (DVD) video player uses 12V -10% DC. For future reference, record the model and serial number (located on the case of the DVD player) in the space provided. CAUTION: THIS DVD VIDEO PLAYER IS A CLASS I LASER PRODUCT. USE OF CONTROLS OR ADJUSTMENTS OR PERFORMANCE OF PROCEDURES OTHER THAN THOSE SPECIFIED HEREIN MAY RESULT IN HAZARDOUS RADIATION EXPOSURE.
Precautions Warning This symbol means important instructions. Failure to heed them can result in serious injury or death. Do not disassemble or alter this unit. Doing so may result in an accident, fire or electric shock. Keep small objects such as battery out of the reach of children. If swallowed, consult a physician immediately. Use the correct ampere rating when replacing fuses. Failure to do so may result in fire or electric shock. Use only in cars with a 12 VOLT negative ground.
Precautions Temperature Be sure the temperature inside the vehicle is between +55° C(+131° F) and -5°C(+23°F) before turning your unit on. Moisture condensation You may notice the CD playback sound wavering due to condensation. If this happens remove the disc from the player and wait an hour for the moisture to evaporate. Damaged disc Do not attempt to play cracked, warped, or damaged discs. Playing a bad disc could severely damage the playback mechanism.
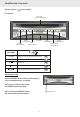
Identification of controls See the page in for the details.
Identification of controls Remote Control EJECT AV SEL 3 To locate next chapter or track To change the playback speed REPEAT To locate previous chapter or track In menu mode, the button(s) of these four are used to select your desired item.
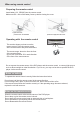
When using remote control Preparing the remote control Insert battery (3V, CR2025) into the remote control. Make sure the + side of the battery faces up before closing the cover. 1) Open the cover, pull the cover as illustrated 2)Insert cell (3V),Close the cover Operating with the remote control This section shows you how to use the remote control. Point the remote control at the remote sensor and press the buttons.
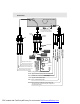
Connections Rear of product REMOTE Remote control sensor jack. Connect IR sensor plug directly to this jack for remote operation. Nacarat Yellow Left (White) Right (Red) Yellow Connect either AUDIO OUT AUDIO OUT AUDIO IN VIDEO OUT Sub woofer Front speaker Rear speaker RCA input for video games Center speaker RCA input for rear-view camera Front speaker Rear speaker To monitor with rear-view camera input To headrest or ceiling mount monitors Black: (-) neg. ground input.
Connections 1 NOTE Connect Audio out( audio related, see page 19) SPDIF/RAW RAW DATA VIA SPDIF SPDIF/PCM PCM DATA VIA SPDIF ANALOG ANALOG OUTPUT Coaxial cable Audio cable 2 NOTE 1 Refer to the owner's manual for " the connected monitor " as well. 2 Refer to the owner's manual of the connected equipment for additional information. 3 When you connect the DVD player to other equipment, be sure to turn off the power .
Loading and unloading a disc Loading and unloading a disc Turn on the power before loading and unloading discs. 1 2 Insert the disc with the side containing words diagrams facing upwards. Unloading disc Press EJECT ejected. button, the disc is automatically Once the disc is partially inserted, it is drawn in automatically. Playback starts. EJECT EJECT Notes: If wrong disc, upside-down discs or dirty discs have been inserted, “NO DISC ” is displayed. Remove the disc.
Turning the power on and off Switching between External and Internal Video Adjusting the volume 1 Turning the power on and off AV SEL Press POWER button The power turns on. To turn the power off, Press button again. POWER Play Position Memory Function Even if you turn power off or switch the ignition Key to OFF during playback or change the video source, playback will continue from the point where playback stopped when the power is turned ON again.
Playing a disc Playing/pausing Tuning the sound on and off 1 Playing a disc VCD CD MP3 Caution ~ Press DVD With some DVDs, certain operations are disabled. Such operations are not possible on such DVDs. The DVD functions described in this manual are not supported by all instructions for details on the features supported. Fingerprints on a disc may adversely affect playback. If a problem occurs, remove the disc and check for fingerprints on the playback side. Clean the disc if necessary.
Stopping playback Fast-forwarding/ fast-reversing Finding the beginning of chapters or tracks 2 Fast-forwarding/ DVD VCD CD MP3 fast-reversing During playback press 7(fast-reverse) or8 (fast-forward) Each time you press the7 or8 button, the playback speed changes to X1, X2, X3 , X4 the normal speed or normal speed. Press to return to normal playback. DVD VCD CD MP3 1 Stopping playback Press the stop button during playback to stop playback. Press during playback.
Playing from the desired location Input the chapter, the title or the time from which you want to start playback using the joystick and the number keys(0~9). ~ TITLE 02/02 CHAPTER 012/057 TOTAL TITLE NUMBER CURRENT TITLE TOTAL CHAPTER NUMBER CURRENT CHAPTER (When title 2 is input ) DVD VCD CD TITLE 02/02 CHAPTER 012/057 1 Playing from (When chapter 12 is input ) the desired location Locating a specific location by entering the track number, the chapter number or the time.
Chapter/track/title repeat playback Switching the audio language 2Switching the DVD VCD audio language REPEAT On DVDs including multiple audio modes or multiple audio languages, the audio language can be switched during playback. REPEAT During playback, press AUDIO. The sound switches between the different audio modes recorded on the disc each time the button is pressed.
Switching the angle Switching the subtitles 2 Switching the subtitles DVD With DVDs on which multiple subtitle languages are recorded, the subtitle language can be switched during playback. During playback, press SUB. The subtitle language switches between the languages recorded and you also can select whether to display the subtitles on the disc each time the button is pressed. 1 Switching the angle DVD Note: Some time may be required for the subtitle to change.
Displaying the disc status 2 Displaying the disc VCD CD status Use the procedure described below to display the status(track number, etc.)of the currently playing Video CD or Audio CD on the screen. During playback, press DISPLAY. The playback status switches each time the button is pressed. 1 Displaying the disc status TOTAL ELAPSED xx:xx:xx PLAY:11 TOTAL:22 TOTAL REMAIN xx:xx:xx PLAY:11 TOTAL:22 DVD Use the procedure described below to display the status(title number, chapter number, etc.
Adjusting the sound setting 1 Adjusting DVD VCD CD MP3 the sound setting The sound settings can be changed to suit your personal preferences and usage.
Changing the default settings(setup) 1 Changing EJECT DVD VCD CD MP3 the default settings(setup) Press SETUP during stop. The setting menu appears. Press joystick button to move the cursor to the item, then press ENTER to select the item you want.
Changing the default settings(setup) EJECT SETUP MENU MAIN PAGE GENERAL SETUP SPEAKER SETUP AUDIO SETUP PREFERENCES EXIT SETUP SPEAKER SETUP LT/RT STEREO DOWNMIX DOWNMIX LOUD SPEAKERS SETUP LT/RT SET LT/RT DOWNMIX STEREO SET STEREO DOWNMIX AUDIO SETUP ANALOG SPDIF/RAW SPDIF/PCM AUDIO OUT OP MODE STEREO L-MONO R-MONO MIX-MONO DUAL MONO DYNAMIC PRO LOGIC LPCM OUTPUT AUDIO OUT LPCM 48K LPCM 96K AUDIO RELATED 19 LINE OUT RF REMOD FULL 6/8 4/8 2/8 OFF OFF ON AUTO ANALOG ANALOG OUTPUT S
Changing the default settings(setup) EJECT SETUP MENU MAIN PAGE GENERAL SETUP SPEAKER SETUP AUDIO SETUP PREFERENCES EXIT OP MODE OPERATIONAL MODE SETUP DUAL MONO DUAL MONO(1+1) SETUP DYNAMIC PRO LOGIC SETUP LINE OUT LINE OUT MODE RF REMOD TV WITH NO AV INPUT STEREO SET STEREO MODE L-MONO SET LEFT MONO MODE R-MONO SET RIGHT MONO MODE MIX-MONO SET MIXED MONO MODE FULL -6/8 -4/8 -2/8 -OFF DYNAMIC RANGE COMPRESSION SET PRO LOGIC ON/OFF SET LPCM TO 48K OR 96K 20 DYNAMIC RNG COMPRESSIO
Changing the default settings(setup) EJECT SETUP MENU MAIN PAGE GENERAL SETUP SPEAKER SETUP AUDIO SETUP PREFERENCES EXIT SETUP CHINA FRANCE HONG KONG JAPAN TAIWAN GBR USA PREFERENCES MULTI NTSC PAL TV TYPE LOCALE 1G 2 3 PG 4 PG 13 5 6 PG-R 7 NC-17 8 ADULT NO-PARENTAL PARENTAL PASSWORD CHANGE RESET DEFAULTS SMART NAV WITH MENU LOGO OLD PASSWORD: NEW PASSWORD: CONFIRM PWD: MPG LOGO JPG LOGO TV TYPE LOCALE SET TV STANDARD PREFERRED LOCALITY CODE 21 MULTI MULTISYNC TV NTSC NTSC TV PAL
Changing the default settings(setup) EJECT SETUP MENU MAIN PAGE GENERAL SETUP SPEAKER SETUP AUDIO SETUP PREFERENCES EXIT PARENTAL SETUP 1G 2 3 PG 4 PG 13 5 6 PG-R 7 NC-17 8 ADULT NO-PARENTAL SET PARENTAL CONTROL PASSWORD CHANGE NOTE: Factory default password is 3308.
MP3 instruction EJECT 1 MP3 instruction MP3 Insert the MP3 disc then playback starts, the MENU of elapsed track appears. SMART MP3 MP3 MP3 Mp3 MP3 ROOT PLAY MODE NAV 1 J&Z xxx xxx xxx xxx 1 2 3 4 5 REP-ONE PRESS 9: 34 Number button To play the preceding or the next track In play mode, it starts to fast-forward or fast-revers To select the track with the number button Note: For some discs it is not possible to select items for the menu to menu screen using the number buttons (0~9).
Others In case of difficulty If operation freezes, the screen goes black or the unit should otherwise not function properly, try turning the power off then back on. Alternatively, try the following methods in the order listed until the unit returns to normal playback mode. 1) Turn the car’s ignition OFF and back ON again. 2) Press the RESET button on the face of the unit This guide will help you isolate the problem if the unit is at fault.
Note Specifications Note Remove this CD stopper before use. Apply the paper cover (supplied) on the screw hole to keep out dust. Remove this CD stopper before use. Apply the paper cover (supplied) on the screw hole to keep out dust. Two black sticking papers There are 2 mounting screws on the case of the DVD player( as above figure shows) to protect the unit during shipping. You need to remove the sticking papers and screws after unpacking this product.
Accessories and Hardware Mounting Bracket (Half Sleeve) X 1 Mounting Screw M5 X1 Mounting Grommet X1 CL PO CL EA W OC ER Rear Strap (Brace) X 1 Hex bolt M5 x 14 X2 Side bracket X 2 Flat head screw M5 x 4 X2 Removable Trim Ring equipped on the unit X1 K R 1 0 4 DI RA SP DIO LA /D YVD 2 DI 7 PL TI TL 5 ST AY MO SP LA Y 3 8 DE AN E BA 9 6 GL E ND SE SE SC SU TU EK - EN P TE SE GO SE M EN R U AN B V O+ L L M AU _ M UT DI EK + TO EM O E Remote control x
Owner’s Manual M-DVD9900 Back cover page MACROM MACROM SA. LUXEMBOURG, MENDRISO BRANCH 3 MOREE ST.