NAVIGATION MULTIMEDIA RECEIVER
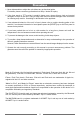
Safety Precautions Thank you for purchasing this product. Please read through these operating instructions so you will know how to operate your model properly. After you have finished reading the instructions, keep this manual in a safe place for future reference. Please don't change the fuse on the power cord without professional guidance, using improper fuse may cause damage to this unit or even cause fire. Only connect the unit to a 12-volt power supply with negative grounding.
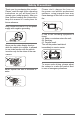
Precautions 1. Never disassemble or adjust the unit without any professional guide. For details, please consult any professional car shop / dealer for inquiry. 2. If the front panel or TFT monitor is squalid, please use a clean silicone cloth and neutral detergent to wipe off the spot. Using a rough cloth and non-neutral detergent such as alcohol for cleaning may result in scratching or decoloration to the applicant. 3.
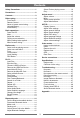
Contents Safety Precautions....................................1 Select iPod as playing source...............16 Play........................................................16 Precautions................................................2 Adjust sound ..........................................17 Adjust volume........................................17 Mute.......................................................17 Select preset equalizer..........................17 Adjust fader/balance.........................
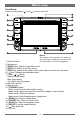
Before using Front Panel Press any key except [ ] and [ ] to turn on the unit. Notice: The graphic in this manual is for reference only, and may be different from that in real unit. Reference to real unit is suggested. 1. Remote Sensor 2. Microphone 3. [RADIO] Key: Switch to the Radio source 4. [DISC] Key: Switch to the Disc source 5. [SRC] Key: Switch to the media source menu, select a source from the menu. 6. [ ] Key: Release the detachable panel. 7.
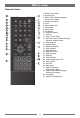
Before using Remote Control 1. Media source menu. 2. Eject the disc 3. Select DVD dialogue language Show music catalog 4. Display information 5. Zoom 6. Select radio band 7. Setup menu 8. Goto search 9. A-B Repeat 10. Repeat playback 11. Call out 12. Play / Pause / Enter 13. Move the cursor up/down/left/right. Up/down: Manual tuning 14. Slow playback 15. Numeric keys 16. Random playback 17. Intro playback 18. Stop playback 19. Mute the volume 20. Adjust volume 21. Hang up 22. Previous/Next 23.
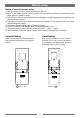
Before using Notes of remote control using 1) Aim the remote control at the remote sensor on the unit. 2) Remove the battery from the remote control or insert a battery insulator if the battery has not been used for a month or longer. 3) DO NOT store the remote control under direct sunlight or in high temperature environment, or it may not function properly. 4) The battery can work for 6 months under normal condition. If the remote control can't work, please change the battery.
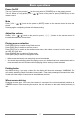
Basic operations Power On/Off Turn on: Press any key except [ ] on the front panel or [POWER] key on the remote control. Turn off: When on, long press [ VOL / / ] knob on the panel or press [POWER] key on the remote control. Mute Press [ VOL / / ] knob on the panel or [MUTE] button on the remote control to mute the sound. Pressing again or adjusting volume will release muting.
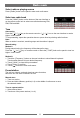
Radio mode Select radio as playing source Press [ Radio ] button on the panel to enter main radio menu. Select one radio band Press the [ BAND ] button on the bottom of the user interface or on the remote control unit to select one radio band among FM1, FM2, FM3 and AM1. Tune Auto tuning ]/[ ] key on the remote control or [ ] / [ ] icon on the user interface to seek a Press the [ higher / lower station. To stop searching, repeat the operation above or press other keys having radio functions.
Radio mode Local Seeking Touch [Options] on the screen, touch the buttons right to [ Local ] to turn on/off Radio Local function. When Local On, only stations with sufficient signal strength will be detected. RDS Text RDS service availability varies with areas. Please understand if RDS service is not available in your area, the following service is not available.
PLAY Load Disc You can play video, audio or images stored on the following discs: • DVD Video, DVD-R, DVD-RW • VCD • Audio CD, CD-R, CD-RW Note: Ensure that the disc contains playable content. Eject the Disc Press the [ ] key on the front panel or remote control to eject the disc. When the disc is ejected, the unit switches to the previous source. Connect USB Device 1. Insert the small end of the supplied USB cable to the rear USB port, 2. Connect the other end of the cable to your USB device.
PLAY Play/Pause 1. O nce a disc, USB or SD/MMC card is inserted, play starts automatically. For DVD movie, if a menu appears, press [ ] to start play. 2. To pause, touch [ ]. To resume play, touch [ ]. Previous/Next Touch [ chapter. ]/[ (DVD) ] key on the screen to skip to previous/next track/ Fast Forward/Backward (Video) Press repeatedly [ ]/[ ] key on the screen to playback fast forward/backward (2x,4x,8x,20x).
PLAY For CD/MP3/WMA files: 1. Touch [ ] to select: [ ]: Play the current chapter repeatedly. ]: Play all the tracks in current folder repeatedly. [ ]: Play all the tracks repeatedly. [ [ ]: Cancel repeat play Tip You can also press REPEAT on the remote control to select repeated play mode. Repeat A-B You can repeat a specific of video file (repeat A-B). 1. Touch bottom half of the screen to display control menu, if necessary. 2. Touch [ 1/2 ] to display the 2nd menu, if necessary. 3.
PLAY Rotate Pictures 1. W hen you view pictures, touch bottom half of the screen to display control buttons menu on the screen. 2. Touch [ Rotate ] repeatedly to rotate the picture. Zoom You can zoom in pictures for a close view. 1. W hen you view pictures, touch bottom half of the screen to display menu on the screen. 2. Touch [ 1/2 ] to display the 2nd menu, if necessary. 3. Touch [ ] repeatedly to zoom the picture. 4. Use [ ], [ ], [ ], [ ] keys to pan through the enlarged picture.
Bluetooth mode You can make or receive phone calls with Bluetooth-enabled phones through the unit. You can also listen to music from a Bluetooth-enabled device. Pair the Bluetooth-enabled devices To connect your Bluetooth device to the unit,you need to pair the device to the unit. Pairing needs only to be done once. You can pair up to five devices. 1. 2. 3. 4. Turn on the Bluetooth function on the device. Search for Bluetooth device with the device. Select “M-OF7020” in the pairing list.
Bluetooth mode Receive call 1. If there is incoming call, [Incoming call...] flashed on the screen. ](green) on the screen to accept call. 2. Press [ ](red) to terminate the call. 2. When conversation ends, touch [ Tip ∙ You can select to accept calls automatically by set [Auto answer] to [On] status. Switch Phone Call to the Mobile If you do not want your passenger to hear your incoming call, you can switch the call to the mobile. 1. During talking, touch [ Privacy ].
iPod Select iPod as playing source Turn on the unit’s power, and connect an iPod to the unit via a iPod cable, the unit will load the iPod automatically. Play For audio files 1. When the music root menu appears on the screen, touch an option (such as PlayLists, Artists...), then touch [ ] or [ ] to select a file. 2. Touch the selected option to play back. 3. To pause, touch [ ]. To resume play, touch [ ]. 4. Skip to previous/next track, press [ ]/[ ] key.
Adjust sound Fader/balance Press [ Menu ] button on the front panel, then touch [Fader - Balance] on the screen. You can also adjust the front and rear speaker balance, the left and right speaker balance,and subwoofer settings. 1. Touch [ Left ], [ Right ] to adjust Balance value. Touch [ Back ], [ Front ] to adjust Fader value. Touch [ 0 ], [24] to adjust Subwoofer volume. ] to exit. 3. Touch [ Equalizer 1. Press [ Menu ] button on the front panel, then touch [Equalizer] on the screen. 2.
SETUP Settings 1. Press [MENU] button on the front panel. 2. Touch [Settings]. The settings menu is displayed. Video settings 1. Touch [Video]. 2. Touch on the option desired. If necessary, select an item from the drop-down menu: Video settings Aspect Ratio Video Input Detect parking brake Parking Assistance Rear Camera 3. Touch [ Options Description Full For widescreen display Normal For normal display You can select the video input format : Auto/NTSC/PAL On/Off You can set the parking on or off.
SETUP Sound settings 1. Touch [Sound]. 2. Touch on the option desired. If necessary, select an item from the drop-down menu: Sound settings Options Description On Turn on the subwoofer. Subwoofer Off Turn off the subwoofer Subwoofer Filter Select the frequency of Subwoofer Filter. On The dynamic Bass Boost functions is on. Dynamic Bass Boost Off The loudness function is off. 3. Touch [ ] to exit. DVD rating 1. Touch [DVD rating]. 2. Touch on the option desired.
SETUP Volume settings You can set different volume for different modes. 1. Touch [Volume]. 2. Touch on a source. ∙ [DVD] ∙ [Aux] ∙ [USB] ∙ [DVB-T] ∙ [SD Card] ∙ [Navigation] ∙ [Radio] ∙ [iPod]] ∙ [Bluetooth] ∙ 3. Touch [ ] or [ ] to assign value: -6 to +6. When switch to the source, the volume increases or decreases automatically. 4. Touch [ ] to exit.
Other modes Listen to other devices You can connect an external audio/video device to the unit. 1. Connect the car audio to the device with the supplied AV cable. 2. Press [SRC] button on the front panel to display the media source menu. 3. Touch [Aux]. 4. Operated the connected the device(see the instructions manual of the device). Reset When the unit hangs up, you can reset it. Press RESET hole with a ball-point pen or similar tool. Reset Tip When the unit is reset, all the settings are reset.
Device connections Important notes for installation Perform the electrical connections required:: 1. Connect the original Fakra connector to supplied Fakra-ISO cable. 2. Connect the CanBus interface to “CAN BOX” cable. 3. Connect the antenna to the “RADIO ANT” input. If the vehicle is equipped with double antenna, use the supplied antenna adapter. 4. Connect the supplied GPS antenna to the “GPS antenna” input.
Detachable panel Remove detachable panel The RADIO/DISC/SRC button block can be detached. To detach the front panel, turn off the unit and perform the following steps: 1. Press [ ] button on the front panel until the button block pops out. 1 2. Prize the right side of the block to take it off. 2 Re-attach detachable panel 1. Fix the button block to the unit. 2. Gently press until it clicks.
Specifications Geneal Reference Supply Voltage..................................................................... 12V(DC) Operating Voltage Range.........................................................10.5 - 15.8V(DC) Max Operating Current..................................................................................15A Grounding System..................................................... Car Battery Negative Pole Dimensions(WXHXD).............................................................
Specifications Supported formats: ·USB or memory file format:FAT16,FAT32 ·Mp3 bit rate(date rate):32-320 Kbps and variable bit rate ·WMA v9 or earlier ·Directory nesting up to a maximum of 8 levels ·Number of albums/folders:maximum 99 ·Number of tracks/titles:maximum 999 ·ID3 tag v2.0 or later ·File name in Unicode UTF8(maximum length:128 bytes) Unsupported formates: ·Empty albums:an empty album is an album that does not contain MP3/WMA files,and is not be shown in the display.
Troubleshooting Warning Never remove the casing of this apparatus. To keep the warranty valid, never try to repair the system yourself. If you encounter problems when using this apparatus, check the following points before requesting service. If the problem remains unsolved, please contact your dealer. No power ∙ Car engine has not been started. Start the car engne. ∙ Connections is ncorrect. ∙ Fuse has been damaged. Replace fuse. No sound ∙ Volume is too low. Adjust volume.
Troubleshooting Fuse is broken ∙ The Fuse type is incorrect. Replace it with a 15A fuse. ∙ Speaker wire or power wire is grounded. Check the connections. Display show ERR-12 ∙ USB date error. Check the USB device. About Bluetooth device Music playback is unavailable on the system even after successful Bluetooth connection. ∙ The device cannot be used with the sstem to play music. The audio quality is poor after connection with a Bluetooth-enabled device. ∙ The Bluetooth reception is poor.
28 28 PIN NO.
Made for iPod touch (2nd, 3rd and 4th generation), iPod classic, iPod nano (2nd, 3rd, 4th, 5th and 6th generation), iPod mini, iPod with video, iPhone 4, iPhone 3GS, iPhone 3G or iPhone. iPhone, iPod, iPod classic, iPod nano, iPod mini and iPod touch are trademarks of Apple inc., registered in the U.S. and other countries. The BLUETOOTH ® worldmark and logos are registered trademarks owned by the Bluetooth SIG, Inc. and any use of such marks by ALDINET S.p.A. is under license.