
Specifications


Align an object using the alignment guides 111
Specify snap alignment settings
Snapping offers a way of precisely placing an object on the Stage by having
the object affix itself to other objects and alignment tools. You’ll specify
snap align settings to show horizontal and vertical guides, which will assist
you in placing art on the Stage.
1. Select View > Snapping > Snap Align to set this option, if it is not
already selected.
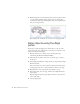
2. Select View > Snapping > Edit Snap Align.
3. In the Movie Border text box of the Snap Align dialog box, enter 30 px
(pixels) to snap objects to a 30-pixel Stage border.
4. Verify that 10 pixels appears in both the Horizontal and Vertical Snap
Tolerance text boxes.
Snap tolerance determines how close an object must be to another
object or alignment tool before it snaps into place.
5. Click OK.
Align an object using the
alignment guides
Now that you’ve specified snap alignment settings, you’ll use the snap
alignment settings that you specified to assist you in placing an object on
the Stage.
1. In the Tools panel, click the Selection tool.
2. In the Timeline, select the Auto layer.
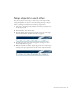
3. From the Library panel (Window > Library), drag the auto graphic and
place it on the Stage, anywhere in the gray area next to the body text.
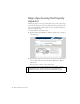
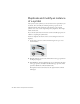
4. Drag the auto instance again so that the snap alignment guides appear.
Move the car close to the body text, and up and down as necessary until
the center alignment guide appears. The guide indicates the auto is
centered in relation to the body text.