
Specifications


Add an action to a button 131
7. With the playhead still on Frame 15, select the button shape on the
Stage, and in the Property inspector select a bright shade of red from the
Fill Color pop-up menu.
8. In the Timeline, click any frame between Frames 1 and 15. In the
Property inspector, select Shape from the Tween pop-up menu.
Drag the playhead from Frames 1 to 15 to see the color change.
Add an action to a button
When the user clicks the button and the tweened animation plays, you
want the playhead to move to the end of the Button Animation Timeline
and then stop. You’ll use ActionScript to control playhead movement in
a Timeline.
1. Add a new layer to the Button Animation Timeline and name it
Actions.
2. On the Actions layer, add a keyframe to Frame 15 by pressing F6.
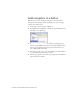
3. Open the Actions panel (Window > Actions) and if necessary, enlarge it
to view both the Actions toolbox and the Script pane.
4. With Frame 15 of the Actions layer selected, go to the Global Functions
> Timeline Control category of the Actions toolbox and double-click
stop.
The
stop action lets you specify that the playhead stop when it reaches
Frame 15.
In the Button Animation Timeline, Frame 15 of the Actions layer now
displays a small a, which indicates that an action is attached to
that frame.
5. Click Scene 1, above the Stage, to exit symbol-editing mode and return
to the main document.
6. Click the pop-up menu control in the upper-right side of the Actions
panel, and select Close Panel.
7. Select Control > Enable Simple Buttons so you can test the animated
button.
8. On the Stage, move the pointer over the button and click the button.
9. Select Control > Enable Simple Buttons to deselect that feature.