
Specifications
Create the user interface 285
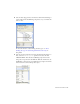
4. In the Component inspector, click the Bindings tab.
5. Click the Add Binding button.
6. In the Add Binding dialog box, select the dataProvider: Array item and
click OK.
7. In the Bindings tab, click the Bound To property.
8. In the Bound To dialog box, click the Data Set component, and then
select the dataProvider: Array schema location and click OK.
9. In the Bindings tab, set the Direction to In.
10. With the Data Grid still selected, go to the Component inspector
Bindings tab and click the Add Binding button.
11. In the Add Binding dialog box, select the selectedIndex: Number item
and click OK.
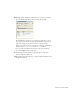
12. Double-click the Bound To property.
13. In the Bound To dialog box, click the Data Set component, and then
select the selectedIndex: Number schema location and click OK.
14. Leave the Direction property set to In/Out.
15. Drag a Button component to the Stage, and give it the instance name
loadData_btn in the Property inspector.
16. In the Component inspector, click the Parameters tab. In the Label
field, type Load Data.
17. With the button still selected on the Stage, open the Behaviors panel
(Window > Behaviors).
18. Click Add Behavior (+), and select Data > Trigger Data Source. In the
Trigger Data Source dialog box, select the timeInfo_con component,
and click OK.
19. Save the file in the same folder where the data.xml file resides.
20.Run the application, and click Load Data.
The XML data is retrieved, converted, and loaded into the DataSet
component. The binding between the DataSet and the DataGrid
copies the data into the grid for display.