
Specifications

36 Basic Tasks: Creating a banner, Part 1
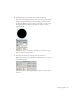
Setting new coordinates moves the upper-left corner of the image to
the upper-left corner of the Stage. You can drag the bitmap image
around the Stage using the Selection tool instead of changing
coordinates in the Property inspector. Use the Property inspector when
you need to set a specific position for an object, like you did in this
step.
8. Select File > Save to save the document before you proceed to the next
section (“Introducing layers and the timeline”).
Introducing layers and the
timeline
The Timeline is above the Stage in the Flash workspace. The Timeline,
which contains layers and frames, helps you organize assets in your
document, and also controls a document's content over time.
Flash documents can play over a length of time, like movies or sound,
which is measured using frames. Layers are like transparencies that stack on
top of one another, and each layer can contain images, text, or animations
that display on the Stage. You'll learn more about frames and the Timeline
in Part 2 of this tutorial, “Basic Tasks: Creating a banner, Part 2”
on page 43.
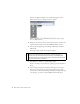
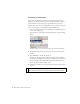
The FLA file you're working on has one layer (Layer 1) with contents on a
single frame (Frame 1). This is the default way that a Flash document
opens.
In this exercise, you lock and rename Layer 1. Often you'll want to place
objects in a particular position on the Stage. To help you keep those objects
in place, Flash enables you to lock layers, so you cannot select the items on
a layer and accidentally move them.
NOTE
You can also import sound files into your FLA files. This isn't covered in
this tutorial, but you can find out more information Chapter 12, “Working
with Sound”.