
Specifications

56 Basic Tasks: Creating a banner, Part 2
15. Select Control > Test Movie.
The test environment opens where you can see the animation. Notice
how it loops, appearing to fade in and out because of the change in
brightness. By default, the playhead returns to Frame 1 and replays the
animation after it reaches the final frame on the Timeline. This means
the animation loops repeatedly, unless you tell it to stop. You will find
out how to do this below in the exercise called “Writing simple
actions”.
16. Select File > Save to save your progress before moving on.
After you finish saving the file, proceed to the following exercise,
“Creating a button”.
Creating a button
When you create a banner, you need to let your user click anywhere in the
banner area and open a new browser window. You can create buttons very
easily in Flash. Your button can either have a graphic with rollover
graphics, sounds, and even animations of their own. Or, you can create an
invisible button. Invisible buttons are useful when you want to create "hot
spots" on your website, or make the entire banner clickable without
obscuring your graphics. In the following exercise, you'll add an invisible
button over your banner graphics.
1. Click Scene 1 in the edit bar to make sure that you’re on the main Stage.
2. Select Insert > Timeline > Layer to create a new layer, and rename the
new layer to button.
3. Select the Rectangle tool in the Tools panel (the button's icon looks like
a square).
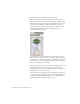
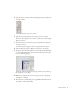
4. Find the Colors section of the Tools panel (see the following figure), and
click the pencil icon to select the Stroke color control.
NOTE
A quicker way to test your SWF file is to use keyboard shortcuts. Press
Control + Enter (Windows) or Command + Return (Macintosh) to test
the file
NOTE
For more information on creating visible buttons with graphics and rollover
effects, search creating buttons in the Flash Help panel (F1).