
Specifications

94 Basic Tasks: Work with Layers
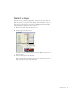
Organize layers in a folder
You can create layer folders to organize layers and reduce Timeline clutter.
The Timeline contains two layers that contain navigation objects: one for
navigational buttons and another for navigational art. You’ll create a layer
folder, named Navigation, for both layers.
1. In the Timeline, select the Buttons layer.
2. Click Insert Layer Folder, which is below the layer names.
3. Double-click the layer folder name and rename the folder Navigation.
4. Drag the Navbar layer and the Buttons layer to the Navigation folder.
The layers appear indented to indicate that they’re within the folder.
You can click the expander arrow to expand and collapse the folder and
included layers.
Add a mask layer
Using a mask layer provides a simple way to selectively reveal portions of
the layer or layers below it. Masking requires making one layer a mask layer
and the layers below it masked layers.
You’ll use the rectangular shape on the Stage to mask part of the road
graphic and animation so that the animation fits better on the Stage.
1. On the Stage, with the Selection tool selected, click the rectangular
shape below the road.
2. Drag the shape straight up and align the left edge of the shape with the
left edge of the road.
3. Right-click (Windows) or Control-click (Macintosh) the Mask layer in
the Timeline and select Mask from the context menu.
The layer converts to a mask layer, indicated by a blue diamond-shaped
icon. The layer immediately below the layer is linked to the mask layer.
The masked layer’s name is indented, and its icon changes to a blue
layer icon.
NOTE
If the Property inspector shows properties for the frame rather than for the
movie clip, click the Background movie clip on the Stage.