User manual Photo-Studio 2 for SMART EDIT
Legal notices To avoid making mistakes during operation, we recommend that you carefully follow the instructions provided in this manual. We have taken a great deal of care whilst programming and checking this software. Nevertheless, since it is not possible to guarantee totally error-free software applications in all environments and at any time, we unfortunately cannot rule out the possibility that some errors may have crept in.
Contents Page 1. General information.......................................................................................... 5 2. The software Photo-Studio 2............................................................................ 5 2.1 What is the Photo-Studio 2?................................................................. 5 2.2 Operation using the trackball............................................................... 6 3. Installation / Starting the program......................................
1. General information Congratulations on purchasing Photo-Studio 2. We would like to thank you for placing your trust in us and hope that this product will meet your expectations. This manual will explain all the steps you need to know for correcting and editing your digital photos. You can manage your photos, sort them by date, create animated sequences across a photo, make a collage, use it to create a presentation, etc...
depends on the quality setting that you selected for the photos in your camera. The photos can be displayed on a video monitor (television) or a high-resolution VGA monitor / flat-panel display or video projector. Photo-Studio 2 allows you to archive and organize your digital photos easily in a multilevel directory system and lets you view them quickly in a preview mode.
Leave the system switched on and select the Install product button in the System settings, so that the appropriate window opens. If you are installing from a SmartMedia card, insert the card into the drive with the gold contacts downwards and the cut-off corner first, on the left (pointing towards the system). If the Photo-Studio 2 software is on a CD/DVD and if your system has a DVD burner and DVD Arabesk software, open the drawer and insert the CD/DVD in the burner.
4. Important notices • The Photo-Studio 2 software has been designed for editing images produced by digital cameras. Limitations might apply if you edit images from a PC (e.g. the image information or the file names might not be retained)! • The system only exports photographs that comply with the DCF standard. 5. Operating the program The following gives you a short summary on the general operation of Photo-Studio 2. - Mark Photo: To mark a photo, simply click on it with the big left trackball button.
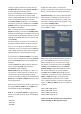
system will import and display a preview of the photos. This process can take some time depending on the number of photos present. In the middle of the menu you will see an area which will then display all of the photos contained on the memory card or CD. If there are more photos on the storage medium than can be displayed in one go, you can use the slider control at the right edge of the screen to scroll through the list. Simply click on it and move the trackball up or down.
and close the window with the Ok button, a new directory is created on the same level as the currently active directory and is displayed with a white border. If you have also activated the Move following photos to new folder function (by clicking on the checkbox so that a checkmark is displayed), the currently marked photo and all the photos that follow are stored in the new directory which is displayed at the position of the previously marked image.
the progress bar), the photos that have been imported up to that point will of course remain on the hard drive. The number given, for example 4/5, tells you that you have already imported 4 out of 5 photos from the directory. Once the photos have been imported, you can remove the memory card or CD.
- Sort out: If you click on this button, the currently selected photo or the activated directory is sorted out. This function is very useful, for instance, when you want to put some photos aside that you do not intend using at the moment or that you probably want to delete. A separate directory is created called Sorted out and is placed at the end of the photo list. You can, of course, access this directory whenever you need to or you can delete it (see below).
photo that was activated last in another menu is displayed at the top left and the three photos that follow this activated photo in the photo list are displayed in the other three boxes. You can of course use the buttons described below to choose the images that you want to display enlarged. First, click on one of the four boxes in which you want your choice of picture to appear. The selected box is indicated by a green border.
display the picture on a television, the edges of the picture are often not visible on television screens. You should therefore not cut away (crop) too much from the edges of the photo! without the photo being cropped. - Rotate: This button corresponds to the function of the same name in the Sort menu. A window opens offering you various options to rotate the currently active photo or all the photos contained in the selected directory.
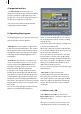
and Edit menus. At the top edge of the menu you will again see the Open/Close, Special and Size buttons. At the bottom edge you see the Information button. Additionally, this menu contains the following buttons: - Description: If you click on the long line, the on-screen keyboard appears and you can enter the name that you want to give the photo or directory. - Control photo: If you click on this button, a menu opens in which you can make image corrections and color corrections to the active photo.
- Retouch: This function allows you to retouch the active photo, e.g. to correct a blemish. After you click on this button, a large view of the photo is displayed. A text at the lower edge of the screen asks you to select the area that you want to modify. You will see a cross inside a small box initially located in the top left corner of the picture. Now roll the trackball to place the frame over the area in question, i.e. the blemish.
on the left trackball button. You will now see the selected area enlarged and a new toolbar appears at the bottom edge of the screen. you made to the picture are saved. If you click on Cancel, you will leave the Red Eyes menu and only the changes that you already saved beforehand are applied. In the Filter menu, you will see the icons for switching directly to the Sort, Show detail, Compare and Edit menus as well as to the main menu. 5.
You can activate a normal inactive (yellow) point by clicking on it, which makes it turn green. To move the active (green) point, you can grab it by clicking it again (it turns blue). As an alternative, you can grab the inactive point using the small, left trackball button, if your trackball is provided with four buttons. Markers appear smaller and contain a dot. Key points are as large as the starting and finishing points but contain a black dot.
path. These markers do not have any other properties that you can change. To add a marker, simply click on the part of the path at which you want the marker to appear. Then roll the trackball to move the point to the position in which you want it and confirm its position by clicking on Ok. You can delete a marker by placing the trackball pointer over it and then clicking on the small right trackball button (four button mode) or big right button (two button mode).
the next point on the path. Alternatively, you can of course also click on the points directly. - Length: This is where you can read off the duration of the complete animation. - Edit: If you click on this button a new toolbar appears. You will see the current picture content of the active waypoint appear in the background. You can close the Edit menu of the animation function by clicking on the menu icon in the bottom right corner.
5.3.2 Collage You can create a collage from several of your photos using this menu function. If you click on this button, a new menu opens. In the top area, you will see the list again and the Open/Close, Special and Size buttons. The following buttons are in the lower area: - New: Clicking on this button opens a new toolbar; in the background you see an empty white surface in which you are going to create the collage.
color selection, a pattern selection and color gradients which you can use to customize the appearance of the box. You can find further information on this in Chapter 6.1 Palette window. Afterwards you can specify the Border size in mm or pixels (depending on which unit of measurement you activated in Options) and the Blur of the border in percent. You can close the Border menu using the icon at the bottom right or by clicking the right trackball button.
what will be visible later on in the video or presentation (depending on the presentation settings). If you activate the Print setting, you will see the printable area framed by auxiliary lines. This is useful to ensure the photos are positioned within the printable area. Any images positioned outside the auxiliary lines will not be printed. With the Auxiliary Lines Color function, a color box opens in which you can specify the color of the auxiliary lines.
integrate the animation into the presentation and then burn it to DVD. Warning: If you use Photo-Studio 2 under SMART EDIT, then the presentation cannot be burned to DVD or transferred to the SMART EDIT Edit menu. Furthermore, effects cannot be inserted and no audio created. Alternatives to editing under SMART EDIT are discussed in section 2.1. 5.4.1 Edit If you click on this button, a new menu is displayed.
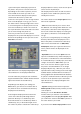
you will see the default length that is set for all photos and collages. With the slider control beneath it, you can change the length for this entry of the active photo or collage (i.e. the one in the middle of the presentation bar). Please note that the length of an animation cannot be changed. of entries (i.e. the number of objects) and the number of objects already calculated are displayed. The respective length is displayed above the object shown in the middle of the presentation bar.
The standard length allows you to define the default for all photos/collages. You can change the display duration of each individual photo or collage using the Length button. You can also subsequently change the standard length at any time in order to make the presentation the length that you want. provided with it. - Delete presentation: Clicking this button brings up a warning message. Confirm with Yes and the current presentation will be deleted irrevocably, allowing you to create a new one. 3.
the photos later in other programs. You can also click on the Delete button in order to select and delete a photo from a list of photos already saved. 5.5.2 Settings Clicking this button opens a window with the following options: The following functions are available in the Print section. - Print: After you have clicked this button, the marked photo or all photos in the marked directory are printed out in order.
6. Special functions 6.1 The Palette window first time, no pattern has been selected yet. Therefore, if you click on the Color/Texture button for the first time in the Palette window this will directly open the image pool from where you can select a color or a pattern. Once you have made this first-time selection, the Color/Texture button will thereafter open the Preview window when you press it and not the image pool.
6.2 Presentation control During a presentation, you can interact with it and control how the presentation runs. The following equipment is supported for this: - Trackball - Radio remote control (available as an option) - Keyboard (available as an option) Please consult your dealer and the MacroSystem pricelists about the currently available accessories for Photo-Studio 2.
240-12/05