
User manual


14
15
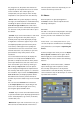
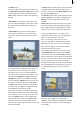
display the picture on a television, the edges
of the picture are often not visible on television
screens. You should therefore not cut away
(crop) too much from the edges of the photo!
You can also move the box that you have just
drawn by placing the screen pointer inside the
boxed section of the picture so that the pointer
turns into a hand, then clicking on the left
trackball button so that the hand changes to a
cross and nally rolling the trackball to move the
box to the desired position. After you conrm
your choice by pressing the left trackball button,
you will see that the screen content has changed
as a result of the new position.
The Format button provides a further option.
You can use it to specify whether a certain
aspect ratio should be applied when cropping
the photo to ensure the photo has the correct
format after editing. Depending on the type of
presentation you want to create afterwards or
delivery to a photo shop, you can make your
changes to the setting as desired (Free, Like
presentation, Video 4:3, Video 16:9, VGA or 3:2
Print).
If you close the Crop menu by clicking on Ok,
the settings will be applied and you will return
to the Edit menu.
Caution: if you click on Ok, the original photo
will be overwritten by the cropped picture
– the original will therefore be deleted from
the hard drive! If you want to prevent this from
happening, you should rst save a copy of the
picture (see below).
If you click on Cancel, the menu will close
without the photo being cropped.
- Rotate: This button corresponds to the function
of the same name in the Sort menu. A window
opens offering you various options to rotate
the currently active photo or all the photos
contained in the selected directory. The photos
can be rotated in steps of 90° and you are shown
a preview of the rotation.
- Copy: If you press this button, a copy of the
selected photo or directory (with all the photos
contained therein) is created immediately and
is stored directly after the original photo or
directory.
- Delete: If you click on this button, the active
photo is deleted without warning. If a directory
is currently active, a warning message will
appear before the entire directory is deleted.
- Menu icons: If you click on these ve menu
icons, you can switch to the Sort, Detailed View,
Compare and Change menus as well as to the
main menu.
- Create scene (this button is available only
if SMART EDIT has been enabled): With this
button you can create scenes from photos.
After clicking this button you see a slider with
which you can set the duration of the scene
to be created. After you have set the duration,
click on Ok, so that either a scene is calculated
from the currently activated photo, or several
scenes (corresponding to the number of photos
contained in the directory) are calculated from
the currently activated directory.
Afterward the created scenes appear
automatically in the SMART EDIT scene bin
behind the scene most recently displayed. You
can now continue to use SMART EDIT to work
on your presentation. If you do not have SMART
EDIT; then you can use Edit in the presentation
menu to insert the photos into the presentation.
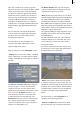
5.2.5 Filter
After you click on this button, a menu opens in
which you can correct and modify your photos.
The menu has the same structure as the Sort