
User manual


20
21
the next point on the path. Alternatively, you can
of course also click on the points directly.
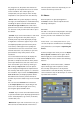
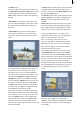
- Edit: If you click on this button a new toolbar
appears. You will see the current picture content
of the active waypoint appear in the background.
You will rst see the Position function. By
clicking on Change here you can change the
position of the image section. After you select
the function, simply roll the trackball in the
desired direction and conrm the new position
using the left trackball button.
Clicking on Center causes the image section to
jump to the center of the photo.
You will also see the Zoom function which you
can use to set the size. If you click on Change,
you can decrease or increase the size of the
section by moving the trackball. The greater the
zoom factor, the larger the displayed picture
appears in the little box. Please note that if the
factor exceeds a value of 1 this will result in
reduced quality! Once you have set the factor
that you want, conrm it by clicking on the left
trackball button.
If you click on Minimal, the display zooms out of
the image section completely and displays the
entire picture.
You can then close the Edit menu and thus apply
the settings you have just made by clicking on
Ok. If you click on Cancel, you will close the
menu without applying any settings changes.
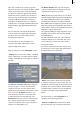
- Play button: You can use this button to view
the animated motion of the “camera” before
the calculations are carried out (the Create
button is still active) so you can make changes
if necessary. The preview only shows a small
version which runs somewhat jerkily. If the
animation has already been computed (i.e. the
Create button is inoperative) it will be played
normally.
- Create : You can use this button to compute the
animation. These calculations might take some
time depending on the length of the animation.
- Length: This is where you can read off the
duration of the complete animation.
You can close the Edit menu of the animation
function by clicking on the menu icon in
the bottom right corner. In this case it is not
possible to close the menu by clicking on the
right trackball button so as to prevent you from
canceling the function inadvertently. You will
then return to the Animation menu.
- Copy: If you click on this button, the animation
that is selected in the list will be copied and
placed directly after the original.
- Play button: If you click on this button, the
animation that is selected in the list will be
played in its entirety if it has already been
computed. If not, only a preview of it will be
shown.
- Edit: If you click on this button you will open
the toolbar that is also displayed when you
create a new animation by pressing New. You
can use Edit to make subsequent changes to
your animation.
- Delete: If you click on this button the selected
animation will be deleted.
- Create : You can make the system compute the
animation by clicking on this button.
If you are working with SMART EDIT, the
animation appears automatically in the scene
bin behind the previous scene.
- Menu icon: You will see a menu icon in the
bottom right corner which you can use to jump
to the main menu.
If SMART EDIT has been enabled, the animation
already set appears automatically in the SMART
EDIT scene bin, so you can include it in your
presentation in the storyboard, for instance,
together with photos and collages.
If you have not yet enabled SMART EDIT; you
can access the animation previously set in the
Presentation menu and then work it into the
nished presentation.