
User manual


6
7
Leave the system switched on and select the
Install product button in the System settings, so
that the appropriate window opens.
If you are installing from a SmartMedia card,
insert the card into the drive with the gold
contacts downwards and the cut-off corner rst,
on the left (pointing towards the system).
If the Photo-Studio 2 software is on a CD/DVD
and if your system has a DVD burner and DVD
Arabesk software, open the drawer and insert
the CD/DVD in the burner.
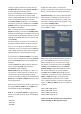
After a moment you will see that thePhoto-
Studio 2 software is listed in the Install product
window. (If installing from a CD/DVD, drive noise
may be heard, which indicates that the system is
reading the CD/DVD). Select it from the list and
click Activate.
A box will appear in which you must enter the
product key obtained from the dealer. You will
then see a message that installation has been
completed, so you can remove the SmartMedia
card or DVD. The printer driver will be installed
automatically. The system will then restart.
If you want to install Photo-Studio 2 as a demo
version, select it from the list and click Activate.
Then click the Demo button in the product key
window.
The word Demo will appear after the program
name. Conrm with Ok and remove the
SmartMedia card or CD/DVD.
Photo-Studio 2 will be available as a demo ver-
sion after the system has been restarted. You
can generate e.g. animation with the demo
version, but its processing will be marked with a
Demo label. The Print and Export functions will
also be greyed out.
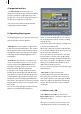
After the system has been restarted, you will see
the program Photo-Studio 2 on the Edit menu,
listed alphabetically under Special.
N.B.: To use the Photo-Studio 2 program print
function, you will need one of the following HP
printers:
• HP 5150
• HP 5740
• HP 5440
Support for other printers could not be
guaranteed at the time this manual was printed.
Please ask your dealer for further information.
Important notice: if you wish to deinstall either
Photo-Studio 2 or the demo version, then you
should at rst remove all photos, collages and
animations, and then delete the program using
the window Install product.
In this way you guarantee that storage space on
the hard drive is freed.
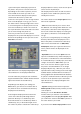
Before you begin working with Photo-Studio 2,
press the Screen button in order to make the
proper settings for the screen you are using.
The button can be found in the menu System
settings (under SMART EDIT) or in Settings/
System settings (under MacroSystem Louvre).
This button allows you to choose between
the Video 4:3 and Video 16:9 settings that are
suitable for a television as well as between the
VGA 1 to VGA 4 settings (Casablanca Claro
and MacroSystem Louvre) that are suitable
for a computer monitor or television with VGA
inputs, or VGA 1 to VGA 3 (all other Casablanca
systems).
VGA 1 (800 x 600, 60 Hz)
VGA 2 (800 x 600, 75 Hz)
VGA 3 (1024 x 768, 60 Hz)
VGA 4 (1024 x 768, 75 Hz)
Please consult the separate Louvre instructions
when installing on MacroSystem Louvre.