
User manual


8
9
system will import and display a preview of
the photos. This process can take some time
depending on the number of photos present.
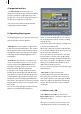
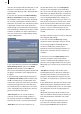
In the middle of the menu you will see an
area which will then display all of the photos
contained on the memory card or CD.
If there are more photos on the storage medium
than can be displayed in one go, you can use
the slider control at the right edge of the screen
to scroll through the list. Simply click on it and
move the trackball up or down. The arrows at
the top and bottom ends of the slider also allow
you to move through the photo list.
In the list you will now see all the photos
displayed or the system will display one or more
directories depending on how you have set the
date lter (see below).
Open directories are displayed highlighted and
closed directories are displayed darkened.
To mark a directory, simply click on it with the
big left trackball button. A white border will then
appear around the selected directory.
Depending on the display size setting (see
Size button), you will see the creation date of
the photos that are contained in the directory
displayed on the directory.
A dot might be displayed in the bottom left
corner of the directory indicating that that
particular directory is a subdirectory (two
dots indicate that it is a subdirectory within a
subdirectory, etc.), in the bottom right corner
the number of photos contained in a directory is
displayed. 0/5 for instance, means that no photo
(of 5) has been imported yet.
This display however does not take account of
any photos in the subdirectory that may have
already been read in.
The various buttons in the Import photos menu
will now be explained:
- Size: This button allows you to choose from
ve different size settings which dene the sizes
of the photos / directories when displayed in
the list. The smaller the display size setting, the
more photos / directories can be displayed in
one go.
If you choose a larger display size setting, the
directory label will also be displayed (i.e. the
date of the photos contained in the directory).
Other menus described later on (Edit, Filter,
Print/Export) allow you to give the directories
names, which will also be displayed on the
directory.
- Open/Close: You can use the Open button to
open the marked directory and thus display all
the photos or subdirectories contained within it.
If a marked directory is already open, the button
changes its function to Close which you can
then use to close the directory again so that
the photos contained within it are no longer
displayed. By the way, a directory can also be
opened and closed by clicking on the small right
trackball button (trackball with four buttons) or
the big right button (trackball with two buttons).
If a photo is marked instead of a directory, it will
of course not be possible to press the button.
Open directories are displayed brighter than
closed directories.
- Special: Clicking on this function opens the
Folder Special window, which provides you with
several options.
Initially you see the Sort Photos in folder
function where you have the choice between
sorting by date and sorting by description. After
you conrm the selection with Ok, the photos in
the active directory are sorted.
If you click on the Create empty folder function