DVD-V2500 Instruction Manual www.samsungasc.
WARNING: Copy Notification TO PREVENT DAMAGE WHICH MAY RESULT IN FIRE OR ELECTRIC SHOCK HAZARD, DO NOT EXPOSE THIS APPLIANCE TO RAIN OR MOISTURE. Federal law provides severe civil and criminal penalties for the unauthorized reproduction, distribution, or exhibition of copyrighted motion pictures and videotapes. (Title 17, United States Code, Sections 501 and 506). WARNING: TO AVOID HAZARDOUS EXPOSURE TO INVISIBLE LASER RADIATION, DO NOT OPEN OR REMOVE/DEFEAT LASER TRANSPORT PROTECTIVE HOUSING.
Important Safety Instructions 1. Read these instructions. 2. Keep these instructions. 3. Heed all warnings. 4. Follow all instructions. 5. Do not use this apparatus near water. 6. Clean only with dry cloth. 7. Do not block any ventilation openings. Install in accordance with the manufacturer’s instructions. 8. Do not install near any heat sources such as radiators, heat registers, or other apparatus (including amplifiers) that produce heat. 9.
Table of Contents ◆ Safety ■ Important Safety Instructions . . . . . . . . . . . . . . . . . . . . . . . . . . . . . . . . . . . . . . . 3 ◆ Feature Summary ■ Feature Summary . . . . . . . . . . . . . . . . . . . . . . . . . . . . . . . . . . . . . . . . . . . . . . . 7 ■ Unpack. . . . . . . . . . . . . . . . . . . . . . . . . . . . . . . . . . . . . . . . . . . . . . . . . . . . . . . . 7 ■ Disc Type and Characteristics . . . . . . . . . . . . . . . . . . . . . . . . . . . . . . . . . . . . . .
Table of Contents ◆ 5 - DVD Setup ■ ■ ■ ■ ■ ■ ■ ■ ■ ■ Player Menu Language . . . . . . . . . . . . . . . . . . . . . . . . . . . . . . . . . . . . . . . . . . . Disc Menu Language. . . . . . . . . . . . . . . . . . . . . . . . . . . . . . . . . . . . . . . . . . . . . Audio Language. . . . . . . . . . . . . . . . . . . . . . . . . . . . . . . . . . . . . . . . . . . . . . . . . Subtitle Language . . . . . . . . . . . . . . . . . . . . . . . . . . . . . . . . . . . . . . . . . . . . . . . Parental . . . .
Table of Contents ◆ 9 - VCR Playback ■ Special VCR Playback Features . . . . . . . . . . . . . . . . . . . . . . . . . . . . . . . . . . . . 54 ■ Tracking . . . . . . . . . . . . . . . . . . . . . . . . . . . . . . . . . . . . . . . . . . . . . . . . . . . . . . . 54 ■ Auto Play . . . . . . . . . . . . . . . . . . . . . . . . . . . . . . . . . . . . . . . . . . . . . . . . . . . . . . 55 ■ S-VHS Playback . . . . . . . . . . . . . . . . . . . . . . . . . . . . . . . . . . . . . . . . . . . . . . .
Feature Summary DVD+VCR Features • Perfect compatibility to play back DVDs, VCDs, audio CDs, MP3 discs or VHS Tapes. • Enjoy a DVD movie while recording a TV show to the VCR. • Auto Setup instantly finds the time and runs channel search. • RF inputs and outputs for all kinds of TVs available. • Composite, S-Video, and Component video outputs. • Universal remote provides the full operation on DVD+VCR. • On-Screen Program (English/French/Spanish).
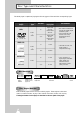
Disc Type and Characteristics This DVD player is capable of playing the following types of discs with the corresponding logos: Disc Types (Logos) Recording Types DVD Audio + Video VIDEO-CD Disc Size Max. Playing Time 5" Single-sided 240 min. Double-sided 480 min. 31/2" Single-sided 80 min. Double-sided 160 min. 5" Audio + Video AUDIO-CD Characteristics • DVD contains excellent sound and video due to Dolby Digital and MPEG-2 system.
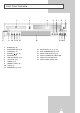
Front Panel Overview 1 8 9 1 2 3 4 5 6 7 8 9 10 11 10 11 12 13 DVD DECK (p.14) DVD OPEN/CLOSE (p.14) VCR DECK (p.15) CHANNEL / (p.16) RECORD (p.57) DVD-VCR SELECT (p.14) VCR EJECT (p.15) POWER (p.14) MEMORY STICK (p.43) STOP (p.33) REWIND/REV (p.33, 54) 2 3 14 12 13 14 15 16 17 4 5 6 15 16 17 PLAY/PAUSE (p.14, 15, 33, 58) FAST-FORWARD/FWD (p.33, 54) FRONT PANEL DISPLAY (p.
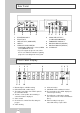
Rear Panel 1 2 1 2 3 4 5 3 4 5 RF ANTENNA INPUT RF OUT TO TV LINE OUT TO TV (COMPOSITE) LINE IN 1 VIDEO OUT SELECT SWITCH * If 525P(480P) VIDEO OUT is selected, VIDEO and S-VIDEO will not work. * If your TV supports progressive scan, follow the TV User’s Manual’s instructions regarding progressive scan setting in the menu system.
Remote Control Overview 1 21 2 22 3 4 23 5 6 7 8 9 10 11 12 13 14 24 25 26 27 28 29 30 31 15 32 33 16 17 18 34 35 36 19 20 1 2 3 4 5 6 7 8 9 10 11 12 13 14 15 16 17 18 19 20 21 22 23 24 25 26 27 28 29 30 31 32 33 34 35 36 POWER (p.14) ZOOM (p.36), TV MUTE (p.12) 0-9 (p.16) 100+(p.16) MEMORY STICK (p.43) VOLUME +/– (p.12) DVD (p.14) REWIND (p.33, 54) SKIP BACK (p.33, 54) STOP (p.33) 3D SOUND (p.38) RECORD (p.57) UP (p.16) LEFT (p.16) SETUP (p.16) ENTER (p.16) RETURN (p.16) TITLE (p.
Using the TV Buttons on the Remote Control Your VCR remote control will work with Samsung televisions and compatible brands. To determine whether your television is compatible, follow the instructions below. 1 1 Switch your television on. 2 Point the remote control towards the television. 3 Hold down the TV button and enter the two-figure code corresponding to the brand of your television, by pressing the appropriate numeric buttons.
Basic Connections/Auto Setup In this section, you will connect the DVD-VCR to your television and run Auto Setup, which automatically searches for channels and sets the player’s internal clock. NOTES: • See Appendix A for Advanced Connections. • Standard RF or Line connection between DVD-V2500 & your TV are required to run DVD+VCR setup menu, even if you connect S-Video or Component Video Output for a better picture quality.
Deck Control Buttons The DVD-VCR uses one set of controls to operate both decks. The following buttons are helpful in successfully controlling each deck. 1 POWER Button Press the POWER button on the remote control or front panel to turn on the DVD-VCR. 2 1 DVD Button Press the DVD button on the remote control or front panel when you want to control the DVD deck. • The DVD indicator will light on the Front Panel Display to show that the DVD deck is selected.
Basic VCR Operation To play a videotape, simply insert it in the VHS deck and press the Play button. Tapes without Record Safety Tabs can be set to play automatically when inserted; see page 56. 1 Insert VHS Tape Insert a standard VHS videotape into the VHS Deck. • Power will turn on automatically when you insert a videotape. 2 Play Tape Press the ll (Play/Pause) button on the remote control or front panel.
Basic TV Tuner Operations The following buttons are used when watching television via the DVD-VCR’s built-in TV tuner. 1 1 TV/VCR Press to switch between your TV’s tuner and the VCR’s internal tuner. 3 2 Channel Up/Down Press to change to the next or previous channel. 3 0-9 Buttons Press to select channels directly. 4 100+ Button Press to select channels 100 and higher. First, press the 100+ button, then press the remaining digits using the 0-9 buttons.
Menu Language Follow these steps to change the on-screen menu language to English, French or Spanish. 1 Open “SETUP MENU” With the DVD in stop mode, press the SETUP button. 1 2 Set “Language” Using the Up and Down buttons, move the selection arrow to “Language/Idioma/Langue,” then press the ENTER button. 3 Set menu Language Move the selection bar to your desired Language, then press the ENTER button.
Manual Clock Set If Auto Setup was unable to find a local TV station to set the DVDVCR’s internal clock, follow these instructions to set the date/time manually. NOTE: It is important to set the clock for accurate Timer Recording. 1 Open “SETUP MENU” With the DVD in stop mode, press the SETUP button. 1,3 2 Select “VCR Setup” Using the up and down buttons, move the selection cursor to “VCR Setup,” then press ENTER to select.
Tuner Band Setting This feature allows you to manually set the DVD-VCR’s tuner band to Antenna or Cable, whichever you connected to the Antenna In jack during initial setup. • Use this setting only if Auto Setup detected the incorrect tuner band, i.e. channels are coming in on the wrong channel numbers. 1 Open “SETUP MENU” 1 With the DVD in stop mode, press the SETUP button. 2 Select “VCR Setup” Using the up and down buttons, move the selection cursor to “VCR Setup,” then press ENTER to select.
Auto Channel Memory Auto Channel Memory will automatically seek and store all active channels in your area. 1 Open “SETUP MENU” With the DVD in stop mode, press the SETUP button. 2 1,3 Select “VCR Setup” Using the up and down buttons, move the selection cursor to “VCR Setup,” then press ENTER to select. 3 Select “Channel” Using the up and down buttons, move the selection cursor to “Channel”, then press ENTER to select.
Channel Add/Delete Use this feature if Auto Channel Search missed a channel that you would like to add, or added a channel you wish to remove. 1 Open “SETUP MENU” With the DVD in stop mode, press the SETUP button. 2 1,3 Select “VCR Setup” Using the up and down buttons, move the selection cursor to “VCR Setup,” then press ENTER to select. 3 Select “Channel” Using the up and down buttons, move the selection cursor to “Channel”, then press ENTER to select.
Auto Power Off 1 Open “SETUP MENU” With the DVD in stop mode, press the SETUP button. 2 Select “Option” Using the up and down buttons, move the selection cursor to “Option,” then press ENTER to select. 1 3 Select “Auto Power Off” Move the selection bar to “Option Setup”, then press right to select from following options: • Off – Auto power off is disabled. • 1Hr – DVD-VCR will auto shut off 1 hour after the last button is pressed.
Front Panel Dimmer You can set the Front Panel Display to be bright all the time, dim all the time, dim during power off. 1 Open “SETUP MENU” With the DVD in stop mode, press the SETUP button. 2 Select “Option” Using the up and down buttons, move the selection cursor to “Option,” then press ENTER to select. 3 Set “Panel Display” Move the selection bar to “Panel Display,” then press right to select from the following options: • Auto dim– Front Panel Display will dim automatically during power off.
Player Menu Language Follow these steps to choose preferred language for player menus. The DVD-VCR will automatically default to the language you choose if it is available on a given DVD. 1 Open “SETUP MENU” With the DVD in stop mode, press the SETUP button. 2 Select “Language” Using the up and down buttons, move the selection cursor to “Language,” then press ENTER to select. 3 Select “Player Menu” Move the selection bar to “Player Menu,” then press ENTER to select.
Audio Language Follow these steps to choose your preferred language for DVD audio soundtracks. The DVD-VCR will automatically default to the language you choose if it is available on a given DVD. 1 Open “SETUP MENU” With the DVD in stop mode, press the SETUP button. 2 Select “Language” Using the up and down buttons, move the selection cursor to “Language,” then press ENTER to select. 3 Select “Audio” Move the selection bar to “Audio,” then press ENTER to select.
Parental Rating Control is a password protected system that allows you to block playback of DVDs based on their content. The system uses an eight level rating system. • If you try to play a DVD that exceeds the selected rating, an error message will appear. • Not all discs are rated. 1 Open “SETUP MENU” With the DVD in stop mode, press the SETUP button. 2 Select “Parental” Using the up and down buttons, move the selection cursor to “Parental,” then press ENTER to select.
Digital Output If your A/V receiver is equipped with a Dolby Digital decoder, your DVD-VCR can output Dolby Digital 5.1 sound, but you MUST enable this feature in the menu system to prevent damage to your speakers. NOTE: 1 PCM Bitstream Select “Bitstream” ONLY if you have connected a Dolby Digital-equipped A/V receiver to the Digital Output (optical or coaxial) on the DVD-VCR back panel. Open “SETUP MENU” With the DVD in stop mode, press the SETUP button.
DTS If your A/V receiver is equipped with a DTS decoder, your DVDVCR can output DTS digital sound, but you MUST enable this feature in the menu system. On Off NOTE: Select “On” ONLY if you have connected a DTS-equipped A/V receiver to the DIGITAL AUDIO OUT (optical or coaxial) on the DVD-VCR back panel. 1 Open “SETUP MENU” With the DVD in stop mode, press the SETUP button. 2 Select “DVD Setup” Using the up and down buttons, move the selection cursor to “DVD Setup,” then press ENTER to select.
Dynamic Compression Dynamic Compression restrains the dynamic range of sound, i.e. the difference between the calm and noisy passage of a DVD audio track. 1 On Off Open “SETUP MENU” With the DVD in stop mode, press the SETUP button. 2 Select “DVD Setup” Using the up/down and left/right buttons, move the selection cursor to “DVD Setup,” then press ENTER to select.
2X Scan Audio When you play DVD Disc at 2x play made you can turn Audio on or off. 1 Open “SETUP MENU” With the DVD in stop mode, press the SETUP button. Off On 2 Select “DVD Setup” Using the up and down buttons, move the selection cursor to “DVD Setup,” then press ENTER to select. 3 Set “2x Scan Audio” Move the selection bar to “2x Scan Audio,” then press right or left button to select from the following options: • Off - Turns 2x audio off.
TV Aspect Ratio Set the aspect ratio (length x width) of your TV screen so the DVD player will display movies at the appropriate size for your television. Choose from standard, letterbox, or widescreen format. 1 Open “SETUP MENU” With the DVD in stop mode, press the SETUP button. 2 Wide Letterbox Pan-Scan Select “DVD Setup” Using the up and down buttons, move the selection cursor to “DVD Setup,” then press ENTER to select.
A/V Receiver Connections To take full advantage of the movie theater experience that DVD offers, you may want to connect your DVD-VCR to a complete Surround Sound system, including an A/V Receiver and six Surround Sound speakers. Before You Begin... OR To Digital Audio Input of an A/V Receiver with a Dolby Digital Decoder • If your A/V receiver is equipped with a Dolby Digital Decoder, you have the option to bypass the DVD-VCR’s built-in Dolby Digital Decoder. Use the DIGITAL AUDIO OUT connection below.
Special Playback Features During DVD/CD playback you can select from the following special playback options. To resume normal playback, press the (Play/Pause) button. 1 ll Still Press the playback. ll (Play/Pause) button on the remote control during 1 • The picture will pause and the audio will mute. • To resume playback, press the ll (Play/Pause) button. • If the player is left in Pause mode for 5 minutes, it will stop automatically.
Disc Menu Navigation Many DVDs feature their own menu systems, where you can select Titles, Chapters, Audio Tracks, Subtitles, and special disc features, such as movie trailers, and information on the cast. Use these buttons to make selections in the Disc menus. 2 1 2 1 2 DISC MENU Button Press to access the DVD’s Disc menu, if applicable. 2 2 3 3 Press , or , to navigate through DVD’s Disc menu options. • Press up, down, left and right to highlight menu choices.
Title/Chapter/Time Selection If you press the DISPLAY button during DVD playback, you can view the current Title, Chapter/Track, and counter position. You can also use the Display screen as a fast way to choose a title, chapter/track, or playing time. 1 1 View the Display Press the DISPLAY button on the remote control during DVD/CD playback. 2 Select Title Press the up/down and left/right buttons to select Title, then press ENTER to change among all available titles on the disc.
Zoom 2 or 4 times magnification is available while you watch a DVD. 1 Open Zoom Magnifying Glass During Playback or STILL mode, press the ZOOM button to display the “Magnifying Glass icon” on the screen. 1 2 Position Magnifying Glass Use the , , , buttons to move the magnifying glass to any position on the screen you want to zoom. 3 Zoom In Press the ENTER button repeatedly to zoom in at 2X - 4X - 2X and normal magnification.
Subtitle Many DVDs provide subtitles in one or more languages. The SUBTITLE button provides a shortcut to view and select these options. 1 1 Open Subtitle Menu During playback, press the SUBTITLE button. 2 Set Subtitle Language Press the left/right buttons to select among all available subtitle languages. • Subtitle languages are often represented by abbreviations. 3 Activate Subtitles Press the up/down buttons to turn subtitles On or Off. • The default subtitle setting is Off.
Audio Many DVDs provide multiple language and audio setup options, such as Dolby Digital 5.1, Dolby Pro Logic, or LPCM 2 Channel audio. The AUDIO button provides a shortcut to view and select among all available options for a given disc. 1 1 Open the Audio Menu During playback, press the AUDIO button on the remote control. 2 Select DVD Audio Track Press the left/right buttons to select the desired language/audio setup on the DVD. • Languages are represented by abbreviations; i.e. “ESP” for “español.
Repeat Chapter/Title You can repeat a single chapter, or repeat a complete title. 1 Open Repeat Menu In Play mode, press the REPEAT button to open the Repeat menu. • The current Repeat Mode will highlighted. 2 1 Select “Chapter” Press the left/right buttons to select “Chapter”. • “Chapter” will highlight when Chapter Repeat is selected. 3 Repeat Chapter Press the ENTER button to repeat the current chapter/track. 4 Select “Title” Press the left/right buttons to select “Title”.
Bookmarks You can insert up to three Bookmarks on your DVDs, so you can jump quickly to your favorite scene or song. 1 Open Bookmark Menu During playback, press the MARK button on the remote control. The “Mark” header will appear on the screen. 1 2 Select Bookmark Placeholder Press the left/right buttons to move to one of the three bookmark placeholders (- - -). • The selected placeholder will be highlighted.
Programmed Playback Programmed Playback lets you set a custom order for playback of chapters/tracks on a DVD or CD. 1 Open Playback Mode Menu While in Stop mode, press the MODE button. 1 2 Select “PROGRAM” Using the left/right buttons, move the selection bar to “PROGRAM” then press ENTER to select. 3 Select Chapter/Track Press the up/down and left/right buttons to select the first chapter/track in your revised playback list, then press the ENTER button.
MP3 Playback MP3 is a popular music format which allows you to compress music files up to 1/12 of their original size while retaining near CD quality sound. Your DVD-VCR can playback MP3 files burned onto a CD-R disc. 1 Insert Disc Insert a CD-R with MP3 files into the DVD deck. • The MP3 main menu will appear after a few seconds and the first song on the disc will begin playing.
Memory Stick What is a Memory Stick? "Memory Stick" is a new compact, portable and versatile IC (Integrated Circuit) recording medium with a data capacity that exceeds a floppy disk. "Memory Stick" is specially designed for digital data exchange among "Memory Stick" compatible devices. Because it is removable, the "Memory Stick" can also be used for external data storage. There are two types of "Memory Sticks".
Memory Stick Precautions on handling the "Memory Stick" The Memory Stick works in the DVD MODE only. 1 Data can become corrupted in the following instances: - When the "Memory Stick" is taken out or the power is turned off while using the DPM (Digital Photo Manager) or DAM (Digital Audio Manager) function. - When using the "Memory Stick" in a location subject to static electricity or electric noise. 2 Memory sticks can only be read in this unit, not written.
Memory Stick Precautions on attaching/removing the "Memory Stick" 1 If it is not fully inserted, until you hear an audible "click", the "Memory Stick" will not work. 2 If you inadvertently remove the "Memory Stick" or turn off the power while using the DPM (Digital Photo Manager) or DAM (Digital Audio Manager) function, the recorded data may become corrupted. 3 To remove the "Memory Stick" during operation, see page 48 .
Memory Stick Memory Stick functions applicable to DPM and DAM Item DPM (Digital Photo Manager) File Format File Size JPEG Image (*.jpg) 1. All files in JPEG format that have less than 1600 x 1200 resolution can be played back with DPM. (JPEG files smaller than 1.5MB can be viewed with Photo View.) DAM (Digital Audio Manager) MP3 Music File (*.mp3) - No limit to file size 2.
DAM (Digital Audio Manager) Playback MP3 Playback 1 Press Stop if in play mode. 2 Press the M.STICK button on the remote and the screen to the right will appear. 3 Insert the Memory Stick encoded with MP3 files into the Memory Stick Slot. 4 Press the UP/DOWN buttons on the remote control to select Digital Audio Manager, and then press the ENTER button. •Your selection is highlighted with yellow borders. 5 Use the UP/DOWN buttons to select the desired song.
Memory Stick Pull out 1 If using DPM (Digital Photo Manager) or DAM (Digital Audio Manager), move to Exit, and then press the ENTER button to exit to Disc Menu. 2 Move to the "STOP MEMORY STICK" function at the bottom of the menu and then press the ENTER button. 3 When the "PLEASE REMOVE MEMORY STICK" message appears on the top of the menu, remove the Memory Stick.
DPM (Digital Photo Manager) Playback View Photo Album (Photo CD) 1 Insert the Memory Photo CD containing JPEG files into the DVD TRAY slot. 2 The Photo CD will be auto play, and then the screen to the vight will appear. 3 Press the UP/DOWN buttons on the remote control to select DIGITAL PHOTO MANAGER, and then press the ENTER button. 1 •Your selection is highlighted with yellow borders. 4 JPEG files in the Photo CD will be displayed on the screen in the order of their recording.
Slide Show 1 Use the LEFT/RIGHT buttons on the remote control to select Slide Show. • Your selection is highlighted with yellow borders. 2 Press the ENTER button and the Slide Show will begin. • To execute any function or option, be sure to press the ENTER button after selecting the menu item you want. • If there is no input for 5 seconds, the Slide Show menu will disappear, and the slide show will begin. • To view the Slide Show menu, press the UP/DOWN/ LEFT/RIGHT button on the remote control.
Slide Show Order 1 Use the LEFT/RIGHT buttons to select Slide Show and press ENTER. 2 Use the LEFT/RIGHT buttons to select Set Order and press ENTER. 3 Use the UP/DOWN/LEFT/RIGHT buttons on the remote control to select the image you want to move, and then press the ENTER button. • Your selection is highlighted with yellow borders. 4 Use the UP/DOWN/LEFT/RIGHT buttons on the remote control to select the location you want to move the image to, and then press the ENTER button.
Photo View 1 Use the UP/DOWN/LEFT/RIGHT buttons on the remote control to select the desired image from the Photo Album screen, and then press the ENTER button. • The selected image will appear on the TV screen. 2 Use the UP/DOWN/LEFT/RIGHT buttons on the remote control to move to the menu item you want, and then press the ENTER button. • If there is no input for 5 seconds, the Photo View menu wil disappear. To view the menu again, press the UP/DOWN/LEFT/RIGHT button.
Edit Photo 1 From the Photo View screen, use the UP/DOWN/LEFT/RIGHT buttons to select EDIT, and then press the ENTER button. • The Edit Photo menu appears. 2 Use the UP/DOWN/LEFT/RIGHT buttons on the remote control to move to the menu item you want, and then press the ENTER button. • If there is no input for 5 seconds, the Edit Photo menu will disappear. To view the menu again, press the UP/DOWN/LEFT/RIGHT button. Menu Description • ALBUM : Takes you back to the Photo Album.
Special VCR Playback Features While a videotape is playing, you can enjoy a variety of special playback features, including Still, Frame Advance, Skip, Repeat, and more. Press the Play button again to resume normal playback. PLAY 1 Still From Play mode, press Play/Pause to still a single frame. 0:00:00 SP 2 Frame Advance From still mode, press JOG DIAL to advance to the next frame.
Auto Play If you want your videotapes to play automatically when you insert them, turn on Auto Play. NOTE: 1 Only tapes that are missing the Record Safety Tab will play automatically when inserted. Open the “SETUP MENU” With the DVD in stop mode, press the SETUP button. 2 Select “VCR Setup” Using the up/down and left/right buttons, move the selection arrow to “VCR Setup,” then press ENTER to select.
Variable Search System Scan and play: press [ ] or [ ] Go to [0:00:00]: Press [ ] End search: Press [ ] 0:00:00 SP Press the SEARCH button to display the search screen in the stop mode. When a program is recorded, the starting point is given an Index mark for easy location. However, the VHS Index Search System (VISS) cannot recognize index marks made by old VCRs. If the VCR has trouble finding a mark, it is probably because the cassette was recorded on a VCR without VISS.
Basic Recording You can record a TV show in progress by inserting a blank tape and pressing the REC button. You can even add time in 30-minute increments up to 4 hours by pressing the REC button repeatedly; see page 49. NOTE: Be sure you videotape has a Record Safety Tab. If the tab is missing, you can cover the opening with a small piece of tape. Warning: Do not cover this opening unless you are sure you want to record over the tape. Before You Begin...
Special Recording Features While a recording is in progress, you can watch a different channel, watch a DVD, or add recording time in 30-minute increments. 1 1 Press the 2 2 Pause/Resume Recording ll (Play/Pause) button. Press REC again to resume. Stop Recording Press the STOP button. 3 Watch a Different Channel Press the TV/VCR button on the remote to switch to your TV tuner, then select a different channel on your television. 4 To Watch a DVD Insert a DVD in the DVD deck and press Play.
One-Touch Recording (OTR) One-Touch Recording (OTR) allows you to add recording time in 30-minute increments up to 4 hours at the touch of a button. RECORD 1 Start Recording Follow the instructions on page 57 to begin recording. 2 Activate OTR While in Record mode, press the REC button again to activate One-Touch Recording (OTR). • Record length 0:30 appears on the On-Screen Display and the DVD-VCR will record for exactly 30 minutes.
How to Set a Timer Recording Insert a blank tape with a Record Safety Tab into the VCR deck. The Timer Recording Feature allows you to program up to 8 events at a time to record up to a month in advance. Set the TV to channel 3 or 4. 1 Before You Begin... • Power on the DVD-VCR • Power on the TV 1 1 Open “SETUP MENU” With the DVD in stop mode, press the SETUP button or press the TIMER button.
S-Video/Component Video Connections (for DVD) The S-Video or Component Video connection is only for the DVD player. The tuner and VCR will still be viewed through the RF or line inputs. 1 Connect S-VIDEO OUT to TV 1 Connect an S-Video cable from the S-VIDEO OUT on the back panel of the DVD-VCR to the S-Video Input on your television.
Stereo Connections You can enjoy stereo sound when watching movies and TV shows by connecting your DVD-VCR to your home stereo system or stereo TV. 1 Connect DVD-VCR to Stereo Connect RCA cables from the Line Out Left & Right Audio jacks on the back panel of the DVD-VCR to the Auxiliary Inputs on your stereo receiver. If you are using a stereo television, connect the Video Output as well.
Monitor TV Connections Monitor-style televisions offer improved sound and picture over regular televisions because they receive the audio and video signals directly from the DVD-VCR through the line inputs. NOTE: 1 A monitor television is not the same as a computer monitor. Connect VCR to Monitor TV Connect RCA cables from the Audio/Video Line Out jacks on the back panel of the DVD-VCR to the Audio/Video Line Inputs of your monitor TV.
Connecting Other Video Equipment You can connect a wide variety of audio/video equipment to your DVD-VCR, including: • An additional VCR • Laser Disc Player • DVD Player • Camcorder • Satellite Receiver • Video Game Since all of these devices use essentially the same connections, they will be described together.
Technical Specifications Inputs Outputs AUDIO 2 Stereo audio inputs, RCA Connector, -8dbm, 47KΩ, front and rear VIDEO 2 Composite video inputs, RCA Connector, 75Ω, 1Vp-p RF Antenna or CATV Input, F-Connector, 75Ω AUDIO 1 Stereo audio outputs, RCA Connector, -8dbm, 1.5KΩ AUDIO (DVD only) 2 Digital audio outputs (1 optical, 1 coaxial) 1 Stereo audio outputs VIDEO 1 Composite video output, RCA Connector, 75Ω, 1Vp-p VIDEO (DVD only) 1 S-Video output, S-Connector, 75Ω, Y=1.0Vp-p, C=0.
SAMSUNG COMBINATION DVD & VCR LIMITED WARRANTY TO ORIGINAL PURCHASER This SAMSUNG brand product, as supplied and distributed by Samsung Electronics America, Inc.
SAMSUNG ELECTRONICS AMERICA, INC. HEADQUARTERS 105 Challenger Road, Ridgefield Park, N.J. 07660-0511 TEL: 1-800-SAMSUNG SERVICE DIVISION 400 Valley Road, Suite 201, Mount Arlington, NJ 07856 1-800-SAMSUNG (1-800-726-7864) www.SAMSUNGUSA.