Instruction Manual DVD-V5500 www.samsung.
SAFETY INSTRUCTIONS Safety Instructions CAUTION RISK OF ELECTRIC SHOCK DO NOT OPEN CAUTION: TO REDUCE THE RISK OF ELECTRIC SHOCK, DO NOT REMOVE COVER (OR BACK). NO USER SERVICEABLE PARTS INSIDE. REFER SERVICING TO QUALIFIED SERVICE PERSONNEL. This symbol is intended to alert the user to the presence of uninsulated “dangerous voltage” within the product’s enclosure that may be of sufficient magnitude to constitute a risk of fire or electric shock to persons.
BEFORE Y O U S TA R T Before you start Accessories Remote Control (AK59-00021C) Batteries-2EA 1.5V(AAA) (AC43-12002H) Video/Audio Cable (AC97-01746A) Antenna Cable (AC39-42001J) Install Batteries in the Remote Control 1 Open the battery cover on the back of the remote control. 2 Insert two AAA batteries. Make sure that the polarities (+ and -) are aligned correctly. 3 Replace the battery cover.
TA B L E OF CONTENTS Table of Contents Safety Instructions ........................................................................................................................................2 Important Safety Instructions ................................................................................................................2 Before you start ............................................................................................................................................
TA B L E OF CONTENTS Chapter 4: DVD Operations Playing a Disc ..............................................................................................................................................29 Using the Search and Skip Functions ........................................................................................................31 Using the Display Function ..........................................................................................................................
Chapter 1 SETUP General Features ■ DVD-VCR Features ■ ■ ■ ■ ■ ■ Perfect compatibility to play back DVDs, audio CDs or VHS Tapes. Enjoy a DVD movie while recording a TV show to the VCR. Auto Setup instantly finds the time and runs channel search. RF inputs and outputs for all kinds of TVs available. Composite, S-Video, and Component Video outputs. On-Screen Program (English/French/Spanish). DVD Features ■ ■ ■ 10-bit video digital to analog converter and 54MHz advanced digital filter.
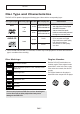
SETUP Disc Type and Characteristics This DVD-VCR is capable of playing the following types of discs with the corresponding logos: Disc Types (Logos) Recording Types Disc Size Max. Playing Time DVD Audio + Video AUDIO-CD 12 Cm 8 Cm Single-sided 240 min. - DVD contains excellent sound and video due to Dolby Digital Double-sided 480 min. and MPEG-2 system. Various screen and audio Single-sided 80 min. functions can be easily selected Double-sided 160 min. through the on-screen menu. 12 Cm 74 min.
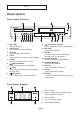
SETUP Description Front Panel Controls Œ ˆ 1 2 3 4 5 6 7 8 ´ ˇ Ø ∏ ”’ ˝Ô DISC TRAY Place the disc here. OPEN/CLOSE Press to open and close the disc tray. VCR Deck Insert a standard VHS video tape. EJECT Press to eject a video tape if the tape is stopped. POWER Press to turn the DVD-VCR on and off. (Reverse/Rewind) Press to reverse/rewind a disc/video tape. (STOP) Press to stop a disc/video tape during playback or record (VCR). (Play/Pause) Press to play or pause the disc/video tape.
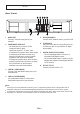
SETUP Rear Panel Œ ´ ˇ¨ ˆ Ø ∏ 1 AUDIO OUT Connect to the Audio input jacks of your television. 2 COMPONENT VIDEO OUT - Use these jacks if you have a TV with Component Video in jacks. These jacks provide PR, PB and Y video. - If Component (Progressive Scan) Video Output is selected in the Alt Video Out menu or by using the P.SCAN button on the front panel, progressive scan mode will be enabled. - If Component (Interlace Scan) Video Output is selected in the Alt Video Out menu or by using the P.
SETUP Tour of the Remote Control 1 2 3 4 5 6 7 8 9 10 11 12 13 POWER button Press to turn the DVDVCR on and off. NUMBER Buttons CLEAR button Use to remove menus or status displays from the screen. DVD button Use to operate DVD. VCR button Use to operate VCR. / (Search/Skip) button Press to reverse search/skip a disc. Use to skip a title, chapter or track on a disc. (STOP) button Press to stop a disc/video tape during play or record (VCR).
Chapter 2 CONNECTIONS Connecting the Antenna Cable There are several ways to connect your DVD-VCR. Select one of the following antenna connections that best suits you below.
CONNECTIONS Method2: Antenna + DVD-VCR + TV: Cable box with many scrambled channels Wall You can record channels by selecting the channel on the cable box. You cannot record one channel while watching another channel. Be sure that the cable box is turned on. Cable Box To RF IN To RF OUT Antenna cable To Antenna Input Method3: Antenna + DVD-VCR + TV: Cable box with a few scrambled channels You can record non-scrambled channels by selecting the channel on the cable box.
CONNECTIONS Before Connecting the DVD-VCR - Always turn off the DVD-VCR, TV, and other components before you connect or disconnect any cables. - Refer to the user’s manual of the additional components (such as a TV) you are connecting for more information on those particular components. Connection to a TV The following shows examples of connections commonly used to connect the DVD-VCR with a TV and other components.
CONNECTIONS Connection to a TV (S-Video) - Connecting to your TV using an S-Video cable. - You will enjoy high quality images. S-Video separates the picture element into black and white(Y) and color(C) signals to present clearer images than regular video input mode. (Audio signals are delivered through the audio output.) 1 Using an S-Video cable (not included), connect the S-VIDEO OUT terminal on the rear of the DVD-VCR to the S-VIDEO IN terminal of your TV.
CONNECTIONS Connection to a TV (Interlace) - Connecting to your TV using Component video cables. - You will enjoy high quality and accurate color reproduction images. Component video separates the picture element into black and white(Y), blue(PB), red(PR) signals to present clear and clean images. (Audio signals are delivered through the audio output.) 1 Using component video cables (not included), connect the COMPONENT VIDEO OUT terminal on the rear of the DVD-VCR to the COMPONENT IN terminal of your TV.
CONNECTIONS Connection to a TV (Progressive) 1 Using component video cables (not included), connect the COMPONENT VIDEO OUT terminal on the rear of the DVD-VCR to the COMPONENT IN terminal of your TV. 2 Using the audio cables, connect the AUDIO (red and white) OUT terminals on the rear of the DVD-VCR to the AUDIO (red and white) IN terminals of your TV. White Turn on the DVD-VCR and TV.
CONNECTIONS Connection to an Audio System Connection to an Audio System (2 Channel Amplifier) 1 Using the audio cables, connect the (LINE) AUDIO (red and white) OUT terminals on the rear of the DVD-VCR to the AUDIO (red and white) IN terminals of the Amplifier. 2 Using the video signal cable(s), connect the VIDEO, S-VIDEO or COMPONENT OUT terminals on the rear of the DVD-VCR to the VIDEO, S-VIDEO or COMPONENT OUT terminal of your TV as described on pages 13 to 16.
CONNECTIONS Connection to an Audio System (Dolby digital, MPEG2 or DTS Amplifier) 1 Using a coaxial cable (not included), connect the DIGITAL AUDIO OUT (COAXIAL) terminal on the rear of the DVD-VCR to the DIGITAL AUDIO IN (COAXIAL) terminal of the Amplifier. 2 Using the video signal cable(s), connect the S-VIDEO or COMPONENT OUT terminals on the rear of the DVD-VCR to the S-VIDEO or COMPONENT OUT terminal of your TV as described on pages 14 to 16.
CONNECTIONS Connecting a Power Cord & Auto Setup 1 Your DVD-VCR's power cord should be plugged into a standard 120V/60Hz wall outlet. Avoid pressing any buttons on the remote control or on the unit during Auto Setup. While your DVD-VCR is running Auto Setup, “Auto” will blink. When Auto Setup is complete, the current time will be displayed on the front panel. If Auto Setup fails to locate a channel to set the clock, you should set the clock manually. (See page 22 to 23.
Chapter 3 INITIAL SETUP Selecting a Menu Language To change the on-screen MENU language to English, French or Spanish, follow these steps. 1 Press the MENU button. 2 Press the …/† buttons to select Setup, then press the √ or ENTER button. 3 Press the …/† buttons to select Language, then press the √ or ENTER button. 4 Press the …/† buttons to select the appropriate language : English, Français or Español. Press the ENTER button. 5 Press the MENU button to exit.
INITIAL SETUP Setting the Clock This menu is used to set the current time. You need to set the time to use timer recording. Setting the Clock Automatically 1 Press the MENU button. 2 Press the …/† buttons to select Setup, then press the √ or ENTER button. 3 Press the …/† buttons to select Clock, then press the √ or ENTER button. Notes You must have the antenna connected to set the Auto Clock. (See pages 11~12) The Clock will be automatically set when you turn off the DVD-VCR.
INITIAL SETUP 6 Press the …/† buttons to select Time Zone, then press the √ or ENTER button. Select the time zone of your area by using the …/†,œ/√ buttons, then press the ENTER button. Select Automatic to set the time zone automatically. 7 Press the …/† buttons to select Daylight Saving, then press the √ or ENTER button to select Yes, No or Auto. 8 Press the MENU button to exit.
INITIAL SETUP 2 Press the …/† buttons to select Setup, then press the √ or ENTER button. 3 Press the …/† buttons to select Clock, then press the √ or ENTER button. 4 Press the …/† buttons to select Manual Clock, then press the √ or ENTER button. 5 Use the œ/√ buttons to select each of the following options, then use the …/† buttons to set each option. Press the ENTER button to set the clock. Manual Clock Time 12 : 00am Date 1/01 Year 2005 SAT 6 Press the MENU button to exit.
INITIAL SETUP Memorizing the Channels Selecting the Video Signal-source This feature allows you to manually set the DVD-VCR’s tuner band to Antenna or Cable, whichever you connected to the Antenna In jack during initial setup. Use this setting only if Auto Setup detected the incorrect tuner band, i.e. channels are coming in on the wrong channel numbers. 1 Press the MENU button. 2 Press the …/† buttons to select Setup, then press the √ or ENTER button.
INITIAL SETUP Storing Channels in Memory (Automatic Method) Auto Channel Memory will automatically seek and store all active channels in your area. 5 Press the …/† buttons to select Auto Channel Memory, then press the √ or ENTER button. The DVD-VCR will automatically search for all available channels in the selected tuner band. This procedure may take a few minutes to complete. Note Do not turn the power off when Auto Channel Memory function is proceeding.
INITIAL SETUP Selecting the RF Output Channel Use this feature if DVD-VCR is connected to TV using RF antenna cable. 1 Press the MENU button. 2 Press the …/† buttons to select Setup, then press the √ or ENTER button. 3 Press the …/† buttons to select Channel, then press the √ or ENTER button. 4 Press the …/† buttons to select RF Output CH, then press the √ or ENTER button to select 3CH or 4CH. 5 Press the MENU button to exit.
INITIAL SETUP Selecting the Front Panel Display You can set the Front Panel Display to be bright all the time, dim all the time, or to automatically dim during power off. 1 Press the MENU button. 2 Press the …/† buttons to select Setup, then press the √ or ENTER button. 3 Press the …/† buttons to select Front Display, then press the √ or ENTER button to select Auto, Bright or Dim. 4 Press the MENU button to exit. ■ Auto: Front Panel Display will dim automatically during power off.
INITIAL SETUP Setting the Power Off Automatically This feature automatically turns off your DVD-VCR if no signal is received and you do not press any buttons for the selected time. 1 Press the MENU button. 2 Press the …/† buttons to select Setup, then press the √ or ENTER button. 3 Press the …/† buttons to select Auto Power Off, then press the √ or ENTER button to select Off, 1Hr or 2Hr. 4 Press the MENU button to exit. ■ Off: Auto power off is disabled.
Chapter 4 D V D O P E R AT I O N S Playing a Disc Before Play - Turn on your TV and set it to the correct Video Input on your TV's remote control. - If you connected an external Audio System, turn on your Audio System and set it to the correct Audio Input. Playback 1 Press the OPEN/CLOSE ( button on the front panel. ) 2 Place a disc gently into the tray with the disc’s label facing up. 3 Press the (Play/Pause) button on your remote control or on the front panel.
D V D O P E R AT I O N S 5 Removing Disc Press the OPEN/CLOSE ( button on the front panel. ) ▼ 6 Pausing Play Press the (Play/Pause) button on your remote control or on the front panel during play. - Screen stops, no sound. - To resume, press the (Play/Pause) button once again. Note If the player is left for about 5 minutes in pause mode, it will stop. ▼ - Each time the button is pressed, a new frame will appear. - No sound is heard during STEP mode.
D V D O P E R AT I O N S Using the Search and Skip Functions During play, you can search quickly through a chapter or track, and use the skip function to jump to the next selection. Searching through a Chapter or Track ▼ If you want to search at a faster speed on the DVD or CD, press and hold the button. During play, press and hold the / (Search) buttons on the remote control for more than 1 second.
D V D O P E R AT I O N S Using the Display Function When Playing a DVD/CD ▼ You can select information in the DVD Function menu by pressing the MENU button. 1 During play, press the INFO. button on the remote control. 2 DVD Press the …/† buttons to select the desired item. ENG ENG MOVE CD CD ▼ You may use the number buttons of the remote control to directly access a title, chapter or to start the playback from a desired time.
D V D O P E R AT I O N S 4 To exit the menu, press the INFO. button again. Note TITLE CHAPTER To access the desired title when there is more than one in the disc. For example, if there is more than one movie on a DVD, each movie will be identified. Most DVD discs are recorded in chapters so that you can quickly find a specific passage (similar to tracks on an audio CD). TRACK TIME AUDIO SUBTITLE Allows playback of the film from a desired time. You must enter the starting time as a reference.
D V D O P E R AT I O N S Using the Disc and Title Menu (DVD) ▼ 1 During playback of a DVD disc, press the MENU button on the remote control. MENU button can be used to access Disc and title menus on a DVD during playback. 2 Press the …/† buttons to select Function, then press the √ or ENTER button. 3 Press the …/† buttons to select DVD Function, then press the √ or ENTER button. Notes - Depending on the disc, the Disc Menu or Title Menu may not work.
D V D O P E R AT I O N S Using the Function Menu (DVD) ▼ MENU button can be used to access DVD functions such as Information, Zoom, Bookmark, Repeat and EZ view menu during DVD playback. ▼ 1 You can also directly select these functions using their respective buttons on the remote control. - Info - MARK - REPEAT During the playback of a DVD disc, press the MENU button on the remote control. 2 Press the …/† buttons to select Function, then press the √ or ENTER button.
D V D O P E R AT I O N S Repeat Play Repeat the current track, chapter, title, a chosen section (A-B), or all of the disc. When playing a DVD/CD 1 During play, press the REPEAT button on the remote control. Repeat screen appears. Off Off ▼ 2 DVD Off Press the œ/√ buttons to select Chapter, Title or A-B, then press the ENTER button. CD Off Chapter Title A - B Track Disc A - B DVD repeats play by chapter or title, and CD repeats play by track or disc.
D V D O P E R ATOffI O N S Using the A-B Repeat function Off 1 During play, press the REPEAT button on the remote control. Repeat screen appears. Chapter Off Off 2 Track DVD Off Press the œ/√ buttons to select A-. Off Chapter Title A - B Off Chapter CD Off Chapter Track Disc A - B Track B 3 DVD Off Mark the Starting Point Press the ENTER button at the beginning of the segment you want to repeat (Point A). CD Once you select point A, B Off will be selected.
D V D O P E R AT I O N S Slow Repeat Play This feature allows you to slowly to repeat scenes containing sports, dancing, musical instruments being played etc., so you can study them more closely. When playing a DVD 1 During play, press the (Play/Pause) button. Off Off 2 Chapter Press and hold the (Forward) button to choose the play speed between 1/8, 1/4 and 1/2 of normal during PAUSE or STEP mode. 3 Press the REPEAT button on the remote control. Press the œ/√ buttons to select A-.
D V D O P E R AT I O N S Adjusting the Aspect Ratio (EZ View) Set the aspect ratio (length x width) of your TV screen so the DVD-VCR will display movies at the appropriate size for your television. To Playback using Aspect Ratio (DVD) ▼ The EZ View feature is not available when the A-B Repeat function is activated. Press the EZ VIEW button on the front panel. - The screen size changes when the button is pressed repeatedly.
D V D O P E R AT I O N S If you are using a 4:3 TV For 16:9 aspect ratio discs For 4:3 aspect ratio discs - 4:3 Letter Box Displays the content of the DVD title in 16:9 aspect ratio. The black bars will appear at the top and bottom of the screen. - NORMAL SCREEN Displays the content of the DVD title in 4:3 aspect ratio. - 4:3 Pan Scan The left and right portions of the screen are cut off and the central portion of the 16:9 screen is displayed.
D V D O P E R AT I O N S Selecting the Audio Language You can select a desired audio language quickly and easily with the AUDIO button. Using the AUDIO button (DVD/CD) Notes - To change the desired audio in the Disc Menu, press the DISC MENU button. - This function depends on what audio languages are encoded on the disc and may not work on all DVDs. - A DVD disc can contain up to 8 audio languages. - To have the same audio language come up whenever you play a DVD, see pages 55 to 56.
D V D O P E R AT I O N S Selecting the Subtitle Language You can select a desired subtitle quickly and easily with the SUBTITLE button. Using the SUBTITLE button (DVD) Notes - To change the desired subtitle in the Disc Menu, press the DISC MENU button. - This function depends on what subtitles are encoded on the disc and may not work on all DVDs. - A DVD disc can contain up to 32 subtitle languages. - To have the same subtitle language come up whenever you play a DVD, see pages 53 to 54.
D V D O P E R AT I O N S Changing the Camera Angle When a DVD contains multiple angles of a particular scene, you can use the ANGLE function. Using the ANGLE button (DVD) If the disc contains multiple angles, the ANGLE icon ( ) appears on the screen. 1 Press the ANGLE button, then the ANGLE icon will appear with the current angle number and the number of angles available. Note If the disc has only one angle, this feature won’t work. Currently, very few discs have this feature.
D V D O P E R AT I O N S Recalling a Marked Scene 1 During play, press the MARK button on the remote control. 2 Press the œ/√ buttons to select a marked scene. 3 Press the (Play/Pause) button to skip to the marked scene. Clearing a Bookmark 1 During play, press the MARK button on the remote control. 2 Press the œ/√ buttons to select the bookmark number you want to delete. 3 Press the CLEAR button to delete a bookmark number.
D V D O P E R AT I O N S Using the Zoom Function (DVD) 1 During the playback of a DVD disc, press the MENU button on the remote control. 2 Press the …/† buttons to select Function, then press the √ or ENTER button. 3 Press the …/† buttons to select DVD Function, then press the √ or ENTER button. 4 Press the …/† buttons to select Zoom, then press the √ or ENTER button. ▼ 5 Press the …/† or œ/√ buttons to select the part of the screen you want to zoom in on.
D V D O P E R AT I O N S Clips Menu for MP3/WMA/JPEG Discs with MP3/WMA/JPEG contain individual songs and/or pictures that can be organized into folders as shown below. They are similar to how you use your computer to put files into different folders. 1 Off Open the disc tray. ROOT ROOT WMA 2 JPEG MP3 Place the disc on the tray. 3 Close the tray. The tray closes and this screen displays.
D V D O P E R AT I O N S MP3/WMA Playback 1 Open the disc tray. Off Off 00:00:23 ROOT 1_mp3 ROOT MP3 2 WMA B e c a u s e Yo u Cactus Place the disc on the tray. Sad Day Wonderful 3 Close the tray. ▼ 4 Off Off 00:00:23 Press the …/† or œ/√ buttons to select a song file. B e c a u s e Yo u 00:00:23 ROOT MP3 WMA 1_mp3 .. B e c a u s e Yo u Cactus Sad Dayu Press the ENTER button to begin playback of the song file.
D V D O P E R AT I O N S CD-R MP3/WMA file When you record MP3 or WMA files on CD-R, please refer to the following. - Use a decompression transfer rate of at least 64Kbps when recording WMA files. - Your MP3 or WMA files should be ISO 9660 or JOLIET format. Sound quality with WMA files basically depends on the rate of compression/decompression you choose. ISO 9660 format and Joliet MP3 or WMA files are compatible with Microsoft's DOS and Windows, and with Apple's Mac.
D V D O P E R AT I O N S Program Play & Random Play You can listen to songs randomly or in the desired sequence. Up to 20 tracks can be programmed. This function is available only with Audio CDs. Program Play Note Random Play • With the unit in stop mode, press the REPEAT button. - The play mode menu will appear. 1 With the unit in stop mode, press the REPEAT button. - The play mode menu will appear. • Press the œ or √ buttons to select Random, then press the ENTER button.
D V D O P E R AT I O N S Picture CD Playback 1 Off Select the desired folder then press the ENTER button. ROOT ROOT WMA JPEG MP3 2 Off Press the …/† buttons to select a Picture file in the clips menu, then press the ENTER button. ROOT .. WMA 1 JPEG 2 MP3 3 Notes - If no buttons on the remote control are pressed for 10 seconds, the menu will disappear. - Press the (Stop) button to return to the clips menu.
D V D O P E R AT I O N S CD-R JPEG Discs - Only files with the “.jpg” and “.JPG” extensions can be played. - If the disc is not closed, it will take longer to start playing and not all of the recorded files may be played. - Only CD-R discs with JPEG files in ISO 9660 or Joliet format can be played. - The name of the JPEG file may not be longer than 8 characters and should contain no blank spaces or special characters (. / = +). - Only a consecutively written multi-session disc can be played.
D V D O P E R AT I O N S Using the Setup Menu The Setup menu lets you customize your DVD-VCR by allowing you to select various language preferences, set up a parental level, even adjust the player to the type of television screen you have. 1 With the unit in Stop mode, press the MENU button on the remote control. 2 Press the …/† buttons to select DVD, then press the √ or ENTER button. Œ Language: Setup of the Language. ´ Audio: Setup of the Audio Options. ˇ Display: Setup of the Display Options.
D V D O P E R AT I O N S Setting Up the Language Features If you set the there is no player menu on the osd disc menu, audio and subtitle language in advance, they will come up automatically every time you watch a movie. 1 With the unit in Stop mode, press the MENU button on the remote control. 2 Press the …/† buttons to select DVD, then press the √ or ENTER button. 3 Press the …/† buttons to select Language, then press the √ or ENTER button.
D V D O P E R AT I O N S Language Function ▼ Disc Menu To set the Disc Menu Language to your preferred language, follow these steps. If your preferred language is available on a DVD, your Disc Menu Language will automatically be set to the language you choose. - If the selected language is not recorded on the disc, the original prerecorded language is selected. ▼ Audio To set the Audio Language to your preferred language, follow these steps.
D V D O P E R AT I O N S Setting Up the Audio Options Audio Options allows you to set up sound for use with your external audio system. 1 With the DVD in Stop mode, press the MENU button on the remote control. 2 Press the …/† buttons to select DVD, then press the √ or ENTER button. 3 Press the …/† buttons to select Audio, then press the √ or ENTER button. ▼ 4 Press the …/† buttons to select the desired item, then press the √ or ENTER button.
D V D O P E R AT I O N S Audio Options Digital Output - PCM: Converts to PCM(2CH) audio. PCM Down Sampling : On - Bitstream: Outputs Dolby Digital via the digital output. Select Bitstream when connecting to a Dolby Digital Decoder. Note There is no analog audio output when you play a DTS sound disc. DTS Select On when connecting to a DTS Decoder. Manufactured under license from Dolby Laboratories. “Dolby” and the double-D symbol are trademarks of Dolby Laboratories.
D V D O P E R AT I O N S Setting Up the Display Options Display options enable you to set various video functions of the player. 1 With the unit in Stop mode, press the MENU button on the remote control. 2 Press the …/† buttons to select DVD, then press the √ or ENTER button. 3 Press the …/† buttons to select Display, then press the √ or ENTER button. ▼ 4 Press the …/† buttons to select the desired item, then press the √ or ENTER button.
D V D O P E R AT I O N S Display Options TV Aspect Depending on the type of television you have, you may want to adjust the screen setting (aspect ratio). - 4:3 Letter Box: Select when you want to see the total 16:9 ratio screen DVD supplies, even though you have a TV with a 4:3 ratio screen. Black bars will appear at the top and bottom of the screen. - 4:3 Pan Scan: Select this for conventional size TVs when you want to see the central portion of the 16:9 screen.
D V D O P E R AT I O N S Setting Up the Parental Control The Parental Control function works in conjunction with DVDs that have been assigned a rating, which helps you control the types of DVDs that your family watches. There are up to 8 rating levels on a disc. 1 With the DVD in Stop mode, press the MENU button on the remote control. 2 Press the …/† buttons to select DVD, then press the √ or ENTER button. 3 Press the …/† buttons to select Parental, then press the √ or ENTER button.
D V D O P E R AT I O N S Setting Up the Rating Level 1 With the unit in stop mode, press the MENU button on the remote control. 2 Press the …/† buttons to select DVD, then press the √ or ENTER button. 3 Press the …/† buttons to select Parental, then press the √ or ENTER button. Enter your password. 0~9 4 Press the …/† buttons to select Rating Level, then press the √ or ENTER button. Yes ▼ 5 Press the …/† buttons to select the Rating Level you want, then press the √ or ENTER button.
D V D O P E R AT I O N S Changing the Password 1 With the unit in stop mode, press the MENU button on the remote control. 2 Press the …/† buttons to select DVD, then press the √ or ENTER button. 3 Press the …/† buttons to select Parental, then press the √ or ENTER button. Enter your password. 0~9 4 Yes Press the …/† buttons to select Change Password, then press the √ or ENTER button. ▼ 5 - To make the DVD setup menu disappear, press the MENU button.
Chapter 5 V C R O P E R AT I O N S In this chapter, you will learn how to play a video cassette tape, how to use the time counter and memory stop features, and how to record a program as you are watching TV. Inserting and Ejecting a Video Cassette Tape To Insert a Video Cassette Tape ▼ 1 Hold the video cassette tape window-side up with the arrow pointing away from you. - Don’t try to insert a tape upside down or backwards. - Use only video tapes labeled “VHS.
V C R O P E R AT I O N S Playing a Pre-Recorded Video Cassette Tape Playing the Tape ▼ - For more information on the safety tab, see page 74. ▼ 1 - The VCR does not play sound while a video tape is paused. Insert the video cassette tape. 2 If the tape doesn’t begin to play automatically, press the (Play/Pause) button. 3 Pausing Play - If you see white lines on the screen, see “Using Automatic Tracking” on page 65.
V C R O P E R AT I O N S Special VCR Playback Features While a videotape is playing, you can enjoy a variety of special playback features, including Still, Frame Advance, Skip, Repeat, and more. Press the Play/Pause button again to resume normal playback. Frame Advance In the pause mode, press F.ADV to advance to the next frame.
V C R O P E R AT I O N S Shuttle In Play mode, Shuttle >> gradually increases the cue speed: Double Speed playback ➝ Picture Search ➝ Jet Search. Shuttle << gradually slows down the tape, then goes into Slow mode, Still mode, Reverse Picture Search and Reverse Jet Search. Each time you press the SHUTTLE button, the playback speed is different accordingly.
V C R O P E R AT I O N S Selecting the Cassette Type If you wish to use the tape counter to display the time remaining on a cassette, you must indicate the type of cassette inserted. 1 Press the MENU button on the remote control. 2 Press the …/† buttons to select VCR, then press the √ or ENTER button. n 3 Press the …/† buttons to select Tape Length, then press the √ or ENTER button to select the correct cassette length. n 4 Press the MENU button to exit.
V C R O P E R AT I O N S Setting the Auto Play If you want your videotapes to play automatically when you insert them, turn on Auto Play. Note Only tapes that are missing the Record Safety Tab will play automatically when inserted (See page 62). 1 Press the MENU button on the remote control. 2 Press the …/† buttons to select VCR, then press the √ or ENTER button. n ▼ 3 n Press the …/† buttons to select Auto Play, then press the √ or ENTER button to select On or Off.
V C R O P E R AT I O N S Setting the Auto Repeat If you want your videotapes to play repeatedly, turn on Auto Repeat. 1 Press the MENU button on the remote control. 2 Press the …/† buttons to select VCR, then press the √ or ENTER button. ▼ 3 n n Press the …/† buttons to select Auto Repeat, then press the √ or ENTER button to select On or Off. - On: The VCR will play a tape repeatedly [unless a tape control is activated (stop, fast forward or rewind)]. - Off: Auto Repeat is disabled.
V C R O P E R AT I O N S Using the Tape Counter The tape counter: - Indicates the elapsed time in the play and record modes (hours, minutes and seconds). - Is reset when a cassette is inserted in the DVD-VCR. - Allows you to easily find the beginning of a sequence. - If the remaining time is to be calculated correctly, you must indicate the type of cassette being used. 1 Insert a cassette in your DVDVCR. To set the tape counter to zero at the beginning of a sequence: - Press the INFO.
V C R O P E R AT I O N S Using the Assemble Edit Function This function allows you to start a new recording at a specific position on the cassette while maintaining a very smooth scene change. 1 Insert the cassette to be edited in your DVD-VCR. 2 Press the (Play/Pause) button to start playback. 3 When you reach the position from which you wish to start the new recording, press the (Play/Pause) button. 4 Press the F.
V C R O P E R AT I O N S 6 Select the source from which you wish to record by pressing: - The CH … or † button for television channel. - The INPUT SEL. button for the LINE1 or LINE2 input source. 7 Press the REC button to start recording. When you have finished recording, press the (Stop) button. Selecting the Audio Output Mode You can select the mode in which the sound is reproduced on the loudspeakers and AV outputs. The following options are available.
V C R O P E R AT I O N S Searching for a Specific Sequence Each time you record a cassette on this DVD-VCR, an “index” is automatically marked on the tape when recording starts. The Search function allows you to fast-forward or rewind to a specific index and start playback from that point. Depending on the direction selected, the indexes are numbered as follows: ➔ Prev Seq. etc. 2 Seq. being played 1 Next Seq. 1 etc. 2 This DVD-VCR uses a standard indexing system (VISS).
V C R O P E R AT I O N S Variable Search System Go To [0:00:00] Stop Use this feature when you want to search for the 0:00:00 counter position on a cassette. Go to [0:00:000] End Search Forward Intro Scan Reverse Intro Scan Press the CLEAR button at the point on the tape where you want to set the counter to [0:00:00]. The VCR will rewind or fast forward, searching for the 0:00:00 counter position, and then automatically stop at that position.
V C R O P E R AT I O N S Basic Recording You can record a TV show in progress by inserting a blank tape and pressing the REC button. You can even add time in 30-minute increments up to 4 hours by pressing the REC button repeatedly; see page 76. Note Be sure your videotape has a Record Safety Tab. If the tab is missing, you can cover the opening with a small piece of tape. Warning: Do not cover this opening unless you are sure you want to record over the tape. Before You Begin...
V C R O P E R AT I O N S Note Recording from the DVD-VCR to the VCR is not possible. 3 Press the REC button on the remote control or front panel. For options while recording is in progress, see “Special Recording Features” on this page. 4 Pause/Resume Recording Press the (Play/Pause) button. Press the REC button again to resume. 5 Stop Recording Press the (Stop) button.
V C R O P E R AT I O N S To Watch a DVD while Recording Insert a DVD in the DVD tray and press the (Play/Pause). The output will automatically change to the DVD. To Add Recording Time See One-Touch Recording (OTR) below. Using One-Touch Recording One-Touch Recording (OTR) allows you to add recording time in 30-minute increments up to 4 hours at the touch of a button. 1 Insert a blank VHS tape into the VCR deck.
V C R O P E R AT I O N S 4 While in Record mode, press the REC button again to activate One-Touch Recording (OTR). Record length 0:30 appears on the On-screen display and the DVD-VCR will record for exactly 30 minutes. 5 Record length 0:30 07 Add Recording Time Continue pressing REC button to add recording time in 30 minute increments up to 4 hours. The DVD-VCR stops recording automatically when the time has elapsed. The DVD-VCR will automatically be turned off when the OTR finished.
V C R O P E R AT I O N S Using a Timer Recording Insert a blank videotape into the VCR deck. Be sure to leave the Record Safety Tab intact. With the Timer Recording function, you can program up to 7 events at a time to record up to a month in advance. To Begin Setting the Timer Recording, - Power On your DVD-VCR. - Power On your TV. 1 Press the MENU button on the remote control. 2 Press the …/† buttons to select PROG, then press the √ or ENTER button.
V C R O P E R AT I O N S Selecting Auto Speed If the length of the videotape is not long enough for a timer recording in the SP mode, set the recording tape speed to “Auto”. Recording will start in the SP mode. If the length is not long enough, the tape speed will automatically change from SP mode to SLP mode. Daily/Weekly Date Programming Weekly [sun’s~sat’s]: Use this to record TV programs on the same channel at the same time every week.
Chapter 6 REFERENCE Troubleshooting Before contacting a Samsung authorized service center, perform the following simple checks. If you are unable to solve the problem after reading the above instructions, note: - The model and serial number on the rear of your DVD-VCR - The warranty information - A clear description of the problem Then contact your nearest SAMSUNG service center. Identifying DVD Problems Problem No operations can be performed with the remote control.
REFERENCE Problem The screen is blocked Forgot password Action Page • Press the / button for more than 5 seconds with no disc in the unit. All settings will revert to the factory settings. - • Press the from a cold start with no disc in unit, press the / button simultaneously on the front panel for 5 seconds. All settings including the password will revert to the factory settings. Don't use this unless absolutely necessary. P59-61 If you experience other problems.
REFERENCE Technical Specifications Inputs AUDIO 2 Stereo audio inputs, RCA Connector, -8dbm, 47KΩ, VIDEO 2 Composite video inputs, RCA Connector, 75Ω, 1Vp-p front and rear RF Antenna or CATV Input, F-Connector, 75Ω AUDIO 1 Stereo audio outputs, RCA Connector, -8dbm, 1.5KΩ AUDIO (DVD only) 1 Digital audio output (1 coaxial) VIDEO 1 Composite video output, RCA Connector, 75Ω, 1Vp-p VIDEO (DVD only) 1 S-Video output, S-Connector, 75Ω, Y=1.0Vp-p, 1 pair Stereo audio outputs Outputs C=0.
REFERENCE
Warranty LIMITED WARRANTY TO ORIGINAL PURCHASER THIS SAMSUNG BRAND PRODUCT, AS SUPPLIED AND DISTRIBUTED BY SAMSUNG ELECTRONICS AMERICA, INC.
HEADQUARTERS 105 Challenger Road Ridgefield Park, NJ 07660-0511 TEL: 1-800-SAMSUNG SERVICE DIVISION 400 Valley Road, Suite 201 Mount Arlington, NJ 07856 1-800-SAMSUNG (1-800-726-7864) www.samsung.